Using WebView by Example
References: "Building web apps in WebView" @ https://developer.android.com/guide/webapps/webview.
The WebView objects allow you to display web content as part of your activity layout, i.e., it is a simple browser. However, it lack some of the features of full-function browsers.
Example 1: Two Activities
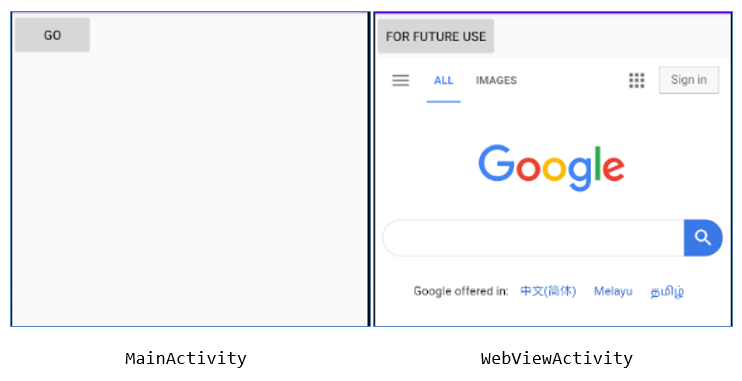
In this example, we shall create two activities (screens) (See "Example: Using an Intent to Start a Second Activity"). The first activity (MainActivity) contains a button to request for a web page. Clicking the button launches the second activity (WebViewActivity) showing the requested web page inside a WebView object.
Step 1: Start a new Project
Start a new Android project with "Empty Views Activity", called "Test WebView".
Step 2a: Define Layout in "res\layout\activity_main.xml"
Replace the existing XML file with the following:
<?xml version="1.0" encoding="utf-8"?>
<LinearLayout xmlns:android="http://schemas.android.com/apk/res/android"
    android:layout_width="fill_parent"
    android:layout_height="fill_parent"
    android:orientation="vertical" >
    <Button
        android:id="@+id/btnGo"
        android:onClick="btnGoHandler"
        android:text="GO"
        android:layout_width="wrap_content"
        android:layout_height="wrap_content" />
</LinearLayout>
We use LinearLayout to hold one "GO" button, which triggers "buttonGoHandler" on click.
Step 2b: Program "MainActivity.java"
package ......;
import ......;
import android.content.Intent;
import android.view.View;

public class MainActivity extends ...... {
    @Override
    protected void onCreate(Bundle savedInstanceState) {
        super.onCreate(savedInstanceState);
        setContentView(R.layout.activity_main);  // use "res/layout/activity_main.xml"
    }

    // On-click handler for the "GO" button
    public void btnGoHandler(View view) {
        // Create an Intent to start the second activity called "WebViewActivity"
        Intent intent = new Intent(this, WebViewActivity.class);
        // Start the intended activity
        startActivity(intent);
    }
}
The button handler creates an Intent and starts the "WebViewActivity".
Step 3a: Create a Second Activity "WebViewActivity" for an WebView Object
Right-click on "Java" node ⇒ "New" ⇒ "Activity" ⇒ "Empty Views Activity" ⇒ In "Activity Name", enter "WebViewActivity" ⇒ In "Layout Name", enter "activity_web_view" (default) ⇒ In "Package name", enter "com.example.testwebview" (default) ⇒ Finish.
Step 3b: Define Layout in "res\layout\activity_web_view"
This layout (in RelativeLayout) contains one Button (for future use) and one WebView object, as follows:
<?xml version="1.0" encoding="utf-8"?>
<RelativeLayout xmlns:android="http://schemas.android.com/apk/res/android"
    xmlns:app="http://schemas.android.com/apk/res-auto"
    xmlns:tools="http://schemas.android.com/tools"
    android:layout_width="match_parent"
    android:layout_height="match_parent" >
    <Button
        android:id="@+id/btnTodo"
        android:text="FOR FUTURE USE"
        android:layout_width="wrap_content"
        android:layout_height="wrap_content" />
    <WebView
        android:id="@+id/webView"
        android:layout_below="@id/btnTodo"
        android:layout_width="fill_parent"
        android:layout_height="wrap_content" />
</RelativeLayout>
Step 3b: Program "WebViewActivity.java"
package ......;
import ......;
import android.webkit.WebView;

public class WebViewActivity extends ...... {
   private WebView webView;  // for displaying web contents

   @Override
   protected void onCreate(Bundle savedInstanceState) {
      super.onCreate(savedInstanceState);
      setContentView(R.layout.activity_web_view);

      webView = (WebView) findViewById(R.id.webView);
      //webView.getSettings().setJavaScriptEnabled(true);

      // 1. URL hardcoded
      webView.loadUrl("https://www.google.com");

      // 2. Start your Tomcat (having the "hello" webapp).
      //    Use the following URL to trigger the HelloServlet with URL "sayhello" on emulator.
      //webView.loadUrl("http://10.0.2.2:9999/hello/sayhello");
            // 10.0.2.2 is the special IP for the host machine of the emulator.
            // You cannot use localhost, as it refers to the emulator.

      // 3. For actual phone, use ipconfig (Windows) or ifconfig (macOS) to check your IP address
      //webView.loadUrl("http://ip_addr:9999/hello/sayhello");
    }
}
The WebView object invokes loadUrl() to load a hardcoded URL.
Take note that you cannot use localhost (127.0.0.1), which refers to the android emulator. You can use a special IP 10.0.0.2 to refer to the host machine of the emulator, or find out the host's IP address.
Step 4: Modify "AndroidManifest.xml" for Permission
Add the lines in red to the generated manifest.
<?xml version="1.0" encoding="utf-8"?>
<manifest ......>

    <uses-permission android:name="android.permission.INTERNET" />

    <application
        android:usesCleartextTraffic="true"
        .......
        ......>
        <activity android:name=".WebViewActivity"></activity>
        <activity android:name=".MainActivity">
            <intent-filter>
                <action android:name="android.intent.action.MAIN" />
                <category android:name="android.intent.category.LAUNCHER" />
            </intent-filter>
        </activity>
    </application>
</manifest>
Notes: android:usesCleartextTraffic="true" is needed to support HTTP; otherwise, only HTTPS is supported.
Step 5: Run the app
Try running the app.
Step 6: Try
Try modify the "FOR FUTURE USE" button as "BACK" button to return to the first activity.
Example 2: One Activity
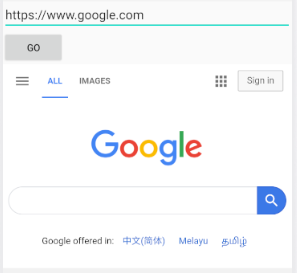
In this example, we have one activity that contains a EditText for entering the URL, a Button to trigger the URL and a WebView to display the web page.
Step 1: Start a new Project
Start a new Android project with "Empty Views Activity", called "Test WebView 2".
Step 2a: Define Layout in "res\layout\activity_main.xml"
<?xml version="1.0" encoding="utf-8"?>
<RelativeLayout xmlns:android="http://schemas.android.com/apk/res/android"
    xmlns:app="http://schemas.android.com/apk/res-auto"
    xmlns:tools="http://schemas.android.com/tools"
    android:layout_width="match_parent"
    android:layout_height="match_parent" >

    <EditText
        android:id="@+id/txtURL"
        android:text="https://www.google.com/"
        android:layout_width="match_parent"
        android:layout_height="wrap_content" />
    <Button
        android:id="@+id/btnGo"
        android:onClick="btnGoHandler"
        android:text="GO"
        android:layout_below="@id/txtURL"
        android:layout_width="wrap_content"
        android:layout_height="wrap_content" />
    <WebView
        android:id="@+id/webView"
        android:layout_below="@id/btnGo"
        android:layout_width="fill_parent"
        android:layout_height="wrap_content" />
</RelativeLayout>
Step 2b: Program "MainActivity.java"
package ......;

import ......;
import android.view.View;
import android.webkit.WebView;
import android.widget.EditText;

public class MainActivity extends ...... {
    private WebView webView;  // for displaying web contents
    private EditText txtURL;

    @Override
    protected void onCreate(Bundle savedInstanceState) {
        super.onCreate(savedInstanceState);
        setContentView(R.layout.activity_main);

        webView = (WebView) findViewById(R.id.webView);
        //webView.getSettings().setJavaScriptEnabled(true);
        txtURL = (EditText) findViewById(R.id.txtURL);
    }

    // On-click handler for the "GO" button
    public void btnGoHandler(View view) {
        // show the web page of the URL of the EditText
        webView.loadUrl(txtURL.getText().toString());
    }
}
Step 3: Modify "AndroidManifest.xml" for Permission
Add the lines in red to the generated manifest.
<?xml ......?>
<manifest ......>

    <uses-permission android:name="android.permission.INTERNET" />

    <application
        android:usesCleartextTraffic="true"
        ......
        ......>
        <activity android:name=".MainActivity">
            <intent-filter>
                <action android:name="android.intent.action.MAIN" />
                <category android:name="android.intent.category.LAUNCHER" />
            </intent-filter>
        </activity>
    </application>
</manifest>
Notes: android:usesCleartextTraffic="true" is needed to support HTTP; otherwise, only HTTPS is supported.
Step 4: Run the App
Try these URLs (https and http):
- https://www.google.com
- Start your Tomcat server (having "hello" webapp and
HelloServlet) and issue http://10.0.2.2:9999/hello/sayhello (10.0.2.2 is a special IP for the host machine of the emulator). - On actual phone, find out your IP address (via command
ipconfig(windows) orifconfig(macOS)) and issue http://ip_addr:9999/hello/sayhello