JAVA ME
Basics & Game Programming
Latest version tested: Sun Java Wireless Toolkit 2.5.2 for CLDC,
NetBeans 6.1 Mobility Pack, CLDC 1.1, MIDP 2.1
Last modified: October 13, 2008
You can develop Java ME program using either:
- Sun Java Wireless Toolkit for CLDC (@ java.sun.com/products/sjwtoolkit).
- NetBeans with Mobility Pack (@ www.netbeans.org).
For serious programming, I certainly recommend NetBeans with Mobility Pack.
There are quite few Java ME books, but tons of on-line learning resources. These are the steps that I recommend:
- Download and install the Sun Java Wireless Toolkit or NetBeans with Mobility pack or both, and write a Hello-world program.
- Check out the "Getting Started" and the "Learning Path" from the Java ME Developer site @ http://developers.sun.com/mobility/reference/index.jsp.
- Study the demos provided in Sun Java Wireless Toolkit and NetBeans Mobility Pack.
Install Sun Java Wireless Toolkit
Step 1: Download
Download Sun Java Wireless Toolkit for CLDC (formerly called J2ME wireless toolkit) from http://java.sun.com/products/sjwtoolkit/.
Step 2: Install
Run the downloaded installer.
Step 3: Read Documentation
Read the installed documentation via "index.html" (in the installed directory). Read "Sun Java Wireless Toolkit for CLDC User's Guide".
Step 4: Try the Demos
"Start" button ⇒ Programs ⇒ Sun Java Wireless Toolkit 2.5.2 ⇒ Open Project... ⇒ choose a demo ⇒ Build ⇒ Run.
Writing First Java ME Program
Step 0: Read Documentation
Read "Sun Java Wireless Toolkit for CLDC User's Guide" chapters 1 and 2 (via "index.html" in the installed directory).
Step 1: Create a New Project
Launch wireless toolkit via "Start" button ⇒ Programs ⇒ Sun Java Wireless Toolkit 2.5.2 ⇒ new Project... ⇒ In "Project Name", enter "Hello". In MIDlet Class Name, enter "HelloMIDlet" ⇒ Create Project ⇒ OK ⇒ Take note of the source file directory, e.g., "c:\WTK2.5.2\apps\Hello\src".
Note: You can change the project directory by editing "$WTK_BASE\wtklib\Windows\ktools.properties" to add the following property:
kvem.apps.dir = your-new-app-directory
Step 2: Write your Source Code
Write the following source code, using a programming text editor, and saved as "HelloMIDlet.java" in the source file directory noted in the previous step.
// #1: Uses Java ME APIs (instead of Java SE)
import javax.microedition.midlet.*;
import javax.microedition.lcdui.*;
// #2: First MIDlet to say "Hello, world"
public class HelloMIDlet extends MIDlet implements CommandListener {
// #3: Declare instance variables
private Form mainForm; // for holding UI components
private Display currentDisplay; // the current display screen
private Command cmdExit; // exit command
// #4: Called back by the Runtime to start or resume (after being paused) the MIDlet
public void startApp() {
mainForm = new Form("HelloMIDlet"); // allocate a Form to hold the UI components
mainForm.append(new StringItem(null, "Hello, world!")); // add a String component
cmdExit = new Command("Exit", Command.EXIT, 0); // allocate the exit command
mainForm.addCommand(cmdExit); // add the command
mainForm.setCommandListener(this); // register "this" to handle command
currentDisplay = Display.getDisplay(this); // retrieve the current display
currentDisplay.setCurrent(mainForm); // use mainForm as the current display
}
// #5: Called back by the Runtime to pause the MIDlet
public void pauseApp() {} // do nothing
// #6: Called back by the Runtime before the MIDlet is destroyed
Explanation:
- A midlet (or Java ME program) (#2) extends from the abstract class
javax.microedition.midlet.MIDlet. This class declares three abstract methods:startApp(),pauseApp()anddestroyApp(). These are call-back methods, that will be invoked by the runtime (or Application Management Software) at the appropriate instance. You need to override these methods to program the running behaviors of your midlet. startApp()(#4) is called by the runtime when the midlet is starting, or resuming after it is being paused.pauseApp()(#5) is called by the runtime to pause the midlet.destroyApp()(#6) is called the the runtime when the midlet is about to be destroyed and removed from the memory.- In the
startApp()(#4), we create themainForm(ofjavax.microedition.lcdui.Form) to place the "Hello, world"StringItemUI component. We add a "Exit" command to themainForm, and setthisclass as the command listener for handling the commands. We then retrieve the current display (ofjavax.microedition.lcdui.Display) of this midlet, and set themainFormas the current display. - This class, as the command listener, needs to implement the
javax.microedition.lcdui.CommandListenerinterface (#2). This interface declares an abstract methodcommandAction(). We override thisnotifyDestroy()in response to the "Exit" command, which will inform the runtime that this midlet has entered the destroy state.
Step 3: Build & Run the Program
Build ⇒ Run ⇒ Launch ⇒ Exit.
Using the NetBeans Mobility Pack
Step 0: Install NetBeans
Install NetBeans. Read "NetBeans HowTo" on how to install NetBeans and write program in NetBeans.
Step 1: Install Mobility Pack
Download NetBeans Mobility Pack CLDC/MIDP from http://www.netbeans.org/products/mobility/. Run the downloaded installer.
Step 2: Read & Read
- Mobile Applications Learning Trail @ http://www.netbeans.org/kb/trails/mobility.html.
- Quick Start Guide @ http://www.netbeans.org/kb/60/quickstart-mobility.html.
Step 3: Write a "Hello-world" Program
refer to the getting starting document and the source code above.
Step 4: Visual Programming
Compared with Sun Java Wireless Toolkit, NetBeans provides a GUI Builder (called Visual Mobile Designer) in addition to source coding. Follow the steps in "Quick Start Guide" to use the Visual Mobile Designer to write a Hello-world Java ME applications.
Next...
Read:
- "Introduction to Mobility Java Technology" @ http://developers.sun.com/mobility/getstart/.
- "Wireless Development Tutorial Part I" and "Part II" @ http://developers.sun.com/mobility/midp/articles/wtoolkit/.
- Follow the learning path suggested in "Learning About the Mobile World" http://developers.sun.com/mobility/learn/.
- Read more tutorials and sample code @ http://developers.sun.com/mobility/learning/tutorial/index.html.
- Study the demo codes in Sun Java Wireless Toolkit and NetBeans Mobility Pack.
Java ME, is easier than the Java SE and Java EE, simply because the APIs is very much smaller (because mobile devices has limited capability). For example, the java.lang in Java ME (CLDC 1.1) has 17 classes and 1 interface, compared with the java.lang of Java SE (JDK 1.6), which has 35 classes and 8 interfaces.
Java ME's Configurations, Profiles & Optional APIs
Unlike Java SE, which is a single piece of software identical in all the operating platforms for developing desktop applications, Java ME is designed for mobile devices, which have limited and diverse computational power, memory, screen size, and networking capability. Due to the large variety and diversity of mobile devices, it does not make sense to design a one-size-fits-all solution and request all variety of mobile devices to support this piece of software.
Java ME is, therefore, divided into configurations, profiles, and optional APIs. A mobile device manufacturer is free to choose what to support, depending on the device's capability.
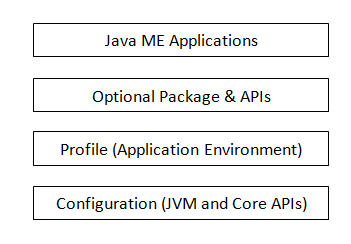
A configuration specifies a Java Virtual Machine (JVM) and a base set of core APIs for a certain class of devices. There are currently two configurations defined:
- CLDC (Connected & Limited Device Configuration): for intermittently networked (connected) and limited capability devices such as mobile phone, smart phone, PDAs. CLDC specifies a JVM and core API packages
java.lang,java.io,java.util(which are subset of the Java SE counterparts) andjavax.microedition.io(for networking support). - CDC (Connected Device Configuration): for robust networked and more capable devices, such as high-end PDAs, set-top boxes. (CDC is beyond the scope of this writing.)
Configuration (CLDC and CDC), by itself, is incomplete for application development. A profile is defined on top of a configuration to provide specific APIs (such as user interface, persistent storage) to make a complete application environment for developing applications. For example, MIDP (Mobile Information Device Profile) is build on top of CLDC; PDAP (PDA Profile) is build on top of CDC.
Mobile devices may choose to support optional APIs, such as Blue tooth API, Wireless Messaging API (WMA 1.0 or 2.0) and many others, depending on their capability.
Configurations and profiles are confusing. As a starter, you need not worry about how to distinguish them. You simply need to understand the combined APIs provided by the "MIDP for CLDC".
Reference: "Introduction to Mobility Java Technology" @ http://developers.sun.com/mobility/getstart/.
MIDP for CLDC
In this writing, we focus on the "MIDP for CLDC". Recall that CLDC is the base, and MIDP builds on top of CLDC to provide a complete application development environment. Currently, there are two versions of CLDC: 1.0 and 1.1 and three versions of MIDP: 1.0, 2.0, 2.1.
CLDC defines the JVM and a base set of core APIs for a class of devices with intermittent connectivity and limited capacity. CLDC specifies core APIs such as java.lang, java.io, java.util:
java.lang: CLDC 1.0 has 15 classes and 1 interface:Object,System,Thread/Runnable,Runtime,Class,String/StringBuffer,Math, wrapper classes (Integer/Byte/Short/Long/Character/Boolean). CLDC 1.1 added the floating-point support and wrapper classesFloat/Double.java.util: CLDC 1.0 has 7 classes and 1 interface:Random, collections (Vector/Hashtable/Stack),Calendar/Date/TimeZone,Enumeration.CLDC 1.1 addedTimer/TimerTask.java.io: CLDC has 11 classes and 2 interfaces:InputStream/OutputStream,DataInputStream/DataOutputStream,ByteArrayInputStream/ByteArrayOutputStream,Reader/Writer,InputStreamReader/OutputStreamWriter, andPrintStream.javax.microedition.io: provides networking support. CLDC 1.0/1.1 define 1 class (Connector) and 8 interface.
If you are familiar with Java SE (JDK), you can see that CLDC provides only a small subset of classes, as the mobile devices has limited capability.
CLDC does not provide a complete application development environment, e.g., it lacks the user interface. MIDP is built upon CLDC to provide a complete environment. MIDP specifies these APIs:
javax.microedition.midlet:MIDletclass for development MIDP applications.javax.microedition.io: addedHttpConnection.javax.microedition.lcdui: User interface support.java.microedition.rms: record management system to support persistent storage.- MIDP 2.0 added packages
javax.microedition.media(multimedia support),javax.microedition.media.control,javax.microedition.lcdui.game(UI for game development), andjavax.microedition.pki(public key infrastructure). - The latest MIDP 2.1 specification does not bring new features but instead it focuses to reduce device fragmentation by specifying a consistent set of Java technologies that must present in MIDP 2.1 capable phone.
Midlet's Life Cycle
A MIDP program is written by subclassing javax.microedition.midlet.MIDlet, and hence is called a midlet. A midlet is run and under the control of the Application Management Software (AMS or the runtime). The AMS can manage multiple midlets at the same time, and needs to content with other applications (such as SMS, MMS) for the limited system resources available in the mobile device.
A midlet extends abstract class MIDlet, which declares three abstract methods for managing its life cycle: startApp(), pauseAPP() and destroyApp(), and other non-abstract methods such as notifyPaused() and notifyDestroy().
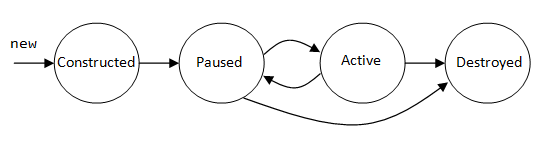
A midlet could be in one of these states: constructed, paused, active, and destroyed. The life cycle of a midlet begins when the AMS invokes the constructor to create a new instance of the midlet. After it is constructed, the AMS places the midlet in the paused state. It then invokes Midlet::startApp() to start the midlet and place the midlet in the active state. The AMS may shift the midlet into the paused state by invoking Midlet::pauseApp() (e.g., there is a incoming call or MMS message which requires attention and system resources) and resume its operation by calling startApp() again. In the paused state, the midlet is not terminated, but it should release any resource it obtained in startApp(). The pause/active transition give you the ability to manage resources effectively. Typically, you shall use startApp() to allocate resources such as record stores, network connections, UI components, and use pauseApp() to release these resources. The AMS can put the midlet into the destroyed state from either paused or active state, via a call to destroyApp().
A midlet may voluntarily enter the paused state by invoking Midlet::notifyPaused(). Similarly, it could invoke Midlet::notifyDestroyed() to inform the AMS that it can now be considered destroyed.
import javax.microedition.midlet.*;
import javax.microedition.lcdui.*;

// Testing the Life Cycle of a MIDlet
public class LifeCycleTest extends MIDlet implements CommandListener {

   private Form mainForm;           // for holding UI components
   private Display currentDisplay;  // the current display screen
   private Command cmdExit;         // exit command
   private StringItem msg;          String UI Component

   // Constructor
   public LifeCycleTest() {
      System.out.println("Constructor is called");
      mainForm = new Form("Midlet Lifecycle Test");
      msg = new StringItem(null, "Constructing Midlet...");
      mainForm.append(msg);
      cmdExit = new Command("Exit", Command.EXIT, 0);
      mainForm.addCommand(cmdExit);
      mainForm.setCommandListener(this);
      currentDisplay = Display.getDisplay(this);
      currentDisplay.setCurrent(mainForm);
   }

   public void startApp() {
      System.out.println("startApp() is called");
      msg.setText("Midlet started...");
   }

   public void pauseApp() {
      System.out.println("pauseApp() is called");
      msg.setText("Midlet paused...");
   }

   public void destroyApp(boolean unconditional) {
      System.out.println("destroyApp() is called");
      msg.setText("Midlet destroyed...");
   }

   public void commandAction(Command cmd, Displayable displayable) {
      if (cmd == cmdExit) {
         //destroyApp(true);  // Uncomment and try this
         notifyDestroyed();
      }
   }
}
Try the above midlet. Start the midlet and use the "Exit" command as well as "Hang-up" button to terminate the midlet.
Reference: "MIDlet Life Cycle" @ http://developers.sun.com/mobility/learn/midp/lifecycle/.
MIDP Basics
HTTP Connection
import java.io.*;
import javax.microedition.io.*;
import javax.microedition.midlet.*;
import javax.microedition.lcdui.*;

// Testing HTTP Connection by connecting to a web page and retrieve
// BUFFER_SIZE bytes of data.
public class HTTPConnectionTest extends MIDlet implements CommandListener {

   private Form mainForm;
   private StringItem msgItem;
   private Command cmdExit,  cmdConnect;
   private Display currentDisplay;
   private HttpConnection conn;
   private InputStream in;
   private byte[] buffer;
   private static final int BUFFER_SIZE = 512;
   private String url = "http://java.sun.com";

   // Constructor
   public HTTPConnectionTest() {
      mainForm = new Form("HTTP Connector Test");
      msgItem = new StringItem(null, "");
      mainForm.append(msgItem);
      cmdExit = new Command("Exit", Command.EXIT, 0);
      cmdConnect = new Command("Connect", Command.SCREEN, 0);
      mainForm.addCommand(cmdExit);
      mainForm.addCommand(cmdConnect);
      mainForm.setCommandListener(this);
   }

   public void startApp() {
      currentDisplay = Display.getDisplay(this);
      currentDisplay.setCurrent(mainForm);
   }

   public void pauseApp() {}

   public void destroyApp(boolean unconditional) {}

   public void commandAction(Command cmd, Displayable displayable) {
      if (cmd == cmdExit) {
         notifyDestroyed();
      } else if (cmd == cmdConnect) {
         // Start a new thread for network connection (as IO operation blocks)
         Thread t = new Thread() {
            public void run() {
               connect();
               fillBuffer();
            }
         };
         t.start();
      }
   }

   // Establish a HTTP connection
   private void connect() {
      try {
         conn = (HttpConnection) Connector.open(url, Connector.READ);
         if (conn.getResponseCode() == HttpConnection.HTTP_OK) {
            in = conn.openInputStream();     // open the network input stream
            buffer = new byte[BUFFER_SIZE];  // allocate the byte buffer for bytes read
         }
      } catch (IOException ex) {
         ex.printStackTrace();
      }
   }

   // Returns false if the buffer is not filled to capacity (indicating last segment)
   private boolean fillBuffer() {
      int totalBytesRead = 0;
      try {
         while (totalBytesRead < BUFFER_SIZE) {
            int bytesRead = in.read(buffer, totalBytesRead, BUFFER_SIZE - totalBytesRead);
            if (bytesRead < 0) {  // end of stream
               in.close();
               break;
            }
            totalBytesRead += bytesRead;
         }
      } catch (IOException ex) {
         ex.printStackTrace();
      }
      msgItem.setText(new String(buffer, 0, totalBytesRead));  // show the bytes read
      return (totalBytesRead == BUFFER_SIZE);
   }
}
Explanation:
[TODO] A "Continue" command to browse thru the entire site. Parsing HTTP response message.
Persistent with Record Management System (RMS)
[TODO]
MIDP User Interface
MIDP provides 3 sets of UI classes:
- a high-level UI which provide standard functionality with high abstraction (
Screen,Item), - a low-level UI which is highly customizable (
Graphics,Canvas) to support custom drawing, and - a mid-level Game API, for game-oriented abstraction (such as
GameCanvasandSprite). Game API will be discussed in the next section.
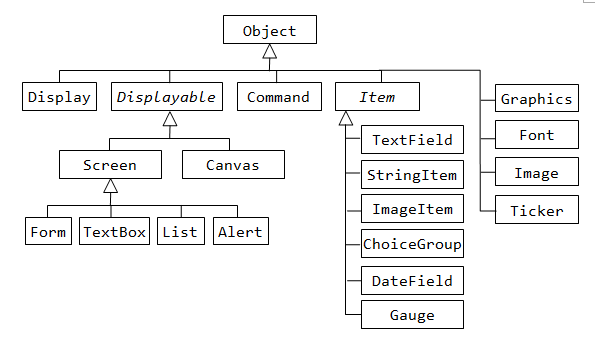
The Display class provides the foundation for visual interaction with a midlet. There is only one instance of Display, which can be retrieved via static method Display.getDisplay(). You can then use Display::setCurrent() and Display::getCurrent() to get/set the current display for a particular Displayable.
Display currentDisplay = Display.getDisplay(this);  // "this" is a MIDlet
Form mainForm = new Form(...);
currentDisplay.setCurrent(mainForm);  // set the current display to a Form (Displayable)
High-Level UI: Displayable, Item, Command and CommandListener
The Displayable is an abstract class of objects that can be placed on the Display. A Displayable may have a title, a ticker, command(s) and an associated command listener. The following methods are provided:
// Get the height and width of the Displayable
public int getHeight();
public int getWidth();
// Getter/Setter for Title and Ticker
public String getTitle();
public void setTitle(String title);
public Ticker getTicker();
public void setTicker(Ticker ticker);
// Add/Remove Command and register command listener
public void addCommand(Command cmd);
public void removeCommand(Command cmd);
public void setCommandListener(CommandListener listener);
Command objects can be associated with the soft buttons (two or three). The constructor of Command take three arguments:
public Command(String label, int type, int priority);
- Label: command label
- Type:
OK,CANCEL,ITEM(list of items),SCREEN(custom),HELP,BACK,STOP. - Priority: a smaller number indicates higher priority.
The CommandListener interface declares one abstract method:
public void commandAction(Command c, Displayable d); // indicate a Command event has occurred on Displayable d
In your commandAction() handler, you can either check for the Command object, command type, or Displayable, and program appropriate action.
// Command definitions
Command cmdExit = new Command("Exit", Command.EXIT, 1);
Command cmdContinue = new Command("Continue", Command.SCREEN, 1);
......

// Command event handler
public void commandAction(Command cmd, Displayable d) {
   // check for the Command object
   if (cmd == cmdExit) {
      ...
   } else if (cmd == cmdContinue) {
      ...
   }
   // or check for the Command's type
   int type = cmd.getCommandType();
   if (type == Command.EXIT) {
      ...
   } else if (type == Command.SCREEN) {
      ...
   }
}
Code Example: TextBoxes
import javax.microedition.midlet.*;
import javax.microedition.lcdui.*;

public class TextBoxTest extends MIDlet implements CommandListener {

   private Display currentDisplay;
   private TextBox tbox1;
   private TextBox tbox2;
   private Command cmdExit;
   private Command cmdNext;

   public void startApp() {
      // Allocate Displayable UI components
      tbox1 = new TextBox("Page 1", "This is page number 1", 40, TextField.ANY);
      tbox2 = new TextBox("Page 2", "This is page number 2", 40, TextField.ANY);
      // Allocate Commands
      cmdExit = new Command("Exit", Command.EXIT, 2);
      cmdNext = new Command("Next Page", Command.SCREEN, 1);
      // Associate Command with appropriate Displayable UI component
      tbox1.addCommand(cmdNext);
      tbox2.addCommand(cmdExit);
      // Register command listener for the Displayables
      tbox1.setCommandListener(this);
      tbox2.setCommandListener(this);
      // Retrieve and setup the current Display
      currentDisplay = Display.getDisplay(this);
      currentDisplay.setCurrent(tbox1);
   }

   public void pauseApp() { }

   public void destroyApp(boolean unconditional) { }

   public void commandAction(Command cmd, Displayable displayable) {
      if (cmd == cmdNext) {
         // Change current display to the next page
         currentDisplay.setCurrent(tbox2);
      } else if (cmd == cmdExit) {
         destroyApp(true);
         notifyDestroyed();
      }
   }
}
Alert
Alert can be used for providing "dialog". There are two types of Alert: one display for a set period of time and does not require user's interaction; the other interrupt the program until user provides a response. Alert is a Displayable. Hence, it can have title, ticker, command(s) and can register command listener. Alert has the following constructors:
public Alert(String title);     // construct an empty Alert with the given title
public Alert(String title, String alertText, Image alertImage, AlertType type);
The available AlertTypes are: ALARM, CONFIRMATION, ERROR, INFO, WARNING. You can use methods getTimeout() and setTimeout() to control the timeout (in milliseconds or FOREVER). Alert can be associated with an image or a sound effect.
Code Example: Guessing a number
import java.util.Random;
import javax.microedition.midlet.*;
import javax.microedition.lcdui.*;

// Guess a number between 1 to 99
public class NumberGuess extends MIDlet implements CommandListener {

   private TextBox textBox;
   private Command cmdExit,  cmdTry;
   private Alert alert;
   private Random rand = new Random();
   private int secretNumber;
   private int numTrial = 0;
   private String msgPrompt = "Enter your guess (between 1 to 99): ";

   // Constructor
   public NumberGuess() {
      textBox = new TextBox("Number Guess", msgPrompt, 60, TextField.PLAIN);
      cmdExit = new Command("Exit", Command.EXIT, 2);
      cmdTry = new Command("Try", Command.SCREEN, 1);
      textBox.addCommand(cmdTry);
      textBox.addCommand(cmdExit);
      textBox.setCommandListener(this);
      alert = new Alert("Result", "", null, AlertType.CONFIRMATION);
      // Setup a random secret number between 1 and 99
      secretNumber = rand.nextInt(100);
   }

   public void startApp() {
      Display.getDisplay(this).setCurrent(textBox);
   }

   public void pauseApp() { }

   public void destroyApp(boolean unconditional) { }

   // Handler for command event
   public void commandAction(Command command, Displayable displayable) {
      if (command == cmdTry) {
         textBox.delete(0, msgPrompt.length());  // remove prompting text
         alert.setString(checkNumber(textBox.getString())); // display alert on result
         Display.getDisplay(this).setCurrent(alert);
         textBox.setString(msgPrompt);
      } else if (command == cmdExit) {
         destroyApp(true);
         notifyDestroyed();
      }
   }

   // Check if the guess is correct, and display the appropriate alert
   private String checkNumber(String strNumberIn) {
      int numberIn = Integer.parseInt(strNumberIn);
      numTrial++;
      if (numberIn == secretNumber) {
         // Regenerate secret number for the next game
         int numTrialSaved = numTrial;
         numTrial = 0;
         secretNumber = rand.nextInt(100);
         return "Congratulation\nYou got it in " + numTrialSaved + " trials";
      } else if (numberIn > secretNumber) {
         return "Try Lower";
      } else {
         return "Try Higher";
      }
   }
}
Code Example: Form (TextField, StringItem) with Items and ItemStateListener
import javax.microedition.midlet.*;
import javax.microedition.lcdui.*;

// A Form with Items (TextField, StringItem) for simple addition and multiplication
public class FormTextFieldTest extends MIDlet implements CommandListener, ItemStateListener {

   private Form mainForm;
   private TextField tfNum1, tfNum2, tfOper, tfResult;
   private StringItem msg;
   private double num1, num2, result;
   private String oper;
   private Command cmdExit, cmdGo;

   public FormTextFieldTest() {
      // Setup the Form and Items
      mainForm = new Form("Form and TextField Test");
      tfNum1 = new TextField("Number 1:", "", 10, TextField.DECIMAL);
      tfNum2 = new TextField("Number 2:", "", 10, TextField.DECIMAL);
      tfOper = new TextField("Operation:", "", 1, TextField.ANY);
      tfResult = new TextField("Result: ", "", 10, TextField.DECIMAL);
      msg = new StringItem("", "Type the numbers, set operation to 'A' for addition " +
              "or 'M' for multiplication, then push 'Go'.");
      mainForm.append(tfNum1);
      mainForm.append(tfNum2);
      mainForm.append(tfOper);
      mainForm.append(tfResult);
      mainForm.append(msg);

      // Setup Commands, register command listener and item-state listener
      cmdExit = new Command("Exit", Command.EXIT, 2);
      cmdGo = new Command("GO", Command.SCREEN, 1);
      mainForm.addCommand(cmdExit);
      mainForm.addCommand(cmdGo);
      mainForm.setCommandListener(this);
      mainForm.setItemStateListener(this);
   }

   public void startApp() {
      Display.getDisplay(this).setCurrent(mainForm);
   }

   public void pauseApp() { }

   public void destroyApp(boolean unconditional) { }

   // Handler for command event
   public void commandAction(Command command, Displayable displayable) {
      if (command == cmdGo) {
         if (oper.equalsIgnoreCase("A")) {
            result = num1 + num2;
         } else if (oper.equalsIgnoreCase("M")) {
            result = num1 * num2;
         }
         tfResult.setString(result + "");
      } else if (command == cmdExit) {
         destroyApp(true);
         notifyDestroyed();
      }
   }

   // Handler for item-state change event
   public void itemStateChanged(Item item) {
      if (item == tfNum1) {
         num1 = Double.parseDouble(tfNum1.getString());
      }
      if (item == tfNum2) {
         num2 = Double.parseDouble(tfNum2.getString());
      }
      if (item == tfOper) {
         oper = tfOper.getString();
      }
   }
}
Low-level UI for Custom Graphics: Canvas and Graphics
[TODO]
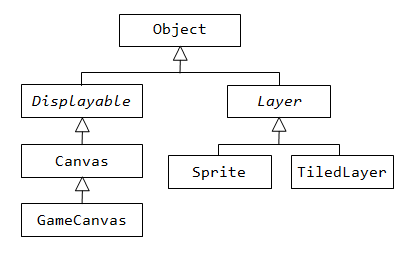
MIDP Game API
MIDP Game API (in package javax.microedition.lcdui.game)
enhances the graphics capabilities (of the MIDP UI package javax.microedition.lcdui) to better support game development. It provides five new classes: GameCanvas, Sprite, Layer, TiledLayer, and LayerManager, as shown below:
GameCanvas
GameCanvas extends Canvas, and adds:
- off-screen graphics buffer for double-buffered rendering. You can retrieve the off-screen graphics handler via method
GameCanvas::getGraphics()and transfer the contents to the on-screen buffer viaGameCanvas::flushGraphics(). - the ability to query key status, via method
GameCanvas::getKeyState().
Code Example: A key-controlled moving avatar built upon GameCanvas
import javax.microedition.midlet.*;
import javax.microedition.lcdui.*;
import javax.microedition.lcdui.game.*;

// Testing the MIDP Game API's GameCanvas class: off-screen graphics buffer and key state.
public class GameCanvasTest extends MIDlet {

   // Allocate a GameCanvas, set it to the current display, and start the game thread
   public void startApp() {
      GameMain game = new GameMain(); // GameMain extends GameCanvas for the game UI
      Display.getDisplay(this).setCurrent(game);
      new Thread(game).start();       // GameMain implements Runnable to run the game thread
   }

   public void pauseApp() { }

   public void destroyApp(boolean unconditional) { }

   // The GameMain class is designed as an inner class, which extends GameCanvas for drawing
   // the game graphics, and implements Runnable to run the game logic in its own thread.
   class GameMain extends GameCanvas implements Runnable {

      // Avatar - a Pacman
      private int xCenter,  yCenter;   // (x,y) position of the pacman's center
      private static final int RADIUS = 20;  // radius
      private int speed = 3;      // speed of move, in pixels
      private int xEye,  yEye;    // (x,y) position of the pacman's eye
      private int direction = 0;  // direction of move, in degrees counter-clockwise
      private int animationCount = 0;        // counter to control avatar's animation

      private static final int INFO_AREA_HEIGHT = 20;  // height of the info display area
      private static final int UPDATE_INTERVAL = 100;  // game update interval in milliseconds

      // Constructor
      public GameMain() {
         super(true);
      }

      // Running behavior of the game thread
      public void run() {
         int canvasWidth = getWidth();
         int canvasHeight = getHeight();

         // Initialize the Pacman
         xCenter = canvasWidth / 2;    // place the pacman in the center of canvas
         yCenter = canvasHeight / 2;
         direction = 0;          // move right
         xEye = xCenter;
         yEye = yCenter - RADIUS / 2;
         animationCount = 0;
         // bounds for the pacman's center (x, y)
         int xMin = RADIUS;
         int xMax = canvasWidth - 1 - RADIUS;
         int yMin = RADIUS + INFO_AREA_HEIGHT;
         int yMax = canvasHeight - 1 - RADIUS;

         // Retrieve the off-screen graphics buffer for graphics drawing
         Graphics g = getGraphics();

         // Game loop
         while (true) {
            // Check key state for user input
            int keyState = getKeyStates();
            if ((keyState & RIGHT_PRESSED) != 0) {
               xCenter += speed;
               if (xCenter > xMax) {
                  xCenter = xMax;
               }
               direction = 0;
               xEye = xCenter;
               yEye = yCenter - RADIUS / 2;
            } else if ((keyState & UP_PRESSED) != 0) {
               yCenter -= speed;
               if (yCenter < yMin) {
                  yCenter = yMin;
               }
               direction = 90;  // degrees counter-clockwise
               xEye = xCenter - RADIUS / 2;
               yEye = yCenter;
            } else if ((keyState & LEFT_PRESSED) != 0) {
               xCenter -= speed;
               if (xCenter < xMin) {
                  xCenter = xMin;
               }
               direction = 180;
               xEye = xCenter;
               yEye = yCenter - RADIUS / 2;
            } else if ((keyState & DOWN_PRESSED) != 0) {
               yCenter += speed;
               if (yCenter > yMax) {
                  yCenter = yMax;
               }
               direction = 270;
               xEye = xCenter + RADIUS / 2;
               yEye = yCenter;
            }

            // Clear screen by filling a rectangle over the entire screen
            g.setColor(0x007fcf);
            g.fillRect(0, 0, canvasWidth, canvasHeight);

            // Draw the Pacman
            // Circular body with a open mouth, width of the mouth varies based on animation count.
            g.setColor(0xffff00);
            g.fillArc(xCenter - RADIUS, yCenter - RADIUS, 2 * RADIUS, 2 * RADIUS,
                    5 * animationCount + direction, 360 - 10 * animationCount);
            animationCount = (animationCount + 1) % 6;   // 6 different opening
            // Draw the Pacman's eye, which alternately opens and closes
            g.setColor(0x000000);
            g.drawArc(xEye, yEye, 4, 4, 0, 360);     // outline
            if (animationCount < 3) {
               g.fillArc(xEye, yEye, 4, 4, 0, 360);  // close via fill
            }

            // Display information in the info area: (x, y) of the Pacman
            g.setColor(0xffffff);
            g.fillRect(0, 0, canvasWidth, INFO_AREA_HEIGHT);
            g.setColor(0x000000);
            g.drawString("(" + xCenter + "," + yCenter + ")", 4, 0, Graphics.TOP | Graphics.LEFT);

            // Flush the off-screen buffer to the display
            flushGraphics();

            // Provide delay to achieve the targeted refresh rate,
            // also yield for other threads to perform their tasks.
            try {
               Thread.sleep(UPDATE_INTERVAL);
            } catch (InterruptedException e) { }
         }
      }
   }
}
Explanation
- The
GameCanvasclass provides a off-screen graphics buffer for double-buffered rendering. You can retrieve the off-screenGraphicshandle via methodGameCanvas::getGraphics(). You can then perform your graphic rendering on this off-screen buffer, and invokeGameCanvas::flushGraphics()to send the contents to the on-screen buffer. - The
GameCanvasclass also provides the ability to query the key states via the methodGameCanvas::getKeyState(), which returns the current key state. You can then use constants such asUP_PRESSED,LEFT_PRESSED(bit-AND with key state), to check for user action.
Code Example: A Bouncing Ball
import javax.microedition.midlet.*;
import javax.microedition.lcdui.*;
import javax.microedition.lcdui.game.*;

// A Bouncing Ball in MIDP
public class BouncingBall extends MIDlet {

   // Allocate a GameCanvas, set it to the current display, and start the game thread
   public void startApp() {
      GameMain game = new GameMain(); // GameMain extends GameCanvas for the game UI
      Display.getDisplay(this).setCurrent(game);
      new Thread(game).start();       // GameMain implements Runnable to run the game thread
   }

   public void pauseApp() { }

   public void destroyApp(boolean unconditional) { }

   // The GameMain class is designed as an inner class, which extends GameCanvas for drawing
   // the game graphics, and implements Runnable to run the game logic in its own thread.
   class GameMain extends GameCanvas implements Runnable {

      // Avatar - the Bouncing Ball
      private int xCenter,  yCenter;        // (x,y) of the center of the ball
      private int speedX = 2,  speedY = 3;  // speed in x and y direction
      private static final int RADIUS = 80; // radius

      private static final int INFO_AREA_HEIGHT = 20;  // height of the info display area
      private static final int UPDATE_INTERVAL = 30;  // game update interval in milliseconds

      // Constructor
      public GameMain() {
         super(true);
      }

      // Running behavior of the game thread
      public void run() {
         int canvasWidth = getWidth();
         int canvasHeight = getHeight();

         // Initializes the Ball
         xCenter = canvasWidth / 2;   // place the ball in the center of the canvas
         yCenter = canvasHeight / 2;

         // Bounds of the center of the ball
         int xMin = RADIUS;
         int yMin = RADIUS + INFO_AREA_HEIGHT;
         int xMax = canvasWidth - 1 - RADIUS;
         int yMax = canvasHeight - 1 - RADIUS;

         // Retrieve the off-screen graphics buffer for graphics drawing
         Graphics g = getGraphics();

         // Game loop
         while (true) {
            // Update the ball's position
            xCenter += speedX;
            yCenter += speedY;
            // Check if the ball hit the bound. 'Reflect' the ball if so.
            if (xCenter > xMax) {
               xCenter = xMax;
               speedX = -speedX;
            } else if (xCenter < xMin) {
               xCenter = xMin;
               speedX = -speedX;
            }
            if (yCenter > yMax) {
               yCenter = yMax;
               speedY = -speedY;
            } else if (yCenter < yMin) {
               yCenter = yMin;
               speedY = -speedY;
            }

            // Clear screen by filling a rectangle over the entire screen
            g.setColor(0x000000);
            g.fillRect(0, 0, canvasWidth, canvasHeight);

            // Draw the ball
            g.setColor(0xffffff);
            g.fillArc(xCenter - RADIUS, yCenter - RADIUS, 2 * RADIUS, 2 * RADIUS, 0, 360);

            // Display information in the infor area: (x, y) of the ball
            g.setColor(0xffffff);
            g.fillRect(0, 0, canvasWidth, INFO_AREA_HEIGHT);
            g.setColor(0x000000);
            g.drawString("(" + xCenter + "," + yCenter + ")", 4, 0, Graphics.TOP | Graphics.LEFT);

            // Flush the off-screen buffer to the display
            flushGraphics();

            // Provide delay to achieve the targeted refresh rate,
            // also yield for other threads to perform their tasks.
            try {
               Thread.sleep(UPDATE_INTERVAL);
            } catch (InterruptedException e) {
            }
         }
      }
   }
}
Explanation
This bouncing ball is straight-forward. However, I have problem writing multiple balls, because MIDP's Math class does not provide arc-tangent function.
Sprite
The Sprite class allow you to render an animated sprite with several image frames stored as one single image for better management of animated frames. Two examples of animated frame images are given below:


The Sprite class is able to extract the frames (given the frame width and height) and number them starting from 0 for the top-left frame, in row-major manner. Read the API documentation of the <code>Sprite</code> class for more illustration.
You construct a sprite as follow:
// Load the image (containing the animated frames) for the sprite
Image img = Image.createImage("/pacman.png");
// Create a Sprite from the image giving the frame's width and height
Sprite sprite = new Sprite(img, 25, 25);
// Select a frame for display
sprite.nextFrame();  // Use the next frame
sprite.setFrame(2);  // select a particular frame number
The Sprite class also provide basic transforms via the method Sprite::setTransform(type). The type includes TRANS_NONE, TRANS_ROT90, TRANS_ROT180, TRANS_ROT270, TRANS_MIRROR, TRANS_MIRROR_ROT90, TRANS_MIRROR_ROT180, TRANS_MIRROR_ROT270. For rotation, you can use setRefPixelPosition(x, y) to set the rotation center (by default, it rotates about (0, 0), which is the top-left corner of the image). Note that: (a) you cannot concatenate multiple transforms, (b) rotation of arbitrary degree in not supported, and (c) the rotational degree is measured clockwise (instead of the usual convection of counter-clockwise).
A sprite can detect collision with another sprite via the method Sprite::collidesWith(). You can set the collision detection at "pixel-level" or "bounding-box-level".
Code Example: Sprite with animated frames, transform, and collision detection
import java.io.IOException;
import javax.microedition.midlet.*;
import javax.microedition.lcdui.*;
import javax.microedition.lcdui.game.*;

// Testing the MIDP Game API's Sprite class: animation and collision detection.
public class SpriteTest extends MIDlet {

   // Allocate a GameCanvas, set it to the current display, and start the game thread
   public void startApp() {
      GameMain game = new GameMain(); // GameMain extends GameCanvas for the game UI
      Display.getDisplay(this).setCurrent(game);
      new Thread(game).start();       // GameMain implements Runnable to run the game thread
   }

   public void pauseApp() { }

   public void destroyApp(boolean unconditional) { }

   // The GameMain class is designed as an inner class, which extends GameCanvas for drawing
   // the game graphics, and implements Runnable to run the game logic in its own thread.
   class GameMain extends GameCanvas implements Runnable {

      // Avatar - Pacman with animation
      private Sprite pacman;
      private String pacmanImageFilename = "/images/PacmanFrames.png";
      private int pacmanXCenter,  pacmanYCenter;  // (x,y) of the center of the Pacman
      private int pacmanSpeed = 3;                // speed of move, in pixels

      // Avatar - Ghost with animation
      private Sprite ghost;
      private String ghostImageFilename = "/images/GhostFrames.png";
      private int ghostXCenter,  ghostYCenter;

      private static final int FRAME_WIDTH = 25;
      private static final int FRAME_HEIGHT = 25;
      private static final int FRAME_RADIUS = FRAME_WIDTH / 2 + 1;

      // Collision Detection
      private boolean hasCollided;  // flag indicating collision

      private static final int UPDATE_INTERVAL = 100; // milliseconds
      private static final int INFO_AREA_HEIGHT = 20;  // height of the info display area

      // Constructor
      public GameMain() {
         super(true);
      }

      // Run the game loop in its own thread
      public void run() {
         int canvasWidth = getWidth();
         int canvasHeight = getHeight();

         // Construct the sprites
         try {
            Image imgPacman = Image.createImage(pacmanImageFilename);
            pacman = new Sprite(imgPacman, FRAME_WIDTH, FRAME_HEIGHT);
            pacman.setRefPixelPosition(FRAME_RADIUS, FRAME_RADIUS);  // set rotation center

            Image imgGhost = Image.createImage(ghostImageFilename);
            ghost = new Sprite(imgGhost, FRAME_WIDTH, FRAME_HEIGHT);
         } catch (IOException e) {
            e.printStackTrace();
         }

         // Position pacman at the center
         pacmanXCenter = canvasWidth / 2;
         pacmanYCenter = canvasHeight / 2;
         // Position ghost at the corner
         ghostXCenter = canvasWidth / 4;
         ghostYCenter = canvasHeight / 4;
         // Pacman's bounds
         int pacmanXMin = FRAME_RADIUS;
         int pacmanXMax = canvasWidth - FRAME_RADIUS;
         int pacmanYMin = FRAME_RADIUS + INFO_AREA_HEIGHT;
         int pacmanYMax = canvasHeight - FRAME_RADIUS;

         // Retrieve the off-screen graphics buffer for graphics drawing
         Graphics g = getGraphics();

         // Game loop
         while (true) {
            // Check key state for user input
            int keyState = getKeyStates();
            if ((keyState & RIGHT_PRESSED) != 0) {
               pacmanXCenter += pacmanSpeed;
               if (pacmanXCenter > pacmanXMax) {
                  pacmanXCenter = pacmanXMax;
               }
               pacman.setTransform(Sprite.TRANS_NONE);
            } else if ((keyState & UP_PRESSED) != 0) {
               pacmanYCenter -= pacmanSpeed;
               if (pacmanYCenter < pacmanYMin) {
                  pacmanYCenter = pacmanYMin;
               }
               pacman.setTransform(Sprite.TRANS_ROT270); // clockwise
            } else if ((keyState & LEFT_PRESSED) != 0) {
               pacmanXCenter -= pacmanSpeed;
               if (pacmanXCenter < pacmanXMin) {
                  pacmanXCenter = pacmanXMin;
               }
               pacman.setTransform(Sprite.TRANS_MIRROR);
            } else if ((keyState & DOWN_PRESSED) != 0) {
               pacmanYCenter += pacmanSpeed;
               if (pacmanYCenter > pacmanYMax) {
                  pacmanYCenter = pacmanYMax;
               }
               pacman.setTransform(Sprite.TRANS_ROT90); // clockwise
            }

            // Clear screen by filling a rectangle over the entire screen
            g.setColor(0x007fcf);
            g.fillRect(0, 0, canvasWidth, canvasHeight);

            // Draw the sprites
            pacman.setPosition(pacmanXCenter - FRAME_RADIUS, pacmanYCenter - FRAME_RADIUS);
            pacman.paint(g);
            pacman.nextFrame();  // use next frame for the next refresh

            ghost.setPosition(ghostXCenter - FRAME_RADIUS, ghostYCenter - FRAME_RADIUS);
            ghost.paint(g);
            ghost.nextFrame();

            // Collision detection
            hasCollided = pacman.collidesWith(ghost, true);

            // Display info
            g.setColor(0xffffff);
            g.fillRect(0, 0, canvasWidth, INFO_AREA_HEIGHT);
            g.setColor(0x000000);
            g.drawString("(" + pacmanXCenter + "," + pacmanYCenter + ")", 4, 0, Graphics.TOP | Graphics.LEFT);
            if (hasCollided) {
               g.setColor(0xff0000);
               g.drawString("Collided", canvasWidth / 2, 0, Graphics.TOP | Graphics.LEFT);
            }

            // flush the off-screen buffer to the display
            flushGraphics();

            // Provide delay to achieve the targeted refresh rate,
            // also yield for other threads to perform their tasks.
            try {
               Thread.sleep(UPDATE_INTERVAL);
            } catch (InterruptedException e) {
            }
         }
      }
   }
}
Explanation
[TODO]
Layer & TiledLayer
A Layer is a rectangular visual panel with a width and height, and can be position on the screen with its top-left corner at (x, y) of the screen (via method setPosition(x, y)). Layer is an abstract class. Sprite (described earlier) and TiledLayer are implementations of the Layer class.
A TiledLayer is a special layer that is divided into grid of cells. Each cells can be filled with a selected tile frame. In this way, you can reuse the tile frames instead of providing a huge image. TiledLayer is often used for background.
To use a TiledLayer, you keep the tile frames in a single image (similar to sprite) and specify the width and height of the tile frame. The frames will be extracted and numbered starting from 1 (unlike sprite frame which starts from 0) for the top-left tile, in row-major manner. You then divide the tile layer into cells (of rows and columns). For each cell, you can assign a tile frame index (from 1 to n). Index 0 indicates that the cell is empty. You can use negative index for animated tile cells. Each negative index is associated with a positive tile frame index, and the associated tile frame can be changed on the fly. For example, the animated tile index -1 can be made alternate between tile frame index 5 and 6. Read the API documentation of TiledLayer for more illustrations.

You can construct a TiledLayer as follow:
// Load the image (containing the tile frames) for the TiledLayer
Image img = Image.createImage("/pacman.png");
// Compute the number of rows and columns of tiles
int tileRows = ....
int tileCols = ....
// Create a TiledLayer from the image giving the numbers of rows and columns, tile frame's width and height
TiledLayer background = new TiledLayer(tileCols, tileRows, img, tileWidth, tileHeight);
// Select a static tile (from 1 to n) for a particular cell
background.setCell(aCol, aRow, aStaticTileIndex);
// Set up animated tile by retrieving the next available animated tile index (starting from -1)
int animatedTileIndex = background.createAnimatedTile(5);  // init to static tile index 5
background.setCell(aCol, aRow, animatedTileIndex);
// Animate tile by changing its associated static tile index
background.setAnimatedTile(animatedTileIndex, 7);
Code Example: TiledLayer with static and animated tiles
import java.io.IOException;
import javax.microedition.midlet.*;
import javax.microedition.lcdui.*;
import javax.microedition.lcdui.game.*;

// Testing the MIDP Game API's TiledLayer class: static and animated tiles.
public class TiledLayerTest extends MIDlet {

   // Allocate a GameCanvas, set it to the current display, and start the game thread
   public void startApp() {
      GameMain game = new GameMain(); // GameMain extends GameCanvas for the game UI
      Display.getDisplay(this).setCurrent(game);
      new Thread(game).start();       // GameMain implements Runnable to run the game thread
   }

   public void pauseApp() { }

   public void destroyApp(boolean unconditional) { }

   // The GameMain class is designed as an inner class, which extends GameCanvas for drawing
   // the game graphics, and implements Runnable to run the game logic in its own thread.
   class GameMain extends GameCanvas implements Runnable {

      // Use a TiledLayer for the background
      private TiledLayer background;
      private String imgTilesFilename = "/images/Tiles.png";
      private static final int TILE_WIDTH = 32;
      private static final int TILE_HEIGHT = 32;
      private int tileRows;  // number of rows of tiles
      private int tileCols;  // number of columns of tiles
      private int animatedTileIndex1, animatedTileIndex2;
      private int frameCount = 0;  // for controlling animated tile

      private static final int UPDATE_INTERVAL = 100;  // game update interval in milliseconds

      // Constructor
      public GameMain() {
         super(true);
      }

      // Running behavior of the game thread
      public void run() {
         int canvasWidth = getWidth();
         int canvasHeight = getHeight();

         // Compute the number of rows and columns of of background tiled layer
         tileCols = canvasWidth / TILE_WIDTH;
         tileRows = canvasHeight / TILE_HEIGHT;
         // Top-left corner (x,y) of the tiled layer
         int tiledLayerX = (canvasWidth - tileCols * TILE_WIDTH) / 2;
         int tiledLayerY = (canvasHeight - tileRows * TILE_HEIGHT) / 2;

         // Set up the TiledLayer and place the chosen tile on each cell
         try {
            Image imgTiles = Image.createImage(imgTilesFilename);
            background = new TiledLayer(tileCols, tileRows, imgTiles, TILE_WIDTH, TILE_HEIGHT);
            // Retrieve the next available animated tile index (negative number)
            animatedTileIndex1 = background.createAnimatedTile(5);  // init to tile index 5
            animatedTileIndex2 = background.createAnimatedTile(7);  // init to tile index 7
            for (int col = 0; col < tileCols; col++) {
               // Top row of sky (static tile index 8)
               background.setCell(col, 0, 8);
               // Bottom two rows of water (animated tiles)
               background.setCell(col, tileRows - 2, animatedTileIndex1);
               background.setCell(col, tileRows - 1, animatedTileIndex2);
            }
            for (int col = 1; col < tileCols - 1; col++) {
               // grassland in between (static tile index 4), sides are empty (index 0)
               for (int row = 1; row < tileRows - 2; row++) {
                  background.setCell(col, row, 4);
               }
            }
         } catch (IOException e) {
            e.printStackTrace();
         }

         // Retrieve the off-screen graphics buffer for graphics drawing
         Graphics g = getGraphics();

         // Game loop
         while (true) {
            // clear screen
            g.setColor(0xffffff);
            g.fillRect(0, 0, canvasWidth, canvasHeight);

            // Change the index for animated tiles
            if (frameCount == 0) {
               background.setAnimatedTile(animatedTileIndex1, 5);
               background.setAnimatedTile(animatedTileIndex2, 7);
            } else if (frameCount == 1) {
               background.setAnimatedTile(animatedTileIndex1, 6);
               background.setAnimatedTile(animatedTileIndex2, 6);
            } else {
               background.setAnimatedTile(animatedTileIndex1, 7);
               background.setAnimatedTile(animatedTileIndex2, 5);
            }
            frameCount = (frameCount + 1) % 3;

            // Position the TiledLayer in the center of the canvas
            background.setPosition(tiledLayerX, tiledLayerY);
            background.paint(g);

            // flush the off-screen buffer to the display
            flushGraphics();

            // Provide delay to achieve the targeted refresh rate,
            // also yield for other threads to perform their tasks.
            try {
               Thread.sleep(UPDATE_INTERVAL);
            } catch (InterruptedException e) {
            }
         }
      }
   }
}
Explanation
[TODO]
LayerManager
The LayerManager can be used to manage a collection of Layers, and place them on the screen with a specific z-order. Each Layer is given an index corresponding to its z-order, with value of 0 closer to you, and highest number further away from you. Layers can be added into the LayerManager (via insert() or append()) and removed (via remove()). Recall that Layer is an abstract class, with implementations in Sprite and TiledLayer classes.
// Construct a LayerManager
LayerManager manager = new LayerManager();
// Construct Layers (of Sprite and TiledLayer) and add into the LayerManager
Sprite sprite1 = new Sprite(...);
manager.insert(sprite1, 0);  // add this layer with z-index of 0 (nearest to you)
Sprite sprite2 = new Sprite(...);
manager.insert(sprite2, 0);  // add this layer with z-index of 0, the rest of layers adjust automatically
// more sprites
.....
TiledLayout background = new TiledLayout(...);
manager.append(background);  // append this layer to the end with highest z-index (furthest from you)
// Remove a Sprite by removing its layer - the layer numbers adjusted.
manager.remove(sprite2);
Code Example: LayerManager with Layers of Sprite and TiledLayer
import java.io.IOException;
import java.util.Random;
import javax.microedition.midlet.*;
import javax.microedition.lcdui.*;
import javax.microedition.lcdui.game.*;

// This example illustrate all the classes provided by MIDP Game API:
// GameCanvas, Sprite, TiledLayer, and LayerManager which manages Layers of Sprites
// and TiledLayer.
public class LayerManagerTest extends MIDlet {

   // Allocate a GameCanvas, set it to the current display, and start the game thread
   public void startApp() {
      GameMain game = new GameMain(); // GameMain extends GameCanvas for the game UI
      Display.getDisplay(this).setCurrent(game);
      new Thread(game).start();       // GameMain implements Runnable to run the game thread
   }

   public void pauseApp() { }

   public void destroyApp(boolean unconditional) { }

   // The GameMain class is designed as an inner class, which extends GameCanvas for drawing
   // the game graphics, and implements Runnable to run the game logic in its own thread.
   class GameMain extends GameCanvas implements Runnable {

      // Sprite Layer: Pacman
      private Sprite pacman;
      private String pacmanImageFilename = "/images/PacmanFrames.png";
      private int pacmanXCenter,  pacmanYCenter;  // (x,y) of the center
      private int pacmanSpeed = 3;                // speed of move, in pixels
      private static final int PACMAN_SIZE = 25;
      private static final int PACMAN_RADIUS = PACMAN_SIZE / 2 + 1;

      // Sprite Layers: Ghosts
      private int numGhosts = 5;
      private Sprite[] ghosts = new Sprite[numGhosts];
      private String ghostImageFilename = "/images/GhostSmallFrames.png";
      private static final int GHOST_SIZE = 20;
      private static final int GHOST_RADIUS = GHOST_SIZE / 2;

      // TiledLayer: background
      private TiledLayer background;
      private String tileImageFilename = "/images/Tiles.png";
      private static final int TILE_WIDTH = 32;
      private static final int TILE_HEIGHT = 32;
      private int tileRows;  // number of rows of tiles
      private int tileCols;  // number of columns of tiles
      private int animatedTileIndex;
      private int animationCount = 0;

      // LayerManager which manages all the layers - Sprites and TiledLayer
      private LayerManager manager;
      private boolean gameOver = false;

      private static final int UPDATE_INTERVAL = 100; // milliseconds
      private Random rand = new Random();

      // Constructor
      public GameMain() {
         super(true);
      }

      // Run the game loop in its own thread
      public void run() {
         int canvasWidth = getWidth();
         int canvasHeight = getHeight();

         // Compute the number of rows and columns of TiledLayer
         tileCols = canvasWidth / TILE_WIDTH;
         tileRows = canvasHeight / TILE_HEIGHT;
         // Compute all the bounds
         int backgroundXMin = (canvasWidth - tileCols * TILE_WIDTH) / 2;
         int backgroundYMin = (canvasHeight - tileRows * TILE_HEIGHT) / 2;
         int backgroundXMax = canvasWidth - backgroundXMin;
         int backgroundYMax = canvasHeight - backgroundYMin;
         int pacmanXMin = backgroundXMin + PACMAN_RADIUS;
         int pacmanXMax = backgroundXMax - PACMAN_RADIUS;
         int pacmanYMin = backgroundYMin + PACMAN_RADIUS;
         int pacmanYMax = backgroundYMax - PACMAN_RADIUS;
         int ghostMinX = backgroundXMin + GHOST_SIZE;
         int ghostMaxX = backgroundXMax - GHOST_SIZE;
         int ghostMinY = backgroundYMin + GHOST_SIZE;
         int ghostMaxY = backgroundYMax - GHOST_SIZE;

         // Setup the layer manager
         manager = new LayerManager();

         // Construct the Sprites & TiledLayer
         try {
            Image imgPacman = Image.createImage(pacmanImageFilename);
            pacman = new Sprite(imgPacman, PACMAN_SIZE, PACMAN_SIZE);
            pacman.setRefPixelPosition(PACMAN_RADIUS, PACMAN_RADIUS);  // set rotation center
            manager.append(pacman);            // add into the LayerManager as last layer
            pacmanXCenter = canvasWidth / 2;   // Position pacman at the center
            pacmanYCenter = canvasHeight / 2;

            Image imgTiles = Image.createImage(tileImageFilename);
            background = new TiledLayer(tileCols, tileRows, imgTiles, TILE_WIDTH, TILE_HEIGHT);
            animatedTileIndex = background.createAnimatedTile(5);
            for (int col = 1; col < tileCols - 1; col++) {
               for (int row = 0; row < tileRows; row++) {
                  background.setCell(col, row, 4);  // static layer index 4
               }
            }
            for (int row = 0; row < tileRows; row++) {
               background.setCell(0, row, animatedTileIndex);    // animated tile
               background.setCell(tileCols - 1, row, animatedTileIndex);
            }
            background.setPosition(backgroundXMin, backgroundYMin);
            manager.append(background);    // add into the LayerManager as last layer

            Image imgGhost = Image.createImage(ghostImageFilename);
            for (int i = 0; i < numGhosts; i++) {
               ghosts[i] = new Sprite(imgGhost, GHOST_SIZE, GHOST_SIZE);
               manager.insert(ghosts[i], 0);  // add into LayerManager as first layer
               // Randomly position the ghosts
               int ghostXCenter = rand.nextInt(ghostMaxX - ghostMinX) + ghostMinX;
               int ghostYCenter = rand.nextInt(ghostMaxY - ghostMinY) + ghostMinY;
               ghosts[i].setPosition(ghostXCenter - GHOST_RADIUS, ghostYCenter - GHOST_RADIUS);
            }
         } catch (IOException e) {
            e.printStackTrace();
         }

         // Retrieve the off-screen graphics buffer for graphics drawing
         Graphics g = getGraphics();

         // Game loop
         while (!gameOver) {
            // Check key state for user input
            int keyState = getKeyStates();
            if ((keyState & RIGHT_PRESSED) != 0) {
               pacmanXCenter += pacmanSpeed;
               if (pacmanXCenter > pacmanXMax) {
                  pacmanXCenter = pacmanXMax;
               }
               pacman.setTransform(Sprite.TRANS_NONE);
            } else if ((keyState & UP_PRESSED) != 0) {
               pacmanYCenter -= pacmanSpeed;
               if (pacmanYCenter < pacmanYMin) {
                  pacmanYCenter = pacmanYMin;
               }
               pacman.setTransform(Sprite.TRANS_ROT270); // clockwise
            } else if ((keyState & LEFT_PRESSED) != 0) {
               pacmanXCenter -= pacmanSpeed;
               if (pacmanXCenter < pacmanXMin) {
                  pacmanXCenter = pacmanXMin;
               }
               pacman.setTransform(Sprite.TRANS_MIRROR);
            } else if ((keyState & DOWN_PRESSED) != 0) {
               pacmanYCenter += pacmanSpeed;
               if (pacmanYCenter > pacmanYMax) {
                  pacmanYCenter = pacmanYMax;
               }
               pacman.setTransform(Sprite.TRANS_ROT90); // clockwise
            }

            // clear screen
            g.setColor(0x000000);
            g.fillRect(0, 0, canvasWidth, canvasHeight);

            // Draw the avatar
            pacman.setPosition(pacmanXCenter - PACMAN_RADIUS, pacmanYCenter - PACMAN_RADIUS);
            pacman.nextFrame();  // use next frame for the next refresh

            for (int i = 0; i < numGhosts; i++) {
               ghosts[i].nextFrame();
            }

            if (animationCount == 0) {
               background.setAnimatedTile(animatedTileIndex, 5);
            } else if (animationCount == 1) {
               background.setAnimatedTile(animatedTileIndex, 6);
            } else {
               background.setAnimatedTile(animatedTileIndex, 7);
            }
            animationCount = (animationCount + 1) % 3;

            // Collision detection
            int numLayer = manager.getSize();
            if (numLayer == 2) {  // exclude the background and pacman layers
               gameOver = true;
            }
            for (int layerIndex = 0; layerIndex < numLayer - 2; layerIndex++) {
               Layer layer = manager.getLayerAt(layerIndex);
               if (pacman.collidesWith((Sprite) layer, true)) {
                  manager.remove(layer);  // remove the layer of this ghost
                  break; // need to break the loop as the layer number changes
               }
            }

            manager.paint(g, 0, 0);  // paint all layers
            if (gameOver) {
               Font font = g.getFont();
               String msg = "GAME OVER!";
               g.setColor(0xffffff);
               int msgWidth = font.stringWidth(msg);
               int msgX = (canvasWidth - msgWidth) / 2;
               int msgY = canvasHeight / 2;
               g.fillRect(msgX - 4, msgY - 2, msgWidth + 8, 20);
               g.setColor(0xff0000);
               g.drawString(msg, msgX, msgY, Graphics.TOP | Graphics.LEFT);
            }

            // flush the off-screen buffer to the display
            flushGraphics();

            // Provide delay to achieve the targeted refresh rate,
            // also yield for other threads to perform their tasks.
            try {
               Thread.sleep(UPDATE_INTERVAL);
            } catch (InterruptedException e) {
            }
         }
      }
   }
}
Explanation
[TODO]
Complete MIDP Game Examples
[TODO]
Reference: "Getting Started With the MIDP 2.0 Game API" @ http://developers.sun.com/mobility/midp/articles/gameapi/
REFERENCES & RESOURCES
- Java ME Developer site @ http://developers.sun.com/mobility/index.jsp.
- Sun Java Wireless Tool Kit for CLDC @ http://java.sun.com/products/sjwtoolkit/.
- NetBeans Mobility Pack.
- Mobile Information Device Profile (MIDP) APIs, v1.0, v2.0, v2.1.
- Connected Limited Device Configuration (CLDC) APIs, v1.0, v1.1.