If you are new to Unix, read "Unix Survival Guide for Mac & Ubuntu - Terminal, File System and Users".
Bash Shell Basics
A shell (or command interpreter, or command prompt) is a program that lets you interact with the Operating System (OS) by issuing text-based commands. It is called a shell, as it protects or shields you from the complicated tasks of interacting with the OS directly. A shell provides a set of commands. It also has its own scripting language for you to write shell scripts (or shell programs), which could be a sequence of commands for automating system administration tasks.
There are many shell programs: from the legacy and obsoleted sh (the original Bourne Shell), csh (C Shell), ksh (Korn Shell), zsh (Z Shell), to newer bash (Bourne Again Shell), tcsh (Tenex C Shell) and tsh (T Shell); and Windows' cmd (command prompt).
In this article, we shall cover only GNU bash shell, which is based on the Unix's original bourne shell (sh), and provides features of csh and tsh. The mother site for bash shell is www.gnu.org/software/bash/.
Unixes provide an application called "Terminal", which runs a shell program. By default, Mac OS X and Linux's Terminal runs the bash shell. Besides the Graphical "Terminal", you can also use Ctrl+Alt+F1 to Ctrl+Alt+F6 to access one of the six virtual console (tty1 to tty6); and use Ctrl+Alt+F7 to switch back to the GUI screen (tty7). In addition, you can also login remotely via the secured ssh (Secure Shell) or the unsecured telnet.
Bash shell supports thousands of commands - the philosophy of Unix is using small programs that perform one task, but performed it well. Bash shell is often identified by a '$' sign in the command prompt.
Help and Man Pages
You can issue help command:
$ help                 // Display the help menu for the bash shell
$ help <command-name>  // Display the help menu for the command
Most of the commands also support an help option, but may exist in various style:
$ <command-name> -h         // Unix-style: dash followed by a single character
$ <command-name> -?
$ <command-name> -help      // X-style: dash followed by a keyword
$ <command-name> --help     // GNU-style: double-dash followed by a keyword
Unix systems provide so called man pages (or manual pages) for all the commands and utilities. To display the man page for a particular command, use man command:
$ man <command-name>          // Display manual page for the command
                              // You can use Up/Down/PgUp/PgDown keys to scroll the texts
$ info <command-name>
$ man <command-name> | less   // Display in page-mode
To search for commands:
$ man -k <keyword>     // Search for commands relevant to keyword
$ apropos <keyword>    // Same as above
Man pages are comprehensive and can be hard to read on the text-based console. Online HTML-formatted man pages are available, for example, the Ubuntu's man pages @ http://manpages.ubuntu.com, Linux documentation @ http://linux.die.net. You can also google "man command-name" to search for online man pages.
The man pages are divided into 10 sections:
- User Commands
- System Calls
- Subroutines
- Devices
- File Formats
- Games
- Miscellaneous
- System Administration
- Kernel
- New
A man page identified its section number in bracket, e.g., chmod(1).
Some commands have man pages in multiple sections. When a man command is issued, the earliest section will be shown by default. You can also explicitly request for another section. For example,
$ man -k chmod     // All commands relevant to chmod
chmod(1)  ......
chmod(2)  ......
$ man chmod        // Show the earliest section
chmod(1) .....
..............
$ man 2 chmod      // Explicitly request for other section
chmod(2) .....
..............
The man pages are kept in /usr/share/man/man<x>, where <x> denotes the section number.
Useful Commands/Utilities
These are the commands/utilities that a good Unix programmer is expected to know. Check the man pages ("man command-name" or google) to get the detailed description.
- File related:
pwd: Print current working directory. In bash shell, the current working directory is also shown in the command prompt.cd pathname: Change current working directory. Thepathnamecould be either absolute or relative (to the current working directory). Special notations "." and ".." refer to the current and parent directories, respectively.ls: List files (in short-format). "ls -l" lists file in long-format; "ls -a" lists also the hidden files.cat: Concatenate files and print its content.less,more: View file in pages.head,tail: Print the first part or last part of the file.mkdir,rmdir: Make directory or remove (delete) empty directory.touch filename: Create the file if it does not exist; otherwise, update the last-modified timestamp.cp,mv,rm: copy, move or remove (delete) files.chmod,chown,chgrp: change file mode, owner, or group.ln: Create link.
- Resource related:
ps: List processes. "ps aux | grep process-name" to list the details of a particular process.df: Report file system disk space usage.export name=value: Set a variable and export to global environment.top: Print resource usage and top processes.who: List all login users.whoami: Print current login user.hostname: Print hostname.uptime: Print how long the system has been running.date: Print date/time.du: Print disk file space usage.
- Utilities:
grep: Search for a string in input.find: Find files.which program-name: Print the location of the program-name.whereis program-name: List all files related to the program-name.whatis program-name: Print one-line description of program-name.locate filename: Search for files in local system.man command-name: Display manual pages for the command.
- Editors:
vi/vim,nano,emacs: Console-based (text-based) editors.gedit: graphical text editor.
- Programming:
make: Install programs.gcc,g++: GNU C/C++ compiler.
- More:
diff,gzip,tar,ping,ssh,history,su,sudo,adduser,addgroup, etc.
More on cd (change directory) command
Read "Change Directory (cd) command" for basic usage.
You can use "cd path" to change the current working directory. The new path could be an absolute path, beginning with root "\" or home "~"; or relative to the current working directory (PWD).
In cd command, you can use "/" to denote the root directory, "~" to denote home directory of the current login user; ".." (double-dot) to refer to the parent directory; "." (single-dot) to refer to the current directory; and "-" (dash) to refer to the previous working directory (OLDPWD).
By default, in "cd relative-path", the new path is relative to the current working directory. Nonetheless, you can set the environment variable CDPATH to change the base. If CDPATH is not set, it is defaulted to current working directory. CDPATH could contain multiple directories separated by ":" (colon). For example,
$ cd                    // home directory
$ pwd
/home/peter
$ mkdir local           // create a directory local (/home/peter/local)

$ export CDPATH=/usr    // set base for relative cd to /usr

$ cd local              // relative to CDPATH
/usr/local

$ export CDPATH=.:/usr  // set base for relative cd to current directory and /usr
$ cd                    // home directory
$ pwd
/home/peter
$ cd local              // found local relative to current directory
/home/peter/local
Pipe and Input/Output Redirection
By default, the output of a command goes to the screen (called STDOUT), and the input of a command comes from the keyboard (called STDIN). You can use a redirection operator to redirect input and output from/to a file or another command:
>(output redirection): Writes the output to a file (or a device such as printer), instead of the screen (STDOUT).>>(output append redirection): Appends the output to a file, instead of the screen.<(input redirection): Reads the input from a file or a device, instead of the keyboard (STDIN).|(pipe): Pipes the output of one command as the input of another command.tee: sends output to standard output and to file(s). Named after T-pipe, which splits water into two directions.
An output redirector '>' involves a program and a sink (destination). An input redirector '<' involves a program and a source. A pipe '|' involves two programs.
For examples,
// Redirect the output of the ls command to a file, instead of screen
$ ls -l > listing.txt

// Pipe the output of ls command as the input of program less for view page-by-page
$ ls -l | less
// Pipe the output of ls command as the input of program wc to count the lines
$ ls -l | wc -l
// Pipe the output of ls command as the input of program grep to filter lines containing "xxxx"
$ ls -l | grep xxxx

// Pipe the output of ls command as the input of tee, which sends the output to standout and file "listing.txt"
$ ls -l | tee listing.txt
// Pipe the output of ls command as the input of grep.
// grep then sends its output to standout and files "listing1.txt" and "listing2.txt"
$ ls -l | grep xxxx | tee listing1.txt listing2.txt
find, locate and grep
find and grep are extremely powerful commands.
find
You can use find to find files. For example,
$ find -name "*.c"
  // Find all filename ending with .c, in current directory and subdirectories

$ find -iname "*.c"
  // option -i for case insensitive

$ find /usr -name "*.c"
  // Search /usr and its subdirectories
locate
The find command recursively search thru the directories and is slow. locate, on the other hand, search an index (which is build every night for the entire file system) and is fast. For example,
$ locate *.c
  // Find all files (from index) ending with .c, in current directory and subdirectories
grep - Print lines matching the pattern
You can use grep to find lines matching a search pattern. The syntax is:
$ grep [options] pattern [file...]

For examples,
$ grep search-word filename
$ grep search-word file1 file2 file3
$ grep -r search-word directoryname  // -r (or -R) for recursive
If input file is not present, grep takes its input from the standard input (STDIN).
For examples,
$ grep "root" /etc/passwd
  // Print lines containing "root" in /etc/passwd.
  // Double-quote or single quote the keyword if it contains special characters.

$ grep "root" /etc/* | less
  // Print lines containing "root" from all files in /etc.
  // Pipe the output to less.

$ grep -r "root" /etc | less
  // Print lines containing "root" recursively from /etc directory.
Very often, the input of grep is piped from the output of another command as follows:
$ command | grep [options] pattern
For examples:
$ ls -R | grep "txt"
  // Recursive list the file and pipe the output to grep pattern "txt"

$ ps aux | grep -i www-data
  // List process(es) containing www-data, case insensitive (-i)
You can use option -i for case insensitive search, -A n to print n lines after the match, -B n to print n before the match. For example,
grep -i -A3 -B3 "www-data" /etc/passwd
   // Print lines containing "www-data" in /etc/passwd,
   // and print 3 lines before and after the matched lines.
You can use option -v to invert the search; -n to print the line number; -c to count the matched lines.
grep with Regular Expression
You can use regular expression (regex) as the search pattern. For example,
$ grep '[0-9]\{5\}' /etc/passwd // Regex is [0-9]{5} - 5 consecutive digits
Take note that you need to use backslash for many of the regex metacharacter such as { and ].
See "Regular Expression" section.
nano editor
GNU nano (successor of GNU pico) is a text-based non-graphic editor, included in most of the Unix system. The mother site of nano is https://www.nano-editor.org/. It is handy for simple editing (e.g., changing a configuration option or adding a line), especially in a non-graphical environment such as Ubuntu Server. However, it is not meant for heavy-duty editing.
nano shows the command options at the bottom of the screen, where ^- denote Ctrl key and M- denotes the Meta Key (Alt in Windows, Cmd in Mac)
Open a file
$ cd /path/to/directory
$ nano filename
$ sudo nano filename
Saving/Exiting
Ctrl-Oto SaveCtrl-Xto Exit
Copy, Cut and Paste
- Cut/Paste:
Ctrl-Kto Cut andCtrl-Uto Paste (Uncut) - Copy/Paste:
Ctrl-6(orAlt-Shift-A) to Set Mark ⇒ Use arrow keys to highlight the text to copy ⇒Alt-6(orAlt-Shift-6) to Copy ⇒Ctrl-Uto Paste (Uncut).
Search and Replace (Regex Supported)
Ctrl-W(Whereis) to Search and enter the search string. UseAlt-Rto toggle between regex and normal mode. To search the same text again, useCtrl-Wand press enter.Ctrl-/for Search and Replace. Again, useAlt-Rto toggle between regex and normal mode. You can choose to replace ONE instance or ALL instances.
Customize Bash Shell
Set PATH
You can use one the following commands to check the current PATH settings:
$ echo $PATH
$ printenv PATH
To modify PATH setting permanently, e.g., to include the current directory into the PATH, edit ~/.profile to include the following statement.
export PATH=.:$PATH
Notes:
- In Unix, directories are separated by a colon (
:). (Windows uses semi-colon (;).) - The current directory, by default, is not included in the
PATH. Hence, to run a program in the current directory, you need to issue./programNameto include a relative directory.
Change Prompt
The prompt is kept in environment variable PS1. You can check the current setting using one the following commands:
$ echo $PS1
$ printenv PS1
The default setting is "username@hostname:directory$", which is set via "\[\e]0;\w\a\]\n\[\e[32m\]\u@\h \[\e[33m\]\w\[\e[0m\]\n\$".
To change the prompt setting, edit "~\.bashrc" to include the following line, where \w denotes the current directory with home denoted as ~.
PS1='\w\$ '
Set Starting Directory
Edit "~\.bashrc" to include a cd (change directory) command at the end of the file.
Managing Users
Users and Groups
Unix is a multi-user operating system. Each user is identified via an username. Each user is assigned to one primary group and zero or more secondary groups (or supplementary groups).
User and group are used for access control of resources, such as files and directories.
There are three types of users: superuser (or privileged user, or root user, or administrator), regular users (normal day-to-day users or non-administrative users), and system users (or pseudo-users).
- A regular user can only access resources specific to his account, and cannot access other user's resources or perform system-wide changes.
- Superuser has unrestricted access to the entire system, and is needed to carry out administrative tasks such as installing new software and performing system-wide configurations. Superuser can carry out ANY task, even destructive ones. In Ubuntu, the superuser is named
root. - System users are not persons (they cannot login interactively), but administrative accounts for running various day-to-day services, e.g.,
www-dataowns the apache web server and all its associated files;nobodyowns no files and is not belong to a privileged group.
User's Home Directory
Each user is allocated a home directory.
- For regular users, it is typically called
/home/<username>(for Ubuntu) or/Users/<username>(for Mac OS X). - The home directory for superuser
'root'is/root. - System users do not have home directory.
/etc/passwd
User information is stored in /etc/passwd. Each user has an entry in the file. For example, below is the partial contents of the Ubuntu's /etc/passwd after installation with a new user called peter:
$ less /etc/passwd
root:x:0:0:root:/root:/bin/bash
daemon:x:1:1:daemon:/usr/sbin:/bin/sh
bin:x:2:2:bin:/bin:/bin/sh
......
www-data:x:33:33:www-data:/var/www:/bin/sh
mysql:x:116:125:MySQL Server,,,:/nonexistent:/bin/false
nobody:x:65534:65534:nobody:/nonexistent:/usr/sbin/nologin
......
peter:x:1000:1000:My User:/home/peter:/bin/bash
The format of /etc/passwd is as follows, where items are separated by a colon:
username:password:UID:GID:GECOS:home-directory:default-login-shell
- username
- password: "
x" indicates that the encrypted password is stored in/etc/shadow. - UID (User ID): 0 for root, 1-999 and 65534 (nobody) for system users (pseudo-users), 1000 and above for regular users.
- GID (Primary Group ID): Each user is assigned to a primary group. GID has the same numbering scheme as UID. Group information is stored in
/etc/group. - GECOS: a comma-separated list of user's full name (display name), address, phone number and other contact information.
- Home directory: set to
/nonexistentfor non-interactive users. - Default login shell: such as
/bin/bashfor Bash shell. For non-interactive users, set to/usr/sbin/nologinor/sbin/nologinor/usr/bin/falseor/bin/false.
/etc/group
Group information is stored in /etc/group. For example,
$ less /etc/group
root:x:0:
daemon:x:1:
bin:x:2:
sys:x:3:
adm:x:4:peter
......
sudo:x:27:peter
......
nogroup:x:65534:
......
peter:x:1000:
The format of /etc/group is as follows:
GroupName:Password:GID:UserList
- Groupname
- Password: typically not used
- GID (Group ID): Used in
/etc/passwd. - UserList: list of users separated by commas. A group can have many users.
getent Command
Beside listing the file, you can use a special command getent to get entries from databases such as /etc/passwd and /etc/group. For examples,
// Syntax:
getent <database-name> [<entry-name>]

// Examples:
$ getent passwd
......
$ getent passwd peter
peter:x:1000:1000:peter,,,:/home/peter:/bin/bash
$ getent group peter
peter:x:1000:
List Users and Groups
To list user information, use command whoami and id:
$ whoami  // Show current login user
peter

$ id      // Show current login user, primary group, and secondary groups
uid=1000(peter) gid=1000(peter) groups=1000(peter),4(adm),27(sudo),...

$ id <username>   // Show the specific user
......
To list the groups of a particular user, use command groups, for example,
$ groups              // Show current login user primary and secondary groups
peter adm sudo ....

$ groups <username>   // Show specific user
......
The current user information is kept in the environment, e.g.,
$ printenv
SHELL=/bin/bash
USER=peter
HOME=/home/peter
......
User and Primary Group
When a regular user is created (e.g., peter), it is given a UID (e.g., 1000). An identical groupname (peter) and GID (1000) is also created, and assigned as the primary group of the user. If this user creates a file or directory, it is owned by this user and its primary group. For example,
// Show current user and primary group
$ id
uid=1000(peter) gid=1000(peter) groups=1000(peter),....
// Create a file and show it owner user and group
$ touch temp.txt
$ ll temp.txt
-rw-rw-r-- 1 peter peter 0 Feb  8 23:49 temp.txt
/etc/shadow
The /etc/shadow contain the encrypted password, aging and account lockout information. For example,
$ sudo less /etc/shadow  // Required superuser privilege via sudo
root:!:15630:0:99999:7:::
nobody:*:17001:0:99999:7:::
www-data:*:17001:0:99999:7:::
peter:xxxxxxxx:15788:0:99999:7:::
......
The format is:
username:password:last-changed:min-days:max-days:warn-days:inactive-days:expire-days:reserved
- username
- password:
- contains the salted-hashed password (in the format of
$algorithmID$salt$hashed), if a password has been set for this user. - A "blank" value indicates that password is not required (or empty password).
- An asterisk (
*) indicates that password is not enabled, i.e., this user cannot login interactively. This is meant for system users such aswww-dataandnobody. - A value starts with a exclamation mark (
!xxxx, typically!or!!) means that the account is locked; the remaining characters on the line represent the password field before the password was locked. For example,rootis locked from login interactively.
- contains the salted-hashed password (in the format of
- last-changed: days since Jan 1, 1970 that the password was last changed.
- min-days: The number of days before password may be changed (0 indicates password can be changed any time).
- max-days: maximum number of days that this password is valid (99999 indicates that password is valid forever).
- warn-days: number of days to issue a warning before the password is expired (7 for a full week).
- inactive-days: number of days after the password is expired that the account becomes inactive.
- expire-days: days since Jan 1, 1970 that the account has been disabled.
Superuser 'root' and Superuser-do 'sudo'
Superuser root
In Unix, the default superuser is called 'root', which can do everything and anything, including destructive tasks. Doing regular tasks (such as program development) with root can be dangerous, as root could remove important system files and destroy your system. Hence, it is strongly recommended to do regular work with a regular user instead of superuser.
However, at times, you need the superuser privilege to perform a task, such as install a new software and writing to a system directory. You can do it in two ways: sudo (superuser-do) or su (switch user).
sudo <command>
An authorized user can run a command with superuser privilege by prefixing it with 'sudo' (superuser-do). The list of users authorized to do 'sudo' is kept in /etc/sudoers (called sudo list).
When you issue "sudo <command>", the system will prompt for password. Reply with the CURRENT login-user's password (NOT the root's password). However, the current user must be a sudoer. The command will then be run with superuser privilege, with un-limited access to all the resources. The entered password will not be shown (not even showing asterisks) for maximum security. The password entered is stored for 15 minutes (by default) for all subsequent sudo commands. After that, you will need to enter the password again. A log entry is created for every sudo command in /var/log/auth.log for auditing purpose.
There are 2 ways to add a user to the sudo list:
- Command-line: Add the user to "
sudo" (or "adm") group via command "adduser <username> <groupname>". The "sudo" and "adm" groups are configured in/etc/sudoersto dosudo.// Syntax: adduser <username> <groupname> $ sudo adduser <username> sudo // or "adm" group
- Interactive:
- In Ubuntu: System Settings ⇒ User Accounts ⇒ Select the user ⇒ Unlock ⇒ Set the account type to "Administrator" (instead of "Standard User"), which adds the user to "
sudo" group. - In Mac OS X: System Preferences ⇒ Users and Groups ⇒ Select the user ⇒ Unlock ⇒ Check "Allow users to administrator this computer".
- In Ubuntu: System Settings ⇒ User Accounts ⇒ Select the user ⇒ Unlock ⇒ Set the account type to "Administrator" (instead of "Standard User"), which adds the user to "
When a command is run under 'sudo', it is run as 'root' user and 'root' group (NOT as the sudoer user and group). For example, all the files created are owned by root:root. We can verify as follows:
// Display the current user and groups
$ id
uid=1000(peter) gid=1000(peter) groups=1000(peter),4(adm),27(sudo),...
// Run with 'sudo'
$ sudo id
uid=0(root) gid=0(root) groups=0(root)

// sudo commands use the environment belonging to 'root'
$ sudo printenv
PATH=/usr/local/sbin:/usr/local/bin:/usr/sbin:/usr/bin:/sbin:/bin
HOME=/home/peter
USER=root
SUDO_COMMAND=/usr/bin/printenv
SUDO_USER=peter
SUDO_UID=1000
SUDO_GID=1000
......
$ printenv  // Without 'sudo'
USER=peter
HOME=/home/peter
......

// Take note that environment variable 'HOME' is NOT set to 'root'
// To set 'HOME' to 'root', use -H flag
$ sudo -H printenv
......
HOME=/root
......

// By default, sudo commands are run as 'root'.
// You can use '-u username' flag to change the user, e.g.,
$ sudo -u nobody id
uid=65534(nobody) gid=65534(nogroup) groups=65534(nogroup)

// The files created are owned by root:root
$ sudo touch temp.txt
$ ll temp.txt
-rw-r--r-- 1 root root 0 Feb  8 22:48 temp.txt
/etc/sudoers
The following shows the contents of /etc/sudoers (on Ubuntu):
$ sudo less /etc/sudoers
#
# This file MUST be edited with the 'visudo' command as root.
#
Defaults	env_reset
Defaults	mail_badpass
Defaults	secure_path="/usr/local/sbin:/usr/local/bin:/usr/sbin:/usr/bin:/sbin:/bin"

# User privilege specification
root	ALL=(ALL:ALL) ALL

# Members of the admin group may gain root privileges
%admin ALL=(ALL) ALL

# Allow members of group sudo to execute any command
%sudo	ALL=(ALL:ALL) ALL

# See sudoers(5) for more information on "#include" directives:
#includedir /etc/sudoers.d
The format of /etc/sudoers is as follows:
user|%group hostlist = (userlist:group) [NOPASSWD:] commandlist
user|%group: name of the user or group (with prefix %) to which this rule applies.hostlist: list of hosts this rule applies to.userlist: list of users (and groups) that this rule can be run as. If omitted, the default isroot. For example,ALL:ALLmeans that the command can be run asALLusers andALLgroups.commandlist: list of commands that can be executed. UseALLfor all commands. The optional prefixNOPASSWD:indicates no password prompting.
For Example,
nobody       ALL=(root) NOPASSWD: /usr/sbin/rndc reload
# The user nobody is allowed to run "rndc reload" as root, on all hosts, without being asked for any password.
"sudo su" or "sudo -i"
Some systems (e.g. Ubuntu) support so-called interactive sudo, or "sudo -i", or "sudo su", which allows you to issue multiple commands under a sudo session. The command prompt will be changed to the root prompt #. You can exit the sudo session via command "exit".
Avoid using this command, as you are likely to forget to switch out from sudo.
"sudo cd ..." won't work!
If you issue "sudo cd <dir-name>", you get an error "sudo: cd: command not found". This is because cd is not a executable, but a shell buili-in. Hence, you need to "sudo su" to switch to root, then cd into the directory.
gksudo <command> (or gksu <command>)
To start a graphical application as root user, use gksudo (Graphical Superuser-do) instead of sudo, e.g.,
$ gksudo gedit <filename>
gksudo sets HOME=~root, which prevents files in your home directory to be owned by root.
In Ubuntu, you can also use gksu (gksudo is a symlink to gksu).
Switch User: su <username>
Unix provides a command called "su <username>" (switch user), which switches the current login user to the given username. You will be prompted for the password of username (NOT the current login user as in sudo).
If username is omitted, the command su switches to the root user. You will be prompted for root's password (provided root user is enabled). The command prompt will be changed to "#" - the default root user prompt. You can exit the root session via command "exit" or "quit".
In Ubuntu and Mac OS X, the root account is locked, by default. That is, you cannot login as root, or su as root user. However, you can use "sudo command" to run command as root; or "sudo su" (or "sudo -i") to switch to root if you are a sudoer (as described earlier). "sudo" will prompt for your (sudoer) password, instead of root's password.
Enabling the root account (NOT Recommended)
As mentioned, many Unix systems (such as Ubuntu and Mac OS X) disable the default superuser root. Instead, you need to use sudo to run a command with superuser privilege. This is to ensure that you use superuser privilege with great care. However, if you wish to enable the root account (NOT RECOMMENDED), you could issue "sudo passwd":
$ sudo passwd
[sudo] password for <current user>:
Enter new UNIX password:
Retype new UNIX password:
The "new UNIX password" refers to the root's password. The root account will be enabled once its password is set.
User Management Commands - adduser/deluser/addgroup/delgroup/passwd
To add/delete a new user or group, use command adduser/deluser or addgroup/delgroup, which is friendlier than the older useradd, userdel, usermod, groupadd, groupdel, groupmod. Check the man pages on their syntax.
Add a Regular User: adduser
For example, to add a new user called mytest:
$ sudo adduser mytest
Adding user `mytest' ...
Adding new group `mytest' (1001) ...
Adding new user `mytest' (1001) with group `mytest' ...
Creating home directory `/home/mytest' ...
Copying files from `/etc/skel' ...
Enter new UNIX password:
Retype new UNIX password:
passwd: password updated successfully
Changing the user information for mytest
Enter the new value, or press ENTER for the default
	Full Name []: my test
	Room Number []:
	Work Phone []:
	Home Phone []:
	Other []:
Is the information correct? [Y/n] y
The new user is added into /etc/passwd. A new group (with groupname identical to username) is also created in /etc/group, and assigned to this user as the primary group. The home directory (with directory name the same as the username) is created under /home (for Linux) and /Users (for Mac OS X). The template files from /etc/skel are copied into the home directory.
The set of initial files in /etc/skel includes:
$ ls -al /etc/skel
-rw-r--r--   1 root root  220 Sep 19  2012 .bash_logout
-rw-r--r--   1 root root 3637 Sep 19  2012 .bashrc
-rw-r--r--   1 root root 8445 Apr 16  2012 examples.desktop
-rw-r--r--   1 root root  675 Sep 19  2012 .profile
Add a Non-Login System User
At times, you might want to add a non-login user for running certain applications (similar to user www-data to run Apache, user mysql to run MySQL). You can use adduser as follows:
$ adduser --system --no-create-home --group --disabled-login <username>
   // --system: system user (with UID less than 1000)
   // --no-create-home: no home directory;
   //   or use "--home <dir>" to specify the home directory
   // --group: groupname the same as the username;
   //   or use "--ingroup <groupname>" to specify a groupname
   // --disabled-login: do not set password; cannot log-in until password is set
   // The default login shell is /bin/false,
   //   or use "--shell <shellname>" to specify the shell
For example,
$ sudo adduser --system --no-create-home --group --disabled-login xxxx
Adding system user `xxxx' (UID 119) ...
Adding new group `xxxx' (GID 127) ...
Adding new user `xxxx' (UID 119) with group `xxxx' ...
Not creating home directory `/home/xxxx'.

# Verify
$ getent passwd xxxx
xxxx:x:119:127::/home/xxxx:/bin/false
$ ll /home/xxxx
ls: cannot access /home/xxxx: No such file or directory
$ id xxxx
uid=119(xxxx) gid=127(xxxx) groups=127(xxxx)
$ sudo deluser --remove-home xxxx
Looking for files to backup/remove ...
Removing user `xxxx' ...
Warning: group `xxxx' has no more members.
Done.
$ sudo delgroup xxxx
The group `xxxx' does not exist.
$ getent group xxxx
$ getent passwd xxxx
Add a Group - addgroup
// Create a new group
$ sudo addgroup <groupname>
Add a User to a Group
$ adduser <username> <groupname>
Set/Change/Lock Password - passwd
// To change your password
$ passwd

// To set/change password for <username>
$ sudo passwd <username>

// To lock out a user
$ sudo passwd -l <username>

// To unlock out a user
$ sudo passwd -u <username>
deluser/delgroup
// To remove a user
$ sudo deluser --remove-home <username>
   // --remove-home: remove the home directory and mail spool

// To remove a user from a group
$ sudo deluser <username> <groupname>

// To remove an empty group
$ sudo delgroup --only-if-empty <groupname>
Examples
// Create a new user called peter (in primary group peter)
$ sudo adduser peter

// Create a new group called devel
$ sudo addgroup devel

// Add user peter to group devel
$ sudo adduser peter devel
    // OR, "sudo usermod -a -G devel peter"
    // -a: append
    // -G <groupname> to specify a secondary group

// Display all groups for user peter
$ sudo id peter
   // Or, "groups peter"

// Delete user peter from group devel
$ sudo delgroup peter devel

// Delete user peter
$ sudo deluser --remove-home peter

// Delete group devel
$ sudo delgroup --only-if-empty devel

// At times, you might need to remove the home directory
$ sudo rm -rfv /home/peter
   // -r: recursive
   // -f: force, do not prompt
   // -v: verbose
File System
Everything in Unix is a file - from data files, executable programs, to input and output devices. Files are organized in directories (aka folders). The directories are organized in a hierarchical tree structure, starting from the root directory, denoted by "/". There is only one root directory for the entire Unix's file system. A directory may contain sub-directories and files.
Unix is a multi-user system. Some files are used solely by the system; some are shared by all users; while some belong to a particular user.
Disk Drives and Root Directory
Windows systems has a concept of drive (e.g., C drive and D drive). Each drive begins with a root directory (e.g., c:\, d:\), resulting in multiple root directories.
Unix has no concept of drive and has a single root for the entire file system. The drives are mounted under the file system at a specific directory.
System and Application Software Directories
A Unix system has these directories for system and application software available to all users:
/lib,/bin,/sbin: System libraries, binaries and superuser's binaries. Binaries are executable programs (having executable file attribute). Libraries are supporting codes for programs. There are two types of libraries, static libraries (.afor archives in Unix,.libin Windows) and dynamic libraries (.sofor shared objects in Unix,.dllfor dynamic link libraries in Windows). Static library codes are linked into the program; whereas shared library codes are loaded during runtime and can be shared by many programs./usr: Application Software (contrast to System Software in/bin,/lib, and/sbin). It contains sub-directories such as/usr/bin,/usr/lib,/usr/include,/usr/share/man(man pages),/usr/share/doc(documentation) and etc./usr/local: Locally installed application software which are not part of the distribution. It contains sub-directories such as/usr/lcoal/bin,/usr/local/lib,/usr/local/include, and etc./opt: optional application software package./etc: System-wide configuration files, such asfstab(file system table for disks, CD drives, and storage devices),passwd(list of users), andsudoers(list of users with superuser access). (It is called "et cetera" in early days to mean additional things tobinandlib.)/var: Variable (changing) files, such as/var/logs(for log files),/var/spool(for printer spool files),/var/mail(for mail),/var/tmp, and etc./root: superuser's home directory./dev: file representation of devices. A special/dev/null(or the null device) is a special file that discards all data written to it but reports that the write operation succeeded. It provides no data to any process that reads from it, yielding EOF immediately./mnt: file system mount point for (fixed) hard disks, CD drive, etc./media: for removable media, such as external drive and USB drive./sys: real-time information on devices used by the kernel./boot: boot loader files and Linux kernel./proc: process information./srv: services./tmp: System's temporary directory.
Users' Home Directories
As mentioned, Unix is a multi-user operating system. Each user on a Unix system is allocated a directory for storing his/her files, known as user's home directory. The home directory of the current login user is denoted as "~".
The user's home directories are allocated under /home/username for Ubuntu, or /Users/username in Mac OS X. It contains sub-directories such as ~/Desktop (i.e., /home/username/Desktop where ~ denotes the home directory), ~/Downloads, ~/Documents, ~/Music, and etc.
The superuser root has home directory called /root.
Pathname and Filename
To reference a file in a Unix file system, you need to provide the directory pathname and the filename. For example, in "/usr/lib/jvm/jdk1.7.0_07/bin/javac", the pathname is "/usr/lib/jvm/jdk1.7.0_07/bin/" and the filename is "javac".
The pathname can be specified in two ways: absolute (starting from root "/" or current user's home directory "~") or relative to the current working directory. You can also use double-dot ".." to refer to the parent directory and dot "." to refer to the current directory.
Dot files and Dot Folders
Files and folders begins with a dot (.), such as .profile and .bashrc, are hidden from normal view. They are primarily used for configuration files. To view the hidden files and folder, you need to use ls command with option -a (all), e.g.,
$ ls -a    // list all files including hidden files
$ ls -al   // list all files in long format
File/Directory Ownerships and Permissions
You can issue command "ls -l" to list files/directory in long format, which shows all the file attributes, e.g.,
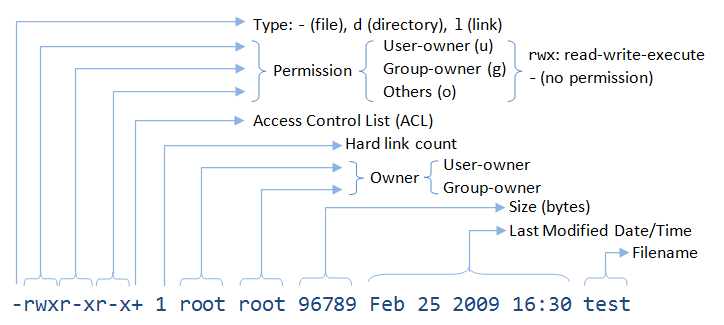
For each entry:
- The first character indicates the type, with
-for file anddfor directory. The other type codes arelfor link (symlink or hard link),bfor block device,cfor character device,pfor named pipe, andsfor socket. - A file/directory has a user-owner and a group-owner, as indicated. The user-owner may or may not belong to the group.
- A file/directory has 3 permission settings, read/list (r), write (w) and execute/access (x), for user-owner (u), group-owner (g) and others (or the world) (o), respectively. The permissions are represented with 9 characters, in 3 groups of "
rwx" for user-owner, group-owner and others, as shown in the above listing. "-" indicates absence of permission. For examples,-rwxr-x--- peter devel test.php // File, // filename is test.php, // user-owner is peter, group-owner is devel, // user-owner has read, write and execute permissions, // group-owner has read and execute permissions, // others (the world) have no permission -rwx------ root root myconfig // File, // filename is myconfig, // user-owner is root, group-owner is root, // user-owner has read, write and execute permissions, // group-owner and others have no permission drwxr-xr-x peter devel www // Directory, // directory name is www, // user-owner is peter, group-owner is devel, // user-owner has list, write and access permissions, // group-owner has list and access permissions, // others (the world) have list and access permissions
File Permissions
A file is indicated by type of "-". For files:
- "
r" (read) permits reading the file content. - "
w" (write) permits writing into the file. - "
x" (execute) indicates that the file is executable, i.e., a program file (or binary file).
Directory Permissions
A directory is indicated by type of "d". For directories, "r" shall be interpreted as list and "x" as access, as follows:
- "
r" (list) permits listing of directory's contents (filenames and sub-directory names only) via listing command such asls. Without "r" permission, you cannot issue "ls" command. - "
w" (write) permits writing into the directory, i.e., creating new files or sub-directories inside the directory. - "x" (access) permits access into this directory (i.e., "
cd" into the directory).
A directory holds two pieces of information for each file/sub-directory it contains: the filename/subdirectory-name and its inode number. I-node stores the attributes of the file/directory, including the disk block location. You can list the name and inode number via command "ls -i". For directories, "r" permission is needed to get the name; "x" permission is needed to get its inode number given the name, which is needed to enter the directory. For example, to issue "cat /home/peter/test/f1.txt", you need "x" permission for directories /, home, peter, test (so as to enter the directories); and "r" permission for file "f1.txt". No "r" permission is needed for the directories, as the names are known. "r" permission is needed for a directory for issuing ls command.
For production system, "x" is needed to enter (access) the directory. Very few programs need to list the directory contents. For development system, both "x" and "r" are needed to enter the directory and issue the ls command.
For example, the following shows the difference between "r" (list or open) and "x" (access) permissions for directory:
$ mkdir d1
$ touch d1/f1.txt
$ touch d1/f2.txt
   // Create a directory "d1", with 2 files inside.

$ chmod 400 d1  // Set directory "d1" to "r" only (400 = r-- --- ---).
$ ls -ld d1
dr-------- 2 peter peter 1024 Mar 29 11:08 d1
   // Directory "d1" has "r" only.
$ ls d1
ls: cannot access d1/f2.txt: Permission denied
ls: cannot access d1/f1.txt: Permission denied
f1.txt  f2.txt
   // Can read the filenames in this directory,
   // but not the file attributes such as permissions and owners.
$ ls -l d1
ls: cannot access d1/f2.txt: Permission denied
ls: cannot access d1/f1.txt: Permission denied
total 0
-????????? ? ? ? ?            ? f1.txt
-????????? ? ? ? ?            ? f2.txt
$ cd d1
bash: cd: d1: Permission denied
   // Cannot "cd" into this directory without "x" permission.
$ cat d1/f1.txt
cat: d1/f1.txt: Permission denied
   // Cannot "cat" file inside this directory (cannot enter the directory without "x").

$ chmod 100 d1        // Set directory "d1" to "x" only (100 = --x --- ---)
$ ls -ld d1
d--x------ 2 peter peter 1024 Mar 29 11:08 d1
$ ls -l d1
ls: cannot open directory d1: Permission denied  // Cannot read filenames
$ cat d1/f1.txt
.......                 // Can "cat" file inside the directory
$ cd d1               // Can "cd" into the directory
$ ls
ls: cannot open directory .: Permission denied

// In "d1" directory, without "w" for directory.
$ touch f1.txt       // can write on existing file
$ touch f3.txt
touch: cannot touch `f3.txt': Permission denied  // Cannot creating new file without "w".

$ cd ..   // Back to parent of "d1"
$ chmod 200 d1  Set "d1" to "w" only (200 = -w- --- ---)
$ ls -ld d1
d-w------- 2 peter peter 1024 Mar 29 11:08 d1   // Directory "w" only
$ touch d1/f1.txt
touch: cannot touch `d1/f1.txt': Permission denied  // Need "x" too
$ touch d1/f3.txt
touch: cannot touch `d1/f3.txt': Permission denied

$ chmod 300 d1  Set "d1" to "wx" only (300 = -wx --- ---)
$ ls -ld d1
d-wx------ 2 peter peter 1024 Mar 29 11:08 d1   // "r" and "x"
$ touch d1/f1.txt
$ touch d1/f3.txt    // Can create new file

$ mkdir d1/d2    // Make sub-directory
$ chmod 100 d1   // "x" only
$ touch d1/d2/f4.txt  // d1 has "x", d2 has "wx"
Change Mode (chmod)
We can use the command chmod (change file mode) to change the file mode (i.e., permission), in the form of "ugoa±rwx" with "+" to add permission and "-" to remove; or "ugoa=rwx" to set the permission, where "u" for user-owner, "g" for group-owner, "o" for others, and "a" for all (i.e., u+g+o). For example,
// Grant executable mode for owner(u), group(g) for all *.sh files
// -c lists all the changes
$ chmod -c ug+x *.sh

// Remove write permission from group(g), others(o) for all *.txt files
$ chmod -c go-w *.txt

// All (u+g+o) read and execute
$ chmod -c a=rx *
You can also use three octal numbers (each for u, g and o) to represent the file permission. Each octal number carries 3 bits (xxx), corresponding to the read-write-execute permissions, where 4 (100B) for read, 2 (010B) for write and 1 (001B) for execute. E.g., "700" is equivalent to "rwx------"; "664" is equivalent to "rw-rw-r--"; "775" is equivalent to "rwxrwxr-x". For example,
$ chmod -c 700 myfile.txt  // 700 = 111 000 000 (rwx------)
$ chmod -c 600 *.txt       // 600 = 110 000 000 (rw-------)
You can use option -R to recursively changing the files in the subdirectories. For example,
$ chmod -R 770 dirName // recursive, all files and subdirectories under the dirName
You can use --reference to specify a file as the reference template for the file mode. For example,
$ chmod --reference ~/test.txt *.txt // Use ~/test.txt's mode for all txt files
Only the file owner (or superuser root) can run chmod. If you are not the file owner, you need to use sudo, provided you are a sudoer.
Change Mode for files and Directories
Very often during software installation, you need to set all the files to a certain mode (e.g., rw-rw---- or 660), and all sub-directories to another mode (e.g., rwxrwx--- or 770 to allow for directory access). You can accomplish via the find command as follows:
$ cd baseDir
// Set current directory and directories to 2770 or rwxrwx---
// with 2 for setgid (to be explained later)
$ sudo find . -type d -exec chmod 2770 {} +
// Set all files to 660 or rw-rw----
$ sudo find . -type f -exec chmod 0660 {} +
The find command is used to find all files/directories recursively with type of d (directory) or f (file). It then invokes -exec action to run the chmod command on each of the file found, with filename expanded in {}. The shell command must be ended with semi-colon (;). However, running a process for each of the file found is highly inefficient, you could place a + instead of semi-colon, to collect the filenames into sets and run the command once per set.
Change Owner/Group (chown, chgrp)
We can use command chown (change file owner/group) to change the owner of files, e.g.,
// Change owner for a file
$ chown peter test.txt
// Change owner of the current directory
$ chown peter .
// Also change the group to programmers for a directory
$ chown peter:programmers /myproject

// Change Group
$ chgrp programmers .
You can use option -R to recursively changing the files in the subdirectories.
In most systems, only superuser can run chown, not even the file owner. This is because Unix systems prevent users from "giving away" files (you can only chown to yourself, which does not require any chown command!)
The file owner can run the chgrp if he belongs to the target group (again, you cannot "give away" files).
umask
umask (filemode creation mask) controls the permissions for new files and directory created. Recall that permissions can be represented by 3 octal numbers, each representing rwx for u (user), g (group) and o (others) respectively, e.g., 660 for (rw- rw- ---); 775 for (rwx rwx r-x).
umask is also represented in 3 octal numbers, with 1 to disable a certain permission. For example, suppose the umask is 022 (--- -w- -w-), it will disables the w for group and others, when a new file/directory is created. In other words, a new file/directory could have (rwx r-x r-x), or lesser permissions; it will never have w for group and others.
Each program has its own umask. For "Terminal" application, you can set the umask in one of the login scripts (such as "~/.profile") with the following line:
umask 022
You can also issue the command umask to display/change the current umask setting.
(For apache, the umask can be set in /etc/apache2/envvars.)
setuid and setgid permission for executable-file
When you execute a program (having "x" file permission) with setuid (Set User ID upon execution) or setgid (Set Group ID upon execution), it takes on the file owner's (or group's) privilege. For example, if a setuid program is owned by root, and executable by all, it will be run in root privilege, even when invoked by a less privilege user. setuid and setgid can be dangerous! Use them with great care!
You can use chmod command to enable setuid/setgid:
$ chmod u+s program-name   // setuid for program
$ chmod g+s program-name   // setgid for program

// Use Octal number
$ chmod 4750 program-name   // 4 (setuid) 750 (rwxr-x---)
$ chmod 2750 program-name   // 2 (setgid) 750 (rwxr-x---)
Program with setuid has owner's execute flag of "s", instead of "x". Similar, program with setgid has group's execute flag of "s".
setgid permission on directories
Setting the setgid permission on a directory causes new files and sub-directories created within it to inherit its group-owner, rather than the operating user's primary group ID.
You can use chmod command to setgid. For examples,
$ chmod g+s directory-name   // setgid for directory

// Using 4 Octal numbers
$ chmod 2750 directory-name  // 2 (setgid), 750 (rwxr-x---)
setuid on directories are ignored.
Access Control List (ACL)
You can use the ACL to grant permission to specific users, other than the owner, group or all. [TODO]
root User
The superuser root can access any file in the system, regardless of the file permissions and ownerships.
Last Modified Date/Time and touch Command
The date/time stamp shows the last modified date/time of the file. You can use command touch to set the last modified date/time to now for an existing file. If the file does not exist, touch creates a new empty file.
$ touch filename   // If file exists, set the last modified date/time to now
                   // Else, create a new empty file.
Hard Links and Symbolic Links
A link is a special file that references another file or directory. A link serves as an alias, which can be used to access the linked file/directory. For example, In Ubuntu, the link vi (in /usr/bin) references /etc/alternatives/vi.
Symlink: A symbolic link (or symlink or soft link) maintains a reference (not a direct pointer) to a file or a directory. A symlink is a file that stores the path to another file/directory. If the referenced file is removed, the symlink will be referencing an non-existent file.
To create a symbolic link, use command ln with option -s:
$ ln -s file-or-dir-name symlink-name
In "ls -l", symlinks are identified via the "symlink -> referenced file/dir".
Hard Link: A hard link is an additional pointer to the file's inode (physical location). You can view the inode of files via "ls -i". A file can be accessed via any hard link. It is available as long as there is at least one hard link left. The "hard link count" for a file is reflected in command "ls -l" (as illustrated in the earlier example).
To create a hard link, use command ln:
$ ln filename hard-link-name
Symlinks are more commonly-used. Symlinks can span file systems; while hard links work only in the same file system. Hard links usually work for file (hard link to directory could lead to inconsistency); while symlinks work for both file and directory. Hard links are also much hard to maintain, as there is little clue on where are the files, other than the link count.
You can remove a link (hard or soft) via rm command, just like any file. A hard-linked file is only deleted from the file system when there is no link to it.
Windows does not support symlink until Windows 7?!
More on ls (list) Command
$ touch testfile    // Create files
$ touch .testfile
$ ls         // short format (default)
$ ls -l      // long format with file attributes
$ ls -a      // all files including hidden files
$ ls -al     // all files in long format

$ mkdir test_dir    // Create (Make) a directory
$ ls -ld test_dir   // Show directory name, not its content
$ ls -l test_dir    // Show content of the directory

$ ls -alR    // Recursively list the sub-directories

// Re-direct the listing to a file
$ ls -alR > listing.txt
// Pipe the output to grep to search for lines containing a keyword, and display page by page
$ ls -alR | grep keyword | less
Wildcards for specifying filenames:
- Wildcard
*matches zero or more characters; ? matches one character; [...]for a character class (match any one character in the class), e.g.,[aeiou]. You can use-to specify a range, e.g.,[a-zA-Z],[0-9].[^...]is the inverse of the above, i.e., match any character NOT in the class,[^aeiou],[^a-e].
File/Directory-Related Commands
// Make/Remove sub-directory
$ mkdir <directory-name>   // Make (create) directory
$ rmdir <directory-name>   // Remove (delete) directory only if it is empty
$ rm -r <directory-name>   // Remove directory recursively, including all files and subdirectories

// Create file if not exist, else update last modified timestamp
$ touch <filename>

// Copy/Move/Remove file
$ cp <fileToBeCopied> <newFilename>  // copy
$ mv <fileTobeMoved> <newFilename>   // move (rename)
$ rm <filename>   // remove (delete)

// Display files on Screen
$ less <filename>    // Display the file page-by-page on screen
$ cat <filename>     // concatenate the given file to screen
$ head <filename>    // Display the beginning of a file
$ tail <filename>    // Display the end of a file - good for reading log files

$ file <filename>    // Display information about a file
To remove an non-empty directory and its sub-directories:
// CAUTION: THERE IS NO UNDO!!!
$ rm -rfv <directory-name>
   // may require sudo
   // -r: recursive
   // -f: force, do not prompt
   // -v: verbose
To monitor log file with "auto-refresh":
$ sudo tail -f /etc/log/apache2/error.log
   // -f: output appended data as the file grows
Tape Archive (tar) and ZIP Compression (gzip, bzip2)
The relevant file formats and utilities are:
.gz: A file compressed viagziputility; which can be uncompress viagunziputility..tar: A tar (tar archive) file, or tarball, is a collection of many files into a single file, used for distribution or backup. It is created viatarutility with option c (create); and can be extracted viatarwith option x (extract)..tar.gz: A compressed tar file withgzip- the most popular format for software distribution and backup.
The Tape Archive (tar) Utility
You can use the tar utility to create, list, and extract .tar.gz files, as follows:
// "Create" a compressed archive of the given files and directories
$ tar czvf <compressed-filename>.tar.gz <directory1> <directory2> <file1> <file2> ...
   // Option "c" to create; "z" to compress; "v" for verbose; "f" for archive filename

// "Extract" compressed archive under the "current" directory
$ cd /path/to/target-directory
$ tar xzfv <compressed-filename>.tar.gz
   // Option "x" to extract

// "Extract" compressed archive under the given directory
$ tar xzfv <compressed-filename>.tar.gz -C <target-directory-name>
   // -C: extract under this directory

// "Extract" but strip the top-level directory from the archive, so as to rename the top directory
$ tar xzfv <compressed-filename>.tar.gz -C <target-directory-name> --strip-components=1

// "List" contents of a compressed archive
$ tar tzvf <compressed-filename>.tar.gz
   // Option "t" to list the table of contents
Notes: to process .tar files without gzip compression (instead of .tar.gz), use the above commands minus the 'z' option.
gzip/gunzip Compression
gzip/gunzip (GNU zip) is an older compression utility. The resultant file type is .gz. gzip is still the most popular form for software distribution over the Internet. The man pages are also kept in gzip format. For example,
bzip2/bunzip2 Compression
bzip2/bunzip2 is a newer compression utility, which is more efficient than gzip, but not as popular. The resultant file type is .bz2. For example,
$ bzip2 -v listing.txt      // Compress to listing.txt.bz2 (-v for verbose)
$ bunzip2 listing.txt.bz2   // Uncompress
Processes (ps)
Unix is a multi-process, multi-user operating system. It supports many processes concurrently.
You can use ps to list all the processes:
$ ps          // Print processes of current user
$ ps -e       // Print all processes
$ ps -ef      // Print all processes in full-listing
$ ps aux      // Same as above (in old BSD options)

// Search for processes
$ ps aux | grep mysqld   // Print MySQL server process
$ ps -ef | grep mysqld   // same as above
$ ps -ef | grep tomcat
$ ps -ef | grep $USER   // of current user, same as ps -f
[TODO] pid, Sample full-listing of ps
To terminal a process, you can issue kill command with the process ID, or job ID.
$ kill pid      // Kill a particular possess with the given processID
$ kill -9 pid   // Force kill
top Command
The top command display the top processes. You can press "k" and enter the process ID (PID) to kill a process.
Foreground and Background Processes
You can have only one foreground process (that interacts with you) in a terminal session. But you can have many background processes (not interacting with you).
To run a non-interactive job in the background, append an & at the end of the command, e.g.,
$ ls -alR > listing.txt &
$ ls -l | lpr &
You can suspend a foreground job by pressing the crtl-z. Use command jobs to display all the suspended jobs (with the job number). To bring a background (or suspended) job to foreground, use "fg JobNumber" or "fg PID".
Example,
$ yes    // Print y repeatedly until killed
y
y
ctrt-z                  // Suspend the job
[1]+ Stopped  yes       // [n] is the job number

$ jobs    // Show all jobs
[1]+ Stopped  yes

$ ps     // Show all processes
  PID TTY          TIME CMD
21877 pts/1    00:00:00 bash
22689 pts/1    00:00:00 yes
22735 pts/1    00:00:00 ps

$ fg %1    // Bring Job number 1 to foreground (or use PID)
y
y
ctrt-z
[1]+ Stopped  yes

$ kill %1
// OR
$ kill -9 22689
Scheduling Tasks
Three commands: at, batch and cron.
at
batch
cron
[TODO]
Shell Programming
Startup Files
When a shell starts, it runs a series of startup files, to initialize itself. The "login" shell executes commands in /etc/profile, ~/.bash_profile, ~/.bash_login and ~/.profile, in the order shown. After that, any interactive "non-login" shell also executes commands in /etc/bashrc and ~/.bashrc ("rc" stands for run commands). Startup files /etc/profile and /etc/bashrc are applicable to all users, whereas startup in the user's home directory is applicable to the current login user. /etc/bashrc and ~/.bashrc may run multiple times.
You should set the PATH in /etc/profile (all users) or ~/.bash_profile or ~/.profile (login user), as /etc/bashrc and ~/.bashrc may run multiple times, and not suitable for commands such as "PATH=$PATH:.". PATH is typically set and exported in /etc/profile, and it can be modified subsequently and does not need to be exported again.
[TODO] /etc/environment
Local Shell Variables and Global Environment Variables
You can define variables in shell. There are two type of shell variables:
- Local variables that are only available within the current shell.
- Global variables or environment variables that are available to all shells and programs that forked from this shell. The convention is to use uppercase for environment variables, e.g., PATH, HOME.
The following commands are valid on Bash Shell (under Ubuntu and Mac OS X). For other shells, check the documentation.
Set/Unset a Local Variable
$ varname=value     // Set a local variable, no space before and after "="
$ varname="value"   // Double quotes needed if the value contains space
$ varname=          // Remove (Unset) a local variable by setting it to nothing
Set an Environment Variable
$ export varname=value    // Set the varname to value and export varname to the environment
$ export varname="value"  // Double quote needed if value contains space
Display ALL Environment Variables
$ printenv
$ env       // same as above
Display a Local Variable
$ echo $varname // also work for environment variable
Display a Environment Variable
$ printenv varname
$ echo $varname
Special System's Environment Variables
- HOME: contains your home directory.
- PATH: contains the list of search paths for executing programs (defined in
/etc/profile). - PWD: Full path of current working directory (OLDPWD for the previous working directory).
- USER: Current login username.
- SHELL: Current shell, e.g., /bin/bash
- [TODO]
PATH
When you issue a command (or run a program) in a shell, without specifying its full-path, the shell searches for the command or executable program from all the directories listed in the PATH environment variable. It returns message "bash: xxx: command not found", if the command or executable program cannot be found in any directory listed in the PATH.
Current Working Directory and PATH
By default, Unix does not include the current working directory in the PATH (unlike Windows). Hence, if you try to run a program stored in the current directory without specifying its path, you will get the error "command not found". This is because the current working directory is not searched.
$ program-name
bash: program-name: command not found
Hence, to run a program stored in the current working directory, you need to specify its path (either relative or absolute) as follows:
$ ./program-name // Specify a relative path to the program
Alternatively, you can include the current working directory in the PATH environment variable, via:
export PATH=.:$PATH // Append current working directory in front of the existing PATH
Setting PATH Permanently
You can set the PATH permanently by placing the additional PATH at the end of /etc/profile (for all users); or ~/.profile, ~/.bash_profile (for current user). For example,
# Include current working directory
# Use $PATH to refer to the existing PATH
# Path entries separated by colon (:)
export PATH=.:$PATH

# More paths
export PATH=~/bin:/usr/local/mysql/bin:$PATH
source or dot (.) Command
After you edited a startup file, instead of logging out and logging in again, you can use the source or dot (.) command to re-run the startup file.
$ echo $PATH
$ source filename    // Run the startup file
$ . filename         // Same as above
$ echo $PATH         // Display PATH
File Descriptors and Redirection
Unix opens three file descriptors for each program: 0 for standard input, 1 for standard output and 2 for standard error. The output redirection > is short for 1>; while input redirection < is short for 0<. To redirect standard error, use 2>. To combine standard output and standard error, use &>.
Shell Script
Begin with a #!/bin/bash (called Hash-Bang or She-Bang), which identifies the shell to run the script.
Set it to executable (otherwise, you will get an error "permission denied"):
$ chmod u+x script-name   // u+x (user-owner executable)
                          // g+x (group-owner executable)
                          // a+x (all executable)
                          // +x (same as uga+x)
Unix's Tools & Utilities
Console-Based Editor vim (or vi)
The vim is an improved version of the classical vi (visual) text editor. Launch via "vim <filename>", or "vi <filename>".
vim (or vim) operates in two mode: insert mode (for text editing) and command mode (for issuing commands such as quit and save).
- Press "
i" to enter insert mode and start editing. - Press ESC to return to command mode.
The frequently-used commands in command-mode are:
- "
:q" to quit; ":q!" to quit without saving. - "
:w" to write (save); ":w filename" to save to the filename. - "
:s/foo/bar/g" to replace bar with foo for the current line, all occurrences (with option g, you can also use option c to ask for comfirmation, and i for case-insensitive). - "
:%s/foo/bar/gci" to replace bar with foo for the all line (option g for global, option c to ask for comfirmation, and option i for case-insensitive). :/wordto search forward and:?wordto search backward.
You could run vimtutor to learn about vim.
emacs
The comprehensive GNU emacs editing environment.
[TODO] more
ssh and scp
To access and manage a remote Unix server, you need ssh and scp. ssh (secure shell) is used for remote login; while scp (secure copy) is used for remote file copy/transfer.
// To login to a remote server:
$ ssh <user>@<hostname>

// To copy/transfer files between local/remote machines:
$ scp -r <src> <dest>
   // -r: recursive to include sub-directories
   // src, dest: <user>@<hostname>:file-dir-name
On Windows' client, you could use the more friendly Graphical Putty (for ssh) and WinSCP (for scp).
[TODO] grep, awk, diff.
Tips and Tricks
Using Terminal
These are important shortcut key in Terminal:
- Tab to auto-complete filename or directory name (type the first few characters and press tab to auto-complete.)
- Ctrl+U to delete all characters before Cursor (effectively clear command-line)
- Ctrl+K to delete all characters after Cursor
- Ctrl+A is to go to the beginning of the line.
- Up/Down arrow keys to retrieve command from history.
Refreshing Log file
$ tail -f <filename>
      // Display refreshes if there are new entries

$ less <filename>
$ head <filename>
$ tail <filename>
Installing Software from Source Distribution
- Download the source tarball (
.tar,.tar.gz,.tar.bz2), and extract into folders.$ cd ...... $ mkdir source $ cd source $ tar xvf source-tarball
- Read the installation instruction, typically in a text file called README or INSTALL.
- Run
configurescript to create themakefile:$ ./configure
- Run the makefile to compile the software:
$ make
$ sudo make install
$ make cleanup
- To remove the software, run:
$ sudo make uninstall
Find files from Folders
Use the find command. See section "find, locate and grep".
Remove Non-empty Directory
// CAUTION: THERE IS NO UNDO!

// Try these in sequence:
$ rm -r <dir-name>
   // -r: recursive

$ sudo rm -r <dir-name>
   // Add sudo to overcome permission

$ sudo rm -rfv <dir-name>
   // -f: force, do not prompt
   // -v: verbose
Miscellaneous
Change Computer Name
To change your computer name:
- Edit
/etc/hostname. - Make the same changes in
/etc/hosts. - Run
sudo service hostname restart, orsudo /etc/init.d/hostname restart, or restart your bash shell, or restart your machine, for the new computer name to take effect.
REFERENCES & RESOURCES
[TODO]