JDK demo includes a folder "jfc", which has many interesting demo on Swing and Java2D.
More on Swing's JComponents
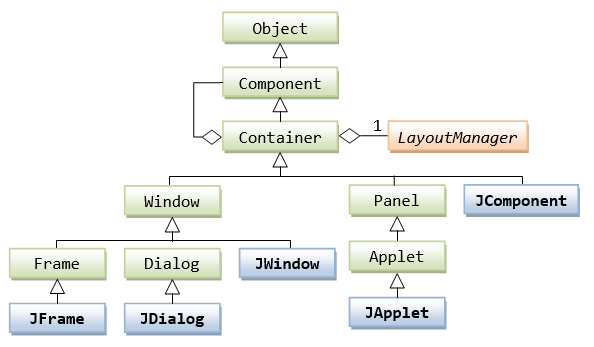
The class hierarchy of Swing's top-level containers (JFrame, JDialog, JApplet) are as follows. These top-level Swing containers are heavyweight, that rely on the underlying windowing subsystem of the native platform.
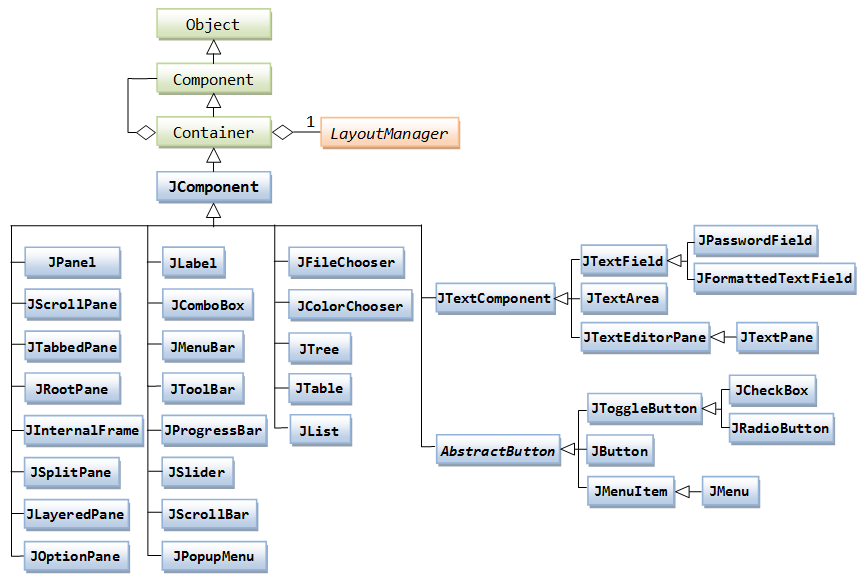
The class hierarchy of Swing's JComponents is as follows. JComponent and its descendants are lightweight components.
ImageIcon

Many Swing's JComponents (such as JLabel and JButton) support a text label and an image icon. For example, the figure shows three buttons: one with text label, one with an image icon, and one with both text and icon.
The javax.swing.ImageIcon class models an image icon. An ImageIcon is a fixed-size picture, typically small, and mainly used for decorating GUI components. The ImageIcon class implements javax.swing.Icon interface, and hence, often upcasted and referenced as Icon.
To construct an ImageIcon, provide the image filename or URL. Image file type of GIF, PNG, JPG and BMP are supported. For example,
// Construct an ImageIcon from an image filename
String imgFilename = "images/duke.png";
      // Can use an absolute filename such as "c:/project/images/nought.gif"
ImageIcon iconDuke = new ImageIcon(imgFilename);

// OR
// Construct an ImageIcon via an image URL (in the form of file://path/filename)
ImageIcon iconDuke = null;
String imgFilename = "images/duke.png";
java.net.URL imgURL = getClass().getClassLoader().getResource(imgFilename);
      // Filename always relative to the root of the project (i.e., bin)
      // can access resource in a JAR file
if (imgURL != null) {
   iconDuke = new ImageIcon(imgURL);
} else {
   System.err.println("Couldn't find file: " + imgFilename);
}
Using URL is more flexible as it can access resources in a JAR file, and produces an error message if the file does not exist (which results in a null URL).
Many JComponents (such as JLabel, JButton) accepts an ImageIcon in its constructor, or via the setIcon() method. For example,
ImageIcon iconDuke = null;
String imgFilename = "images/duke.gif";  // relative to project root (or bin)
URL imgURL = getClass().getClassLoader().getResource(imgFilename);
if (imgURL != null) {
   iconDuke =  new ImageIcon(imgURL);
} else {
   System.err.println("Couldn't find file: " + imgFilename);
}

JLabel lbl = new JLabel("The Duke", iconDuke, JLabel.CENTER);
lbl.setBackground(Color.LIGHT_GRAY);
lbl.setOpaque(true);

Container cp = getContentPane();
cp.add(lbl);
An ImageIcon uses an java.awt.Image object to hold the image data. You can retrieve this Image object via the ImageIcon's getImage() method. The Image object is used in the drawImage() method for custom drawing (which shall be discussed later).
Setting the Appearances and Properties of JComponents
Most of the Swing Components supports these features:
- Text and icon.
- Keyboard short-cut (called mnemonics), e.g., activated via the "Alt" key in Windows System.
- Tool tips: display when the mouse-pointer pauses on the component.
- Look and feel: customized appearance and user interaction for the operating platform.
- Localization: different languages for different locale.
All JComponents (such as JPanel, JLabel, JTextField and JButton) support these set methods to set their appearances and properties:
// javax.swing.JComponent
public void setBackground(Color bgColor)
   // Sets the background color of this component
public void setForeground(Color fgcolor)
   // Sets the foreground (text) color of this component
public void setFont(Font font)
   // Sets the font used by this component
public void setBorder(Border border)
   // Sets the border for this component
public void setPreferredSize(Dimension dim)
public void setMaximumSize(Dimension dim)
public void setMinimumSize(Dimension dim)
   // Sets the preferred, maximum or minimum size of this component.
public void setOpaque(boolean isOpaque)
   // If true (opaque), fill the background with background color;
   // otherwise, enable transparent background.
   // Most of the JComponents have default of true, except JLabel.
public void setToolTipText(String toolTipMsg)
   // Sets the tool-tip message, to be displayed when the mouse-pointer pauses over the component.
Swing's JLabel and buttons (AbstractButton subclasses): support both text and icon, which can be specified in the constructor or via the setters.
// javax.swing.JLabel, javax.swing.AbstractButton
public void setText(String strText)
   // Set the text
public void setIcon(Icon defaultIcon)
   // Set the button's default icon (you can have different icons for "pressed" and "disabled" states)
public void setHorizontalAlignment(int alignment)
   // Set the horizontal alignment of icon and text
   // SwingConstants.RIGHT, SwingConstants.LEFT, SwingConstants.CENTER
public void setVerticalAlignment(int alignment)
   // Set the vertical alignment of icon and text,
   // SwingConstants.TOP, SwingConstants.BOTTOM, SwingConstants.CENTER
public void setHorizontalTextPosition(int textPosition)
   // Set the horizontal text position relative to icon
   // SwingConstants.RIGHT, SwingConstants.LEFT, SwingConstants.CENTER, SwingConstants.LEADING, SwingConstants.TRAILING.
public void setVerticalTextPosition(int textPosition)
   // Set the vertical text position relative to icon
   // SwingConstants.TOP, SwingConstants.BOTTOM, SwingConstants.CENTER
JTextField supports:
// javax.swing.JTextField, javax.swing.JLabel, javax.swing.AbstractButton
public void setHorizontalAlignment(int alignment)
   // Set the text's horizontal alignment: JTextField.LEFT, JTextField.CENTER
   //    JTextField.RIGHT, JTextField.LEADING, JTextField.TRAILING
   // No setVerticalAlignment as text field is single-line
Swing's buttons support mnemonic (to be triggered via keyboard short-cut with alt key).
// javax.swing.AbstractButton
public void setMnemonic(int mnemonic)
   // Set the keyboard mnemonic (i.e., the alt short-cut key).
   // Use KeyEvent.VK_xxx to specify the key.
Example
This example creates 3 JComponents: a JLabel, a JTextField and a JButton, and sets their appearances (background and foreground colors, font, preferred size and opacity). It also sets the horizontal text alignment for the JTextField.
Images:


1 2 3 4 5 6 7 8 9 10 11 12 13 14 15 16 17 18 19 20 21 22 23 24 25 26 27 28 29 30 31 32 33 34 35 36 37 38 39 40 41 42 43 44 45 46 47 48 49 50 51 52 53 54 55 56 57 58 59 60 61 62 63 64 65 66 67 68 69 70 71 72 73 74 75 76 77 78 79 80 81 82 83 84 85 86 87 88 89 90 91 92 |
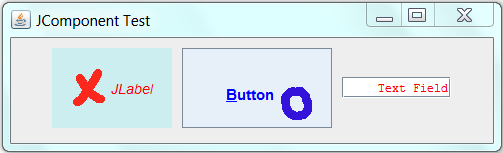
import java.awt.*; import java.awt.event.*; import java.net.URL; import javax.swing.*; /** Test setting Swing's JComponents properties and appearances */ @SuppressWarnings("serial") public class SwingJComponentSetterTest extends JFrame { // Image path relative to the project root (i.e., bin) private String imgCrossFilename = "images/cross.gif"; private String imgNoughtFilename = "images/nought.gif"; /** Constructor to setup the GUI */ public SwingJComponentSetterTest() { // Prepare ImageIcons to be used with JComponents ImageIcon iconCross = null; ImageIcon iconNought = null; URL imgURL = getClass().getClassLoader().getResource(imgCrossFilename); if (imgURL != null) { iconCross = new ImageIcon(imgURL); } else { System.err.println("Couldn't find file: " + imgCrossFilename); } imgURL = getClass().getClassLoader().getResource(imgNoughtFilename); if (imgURL != null) { iconNought = new ImageIcon(imgURL); } else { System.err.println("Couldn't find file: " + imgNoughtFilename); } Container cp = getContentPane(); cp.setLayout(new FlowLayout(FlowLayout.CENTER, 10, 10)); // Create a JLabel with text and icon and set its appearances JLabel label = new JLabel("JLabel", iconCross, SwingConstants.CENTER); label.setFont(new Font(Font.DIALOG, Font.ITALIC, 14)); label.setOpaque(true); // needed for JLabel to show the background color label.setBackground(new Color(204, 238, 241)); // light blue label.setForeground(Color.RED); // foreground text color label.setPreferredSize(new Dimension(120, 80)); label.setToolTipText("This is a JLabel"); // Tool tip cp.add(label); // Create a JButton with text and icon and set its appearances JButton button = new JButton(); // use setter to set text and icon button.setText("Button"); button.setIcon(iconNought); button.setVerticalAlignment(SwingConstants.BOTTOM); // of text and icon button.setHorizontalAlignment(SwingConstants.RIGHT); // of text and icon button.setHorizontalTextPosition(SwingConstants.LEFT); // of text relative to icon button.setVerticalTextPosition(SwingConstants.TOP); // of text relative to icon button.setFont(new Font(Font.SANS_SERIF, Font.BOLD, 15)); button.setBackground(new Color(231, 240, 248)); button.setForeground(Color.BLUE); button.setPreferredSize(new Dimension(150, 80)); button.setToolTipText("This is a JButton"); button.setMnemonic(KeyEvent.VK_B); // can activate via Alt-B (buttons only) cp.add(button); // Create a JTextField with text and icon and set its appearances JTextField textField = new JTextField("Text Field", 15); textField.setFont(new Font(Font.DIALOG_INPUT, Font.PLAIN, 12)); textField.setForeground(Color.RED); textField.setHorizontalAlignment(JTextField.RIGHT); // Text alignment textField.setToolTipText("This is a JTextField"); cp.add(textField); setDefaultCloseOperation(JFrame.EXIT_ON_CLOSE); setTitle("JComponent Test"); setLocationRelativeTo(null); // center window on the screen setSize(500, 150); // or pack() setVisible(true); // Print description of the JComponents via toString() System.out.println(label); System.out.println(button); System.out.println(textField); } /** The entry main() method */ public static void main(String[] args) { // Run the GUI codes on Event-Dispatching thread for thread safety SwingUtilities.invokeLater(new Runnable() { @Override public void run() { new SwingJComponentSetterTest(); // Let the constructor do the job } }); } } |
javax.swing.JLabel[, 41, 10, 120x80, alignmentX=0.0, alignmentY=0.0, border=, flags=25165832,
      maximumSize=, minimumSize=, preferredSize=java.awt.Dimension[width=120,height=80],
      defaultIcon=file:.../cross.gif, disabledIcon=,
      horizontalAlignment=CENTER, horizontalTextPosition=TRAILING,
      iconTextGap=4, labelFor=, text=JLabel, verticalAlignment=CENTER, verticalTextPosition=CENTER]
javax.swing.JButton[, 171, 10, 150x80, alignmentX=0.0, alignmentY=0.5,
      border=javax.swing.plaf.BorderUIResource$CompoundBorderUIResource@c5e2cf, flags=424,
      maximumSize=, minimumSize=, preferredSize=java.awt.Dimension[width=150,height=80],
      defaultIcon=file:/.../nought.gif, disabledIcon=, disabledSelectedIcon=,
      margin=javax.swing.plaf.InsetsUIResource[top=2,left=14,bottom=2,right=14],
      paintBorder=true, paintFocus=true, pressedIcon=, rolloverEnabled=true, rolloverIcon=,
      rolloverSelectedIcon=, selectedIcon=, text=Button, defaultCapable=true]
javax.swing.JTextField[, 331, 39, 109x21, layout=javax.swing.plaf.basic.BasicTextUI$UpdateHandler,
      alignmentX=0.0, alignmentY=0.0, border=javax.swing.plaf.BorderUIResource$CompoundBorderUIResource@1991de1,
      flags=296, maximumSize=, minimumSize=, preferredSize=,
      caretColor=sun.swing.PrintColorUIResource[r=51,g=51,b=51],
      disabledTextColor=javax.swing.plaf.ColorUIResource[r=184,g=207,b=229], editable=true,
      margin=javax.swing.plaf.InsetsUIResource[top=0,left=0,bottom=0,right=0],
      selectedTextColor=sun.swing.PrintColorUIResource[r=51,g=51,b=51],
      selectionColor=javax.swing.plaf.ColorUIResource[r=184,g=207,b=229],
      columns=15, columnWidth=7, command=, horizontalAlignment=RIGHT]
The above clearly showed that there are many more properties that can be controlled.
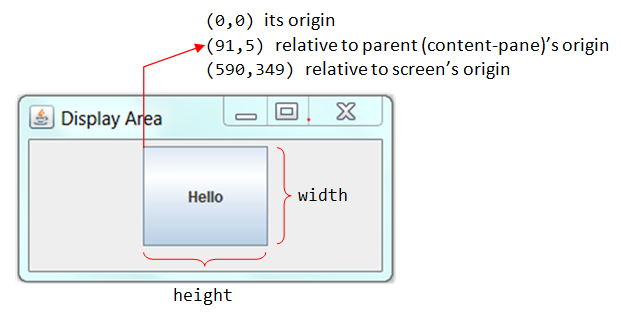
Display Area, Border and Insets
Display Area
You can use the following get methods to get the dimensions of the display area of a JComponent. Each component maintains its own co-ordinates with origin (top-left corner) at (0, 0), width and height. You can also get the origin (x, y) relative to its parent or the screen.
public int getWidth()
public int getHeight()
public Dimension getSize()
   // Get the current width or height of the component, measured in pixels.
   // The getSize() returns width and height in a Dimension object.
public int getX()
public int getY()
public Point getLocation()
   // Get the component's current origin (x, y) relative to the
   //  parent's (e.g., JPanel or JFrame) upper-left corner, measured in pixels.
   // The getLocation() returns the (x, y) in a Point object.
public Point getLocationOnScreen()
   // Get the component's current origin (x, y) relative to the screen
For example:
1 2 3 4 5 6 7 8 9 10 11 12 13 14 15 16 17 18 19 20 21 22 23 24 25 26 27 28 29 30 |
import java.awt.*;
import javax.swing.*;

public class TestSize {
   public static void main(String[] args) {
      JFrame frame = new JFrame("Display Area");
      Container cp = frame.getContentPane();
      cp.setLayout(new FlowLayout());
      JButton btnHello = new JButton("Hello");
      btnHello.setPreferredSize(new Dimension(100, 80));
      cp.add(btnHello);

      frame.setDefaultCloseOperation(JFrame.EXIT_ON_CLOSE);
      frame.setSize(300, 150);  // or pack() the components
      frame.setLocationRelativeTo(null);  // center the application window
      frame.setVisible(true);             // show it

      System.out.println(btnHello.getSize());
      System.out.println(btnHello.getLocation());
      System.out.println(btnHello.getLocationOnScreen());

      System.out.println(cp.getSize());
      System.out.println(cp.getLocation());
      System.out.println(cp.getLocationOnScreen());

      System.out.println(frame.getSize());
      System.out.println(frame.getLocation());
      System.out.println(frame.getLocationOnScreen());
   }
}
|
java.awt.Dimension[width=100,height=80]   // JButton's getSize()
java.awt.Point[x=91,y=5]                  // JButton's getLocation()
java.awt.Point[x=590,y=349]               // JButton's getLocationOnScreen()

java.awt.Dimension[width=282,height=105]  // ContentPane's getSize()
java.awt.Point[x=0,y=0]                   // ContentPane's getLocation()
java.awt.Point[x=499,y=344]               // ContentPane's getLocationOnScreen()

java.awt.Dimension[width=300,height=150]  // JFrame's getSize()
java.awt.Point[x=490,y=308]               // JFrame's getLocation()
java.awt.Point[x=490,y=308]               // JFrame's getLocationOnScreen()
Border
Swing supports these border types (in package javax.swing.border), which can be applied to all JComponents:
EmptyBorder: empty, transparent border which takes up space but does no drawing.LineBorder: line border of arbitrary thickness and of a single color.TitledBorder: with the addition of aStringtitle in a specified position and justification.StrokeBorder: border of an arbitrary stroke.BevelBorder: two-line bevel border.SoftBevelBorder: raised or lowered bevel with softened corners.EtchedBorder: etched-in or etched-out with highlight/shadow.MatteBorder: matte-like border of either a solid color or a tiled icon.CompoundBorder: compose twoBorders - inner and outer.
To set a border to a JComponent, the easier way is to choose a static method from the BorderFactory class (instead of using the constructor of the Border class). For example,
JPanel panel = new JPanel();
panel.setBorder(BorderFactory.createLineBorder(Color.CYAN, 15));
   // Set border to line-border with the given color and thickness
The BorderFactory class provides these static methods to create borders:
public static Border createLineBorder(Color color, [int thickness, boolean rounded])
   // Creates a line border with the specified color, thickness, and corner shape.
public static Border createEmptyBorder([int top, int left, int bottom, int right])
   // Creates an "empty" border with the given width of the top, left, bottom, and right sides.
public static TitledBorder createTitledBorder(String title)
   // Creates a new titled border with the specified title.
public static TitledBorder createTitledBorder(Border border, [String title,
      int titleJustification, int titlePosition, Font titleFont, Color titleColor])
   // Adds a title to an existing border, with the specified positioning, font and color.
public static CompoundBorder createCompoundBorder([Border outsideBorder, Border insideBorder])
   // Creates a compound border specifying the border objects to use for the outside and inside edges.
MORE: Refer to the API
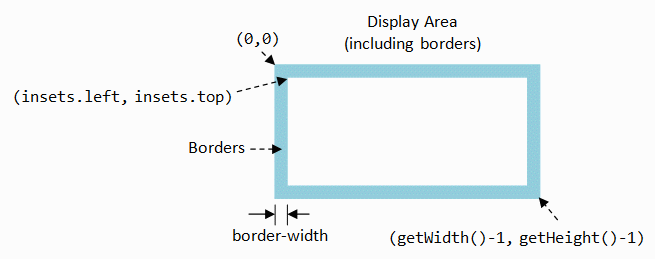
Borders are included into the display area of a JComponent as illustrated.
To exclude the border, you could use the method getInSets() to retrieve the 4 borders in an Insets object (says insets), and use insets.left, insets.right, insets.top, and insets.bottom to retrieve the width of the 4 borders. For example,
// Continue from previous example
Insets insets = frame.getInsets();
System.out.println(insets);
   // java.awt.Insets[top=36,left=9,bottom=9,right=9]
int realWidth = frame.getWidth() - insets.left - insets.right;
int realHeight = frame.getHeight() - insets.top - insets.bottom;
System.out.println("real width = " + realWidth);    // real width = 282
System.out.println("real height = " + realHeight);  // real height = 105
Example
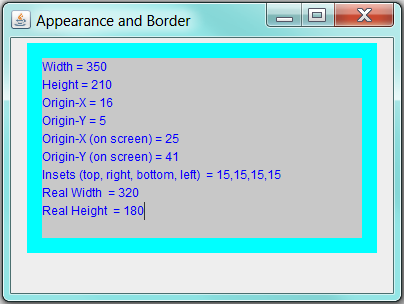
This example illustrates the display area, border and the various dimension.
1 2 3 4 5 6 7 8 9 10 11 12 13 14 15 16 17 18 19 20 21 22 23 24 25 26 27 28 29 30 31 32 33 34 35 36 37 38 39 40 41 42 43 44 45 46 47 48 49 50 51 |
import java.awt.*; import javax.swing.*; // A Swing application inherits from top-level container javax.swing.JFrame public class TestDisplayAreaAndBorder extends JFrame { /** Constructor to setup the GUI */ public TestDisplayAreaAndBorder() { Container cp = getContentPane(); cp.setLayout(new FlowLayout()); JTextArea comp = new JTextArea(10, 25); // row and columns comp.setBackground(new Color(200, 200, 200)); comp.setForeground(Color.BLUE); comp.setBorder(BorderFactory.createLineBorder(Color.CYAN, 15)); // set border to line-border with the given color and thickness comp.setPreferredSize(new Dimension(350, 200)); cp.add(comp); setDefaultCloseOperation(JFrame.EXIT_ON_CLOSE); setTitle("Appearance and Border"); setSize(400, 300); setVisible(true); StringBuffer msg = new StringBuffer(); msg.append("Width = " + comp.getWidth()); msg.append("\nHeight = " + comp.getHeight()); msg.append("\nOrigin-X = " + comp.getX()); msg.append("\nOrigin-Y = " + comp.getY()); msg.append("\nOrigin-X (on screen) = " + comp.getLocationOnScreen().x); msg.append("\nOrigin-Y (on screen) = " + comp.getLocationOnScreen().y); Insets insets = comp.getInsets(); msg.append("\nInsets (top, right, bottom, left) = " + insets.top + "," + insets.right + "," + insets.bottom + "," + insets.left); msg.append("\nReal Width = " + (comp.getWidth() - insets.left - insets.right)); msg.append("\nReal Height = " + (comp.getHeight() - insets.top - insets.bottom)); comp.setText(msg.toString()); } /** The entry main() method */ public static void main(String[] args) { // Run the GUI codes on Event-Dispatching thread for thread safety SwingUtilities.invokeLater(new Runnable() { @Override public void run() { new TestDisplayAreaAndBorder(); // Let the constructor do the job } }); } } |
Positioning Your Application Window
You can position your main application window (JFrame), or top-level container, on the screen, via:
// Set methods (in java.awt.Window)
// (x, y) specifies the origin (top-left corner) of the window on the screen
public void setSize(int width, int height)
public void setLocation(int x, int y)
public void setBounds(int x, int y, int width, int height)
public void setSize(Dimension dim)
public void setLocation(Point origin)
public void setBounds(Rectangle r)   // JDK 1.6

// The associated get methods (in java.awt.Component) are:
public int getWidth()
public int getHeight()
public int getX()
public int getY()
public Dimension getSize()
public Point getLocation()
public Rectangle getBounds()
   // No setX(), setY(), setWidth(), setHeight()
You can get the screen size via static method Toolkit.getDefaultToolkit().getScreenSize(). For example,
Dimension dim = Toolkit.getDefaultToolkit().getScreenSize();  // Get the screen dimension
int screenWidth = dim.width;
int screenHeight = dim.height;
You can also run your application in full-screen mode (with or without decorations such as title bar), instead of window-mode. Read "Swing How-To".
A quick way to center your application on the screen is to use setLocationRelativeTo(null):
setSize(WINDOW_WIDTH, WINDOW_HEIGHT); // or pack() the components
setLocationRelativeTo(null);  // center the window on the screen
                              // shall be run after setSize()
setVisible(true);             // show it
Text Components: JTextField, JTextArea, JEditorPane
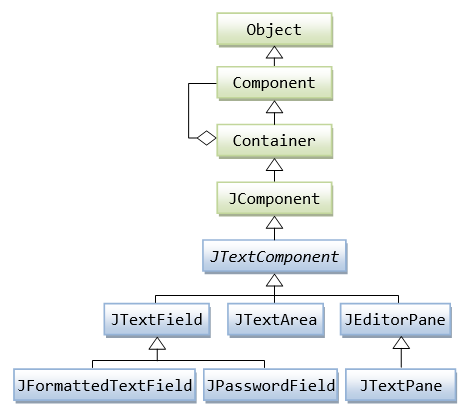
Swing provides 6 text components, as shown in the above class diagram. All text components extends from JTextComponent.
JTextField,JPasswordField,JFormattedTextField: For displaying only one line of editable text. Like buttons, they triggerActionEventwhen user hits the "enter" key.JTextArea: Plain text area for displaying multiple lines of editable text, unformatted. All the texts are in the same font.JEditorPane,JTextPane: A styled text area which can use more than one font. They support embedded images and embedded components.JEditorPanecan load HTML-formatted text from a URL.
Example: JTextField, JPasswordField, JFormattedTextField, and JTextArea
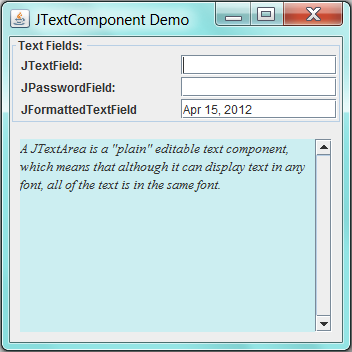
This example illustrates single-line JTextField, JPasswordField, JFormattedField, and multi-line JTextArea wrapped inside an JScrollPane.
1 2 3 4 5 6 7 8 9 10 11 12 13 14 15 16 17 18 19 20 21 22 23 24 25 26 27 28 29 30 31 32 33 34 35 36 37 38 39 40 41 42 43 44 45 46 47 48 49 50 51 52 53 54 55 56 57 58 59 60 61 62 63 64 65 66 67 68 69 70 71 72 73 74 75 76 77 78 79 80 81 82 83 84 |
import java.awt.*; import java.awt.event.*; import javax.swing.*; /** Test JTextField, JPasswordField, JFormattedTextField, JTextArea */ @SuppressWarnings("serial") public class JTextComponentDemo extends JFrame { // Private variables of the GUI components JTextField tField; JPasswordField pwField; JTextArea tArea; JFormattedTextField formattedField; /** Constructor to set up all the GUI components */ public JTextComponentDemo() { // JPanel for the text fields JPanel tfPanel = new JPanel(new GridLayout(3, 2, 10, 2)); tfPanel.setBorder(BorderFactory.createTitledBorder("Text Fields: ")); // Regular text field (Row 1) tfPanel.add(new JLabel(" JTextField: ")); tField = new JTextField(10); tfPanel.add(tField); tField.addActionListener(new ActionListener() { @Override public void actionPerformed(ActionEvent e) { tArea.append("\nYou have typed " + tField.getText()); } }); // Password field (Row 2) tfPanel.add(new JLabel(" JPasswordField: ")); pwField = new JPasswordField(10); tfPanel.add(pwField); pwField.addActionListener(new ActionListener() { @Override public void actionPerformed(ActionEvent e) { tArea.append("\nYou password is " + new String(pwField.getPassword())); } }); // Formatted text field (Row 3) tfPanel.add(new JLabel(" JFormattedTextField")); formattedField = new JFormattedTextField(java.util.Calendar .getInstance().getTime()); tfPanel.add(formattedField); // Create a JTextArea tArea = new JTextArea("A JTextArea is a \"plain\" editable text component, " + "which means that although it can display text " + "in any font, all of the text is in the same font."); tArea.setFont(new Font("Serif", Font.ITALIC, 13)); tArea.setLineWrap(true); // wrap line tArea.setWrapStyleWord(true); // wrap line at word boundary tArea.setBackground(new Color(204, 238, 241)); // light blue // Wrap the JTextArea inside a JScrollPane JScrollPane tAreaScrollPane = new JScrollPane(tArea); tAreaScrollPane.setBorder(BorderFactory.createEmptyBorder(10, 10, 10, 10)); tAreaScrollPane.setVerticalScrollBarPolicy(JScrollPane.VERTICAL_SCROLLBAR_ALWAYS); // Setup the content-pane of JFrame in BorderLayout Container cp = this.getContentPane(); cp.setLayout(new BorderLayout(5, 5)); cp.add(tfPanel, BorderLayout.NORTH); cp.add(tAreaScrollPane, BorderLayout.CENTER); setDefaultCloseOperation(JFrame.EXIT_ON_CLOSE); setTitle("JTextComponent Demo"); setSize(350, 350); setVisible(true); } /** The entry main() method */ public static void main(String[] args) { // Run GUI codes in Event-Dispatching thread for thread safety SwingUtilities.invokeLater(new Runnable() { @Override public void run() { new JTextComponentDemo(); // Let the constructor do the job } }); } } |
JPasswordField
Use getPassword() to get the password entered in a char[]. [TODO: Security Issues]
JFormattedTextField (Advanced)
[TODO]
JTextArea wrapped in a JScrollPane
It is common to wrap a JTextArea inside a JScrollPane, so as to scroll the text area (horizontally or vertically). To do so, allocate a JScrollPane with the JTextArea as the argument.
JTextArea tArea = new JTextArea(...);  // Allocate JTextArea
JScrollPane tAreaScrollPane = new JScrollPane(tArea);  // Allocate JScrollPane which wraps the JTextArea
tAreaScrollPane.setVerticalScrollBarPolicy(...);       // Configure vertical scroll bar
tAreaScrollPane.setHorizontalScrollBarPolicy(...);     // Configure horizontal scroll bar
JTextArea's Properties
You can replace the document, or append or insert more text.
public void append(String str)
   // Append the str to the end of the document
public void replaceRange(String str, int startPos, int endPos)
   // Replace with the str from startPos to endPos position
public void insert(String str, int pos)
   // Insert the str after the specified position
JEditorPane as HTML Browser
You can use JEditorPane to display an HTML document (but no CSS and JavaScript). Again, it is common to wrap a JEditorPane inside a JScrollPane. For example,
JEditorPane editorPane = new JEditorPane();  // allocate a JEditorPane
editorPane.setEditable(false);
try {
   // Form a URL and display the HTML page on the editor-pane
   URL url = new URL("http://www3.ntu.edu.sg/home/ehchua/programming/index.html");
   editorPane.setPage(url);
} catch (MalformedURLException e) {
   e.printStackTrace();
} catch (IOException e) {
   e.printStackTrace();
}
// Wrap the JEditorPane inside a JScrollPane
JScrollPane editorScrollPane = new JScrollPane(editorPane);
editorScrollPane.setVerticalScrollBarPolicy(JScrollPane.VERTICAL_SCROLLBAR_ALWAYS);
setContentPane(editorScrollPane);
JTextPane (Advanced)
JTextPane is used for formatted styled text display; whereas JTextArea is used for plain text display. Although you can set the font and style for JTextArea, all the text is display in the same font. In JTextPane, you can set different fonts and styles for different sections of text.
You can use JTextPane for to develop an editor (such as NotePad or NotePad++) with different sections of text displayed in different fonts and colors.
Example: See Swing Tutorial's "Text Component Features". This is an excellent example that illustrates many features and concepts.
Text Component API: It provides many features, from cut and paste to changing the selected text. See Swing Tutorial's "Text Component API".
Buttons and ComboBox: JButton, JCheckBox, JRadioButton, JComboBox
Read: Swing Tutorial's "How to Use Buttons, Check Boxes, and Radio Buttons".
A user can click a button (or a menu item) to trigger a specific action. Swing supports mouse-less operations, where user could use a keyboard short-cut (called mnemonic) to activate the action.
Buttons and menu-items are inherited from AbstractButton, as shown in the class diagram.
You could place a text string (called button's label) as well as an icon on the button. You could use different icons for different button states: defaultIcon, disabledIcon, pressedIcon, selectedIcon, rolloverIcon, disabledSelectedIcon, rolloverSelectedIcon. The defaultIcon can be set via the constructor or setIcon() method. The other icons can be set via setXxxIcon() methods. You can set the alignment of text and button via setHorizontalAlignment() and setVerticalAlignment() methods. You can set the position of the text relative to the icon via setHorizontalTextPosition() and setVerticalTextPosition().
Swing supports many type of buttons.
Command Buttons: JButton
Click to fires an ActionEvent to all its registered ActionListeners.
Toggle Buttons: JRadioButton, JCheckBox, JToggleButton
Toggle buttons are two-state buttons: SELECTED or DESELECTED.
For radio button, you can choose none or one among the group. JRadioButtons are typically added into a ButtonGroup to ensure exclusive selection. JRadioButton fires ItemEvent to its ItemListeners. It also fires ActionEvent to its ActionListeners. Both ItemEvent and ActionEvent can be used.
For checkboxes, you can choose none or more among the group. JCheckBoxes fire ItemEvent as well as ActionEvent. We typically use ItemEvent as we may need to distinguish between item-states of SELECTED and DESELECTED.
The ItemListener (of ItemEvent) declares one abstract method itemStateChanged(ItemEvent e).
JComboBox
JComboBox can be used to provide a drop-down menu. It supports single-selection and multiple-selection. JComboBox receives a Object array (typically a String array), which provides the items in the drop-down list. JComboBox fires ItemEvent. We could use JComboBox's getSelectedIndex() to get the index of the selected item; or getSelectedItem() to get the selected Object. JComboBox also fires ActionEvent.
Example on JButton, JRadioButton and JComboBox
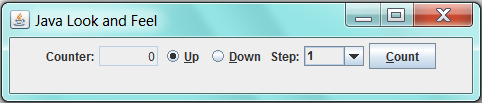
In this example, we shall modify our counter application to include two radio buttons for specifying counting up/down, and a combo-box to select the count-step size.
1 2 3 4 5 6 7 8 9 10 11 12 13 14 15 16 17 18 19 20 21 22 23 24 25 26 27 28 29 30 31 32 33 34 35 36 37 38 39 40 41 42 43 44 45 46 47 48 49 50 51 52 53 54 55 56 57 58 59 60 61 62 63 64 65 66 67 68 69 70 71 72 73 74 75 76 77 78 79 80 81 82 83 84 85 86 87 88 89 90 91 92 93 94 95 96 |
import java.awt.*; import java.awt.event.*; import javax.swing.*; /** Counter with JRadioButton and JComboBox */ @SuppressWarnings("serial") public class SwingCounterRadioCombo extends JFrame { private JTextField tfCount; private int count = 0; // counter's value private boolean countingUp = true; // counting up or down private int step = 1; // increment step size /** Constructor to setup the UI */ public SwingCounterRadioCombo () { Container cp = getContentPane(); cp.setLayout(new FlowLayout()); // Create JLabel and JTextField cp.add(new JLabel("Counter:")); tfCount = new JTextField("0", 5); tfCount.setEditable(false); tfCount.setHorizontalAlignment(JTextField.RIGHT); cp.add(tfCount); // Create JRadioButton for counting up and down JRadioButton rbUp = new JRadioButton("Up", true); rbUp.setMnemonic(KeyEvent.VK_U); cp.add(rbUp); rbUp.addActionListener(new ActionListener() { @Override public void actionPerformed(ActionEvent e) { countingUp = true; } }); JRadioButton rbDown = new JRadioButton("Down", true); rbDown.setMnemonic(KeyEvent.VK_D); cp.add(rbDown); rbDown.addActionListener(new ActionListener() { @Override public void actionPerformed(ActionEvent e) { countingUp = false; } }); // Setup a ButtonGroup to ensure exclusive selection ButtonGroup btnGp = new ButtonGroup(); btnGp.add(rbUp); btnGp.add(rbDown); // Create JComboBox for setting the count step size add(new JLabel("Step:")); final Integer[] steps = {1, 2, 3, 4, 5}; // auto-upcast final JComboBox<Integer> comboCount = new JComboBox<Integer>(steps); comboCount.setPreferredSize(new Dimension(60, 20)); cp.add(comboCount); comboCount.addItemListener(new ItemListener() { @Override public void itemStateChanged(ItemEvent e) { if (e.getStateChange() == ItemEvent.SELECTED) { step = (Integer)comboCount.getSelectedItem(); } } }); // Create JButton for "Count" JButton btnCount = new JButton("Count"); btnCount.setMnemonic(KeyEvent.VK_C); cp.add(btnCount); btnCount.addActionListener(new ActionListener() { @Override public void actionPerformed(ActionEvent e) { if (countingUp) { count += step; } else { count -= step; } tfCount.setText(count + ""); } }); setDefaultCloseOperation(JFrame.EXIT_ON_CLOSE); setTitle("Swing Counter with RadioButton & ComboBox"); setSize(480, 100); setVisible(true); } /** The entry main() method */ public static void main(String[] args) { // Run the GUI codes in the Event-Dispatching thread for thread-safety SwingUtilities.invokeLater(new Runnable() { @Override public void run() { new SwingCounterRadioCombo(); // Let the constructor do the job } }); } } |
Example on JRadioButton, JCheckBox and JComboBox
In this example, we have two groups of radio buttons: one group to set the horizontal alignment of the JLabel, and processed via ItemEvent; another group sets the vertical alignment and processed via ActionEvent.
1 2 3 4 5 6 7 8 9 10 11 12 13 14 15 16 17 18 19 20 21 22 23 24 25 26 27 28 29 30 31 32 33 34 35 36 37 38 39 40 41 42 43 44 45 46 47 48 49 50 51 52 53 54 55 56 57 58 59 60 61 62 63 64 65 66 67 68 69 70 71 72 73 74 75 76 77 78 79 80 81 82 83 84 85 86 87 88 89 90 91 92 93 94 95 96 97 98 99 100 101 102 103 104 105 106 107 108 109 110 111 112 113 114 115 116 117 118 119 120 121 122 123 124 125 126 127 128 129 130 131 132 133 134 135 136 137 138 139 140 141 142 143 144 145 146 147 148 149 150 151 152 153 154 155 156 157 158 159 160 161 162 163 164 165 166 167 168 169 170 171 172 173 174 175 176 177 178 179 180 181 182 183 184 185 186 187 188 |
import java.awt.*; import java.awt.event.*; import java.net.URL; import javax.swing.*; /** Test JRadioButton, JCheckBox and JComboBox */ @SuppressWarnings("serial") public class ButtonComboBoxDemo extends JFrame { // private variables of GUI components private JLabel lblForTest; private String imgCrossFilename = "images/cross.gif"; private String lblText = "Cross"; private Icon iconCross; private JRadioButton rbLeft, rbCenter, rbRight, rbTop, rbMiddle, rbBottom; private JCheckBox cbText, cbIcon; private JComboBox<String> comboColor; /** Constructor to setup the UI components */ public ButtonComboBoxDemo() { // Create a JLabel with text and icon for manipulation URL imgURL = getClass().getClassLoader().getResource(imgCrossFilename); if (imgURL != null) { iconCross = new ImageIcon(imgURL); } else { System.err.println("Couldn't find file: " + imgCrossFilename); } lblForTest = new JLabel(lblText, iconCross, SwingConstants.CENTER); lblForTest.setOpaque(true); lblForTest.setBackground(new Color(204, 238, 241)); lblForTest.setForeground(Color.RED); lblForTest.setFont(new Font(Font.SANS_SERIF, Font.ITALIC, 18)); // Create radio buttons for setting horizontal alignment of the JLabel rbLeft = new JRadioButton("Left"); rbLeft.setMnemonic(KeyEvent.VK_L); rbCenter = new JRadioButton("Center", true); // selected rbCenter.setMnemonic(KeyEvent.VK_C); rbRight = new JRadioButton("Right"); rbRight.setMnemonic(KeyEvent.VK_R); // Put the radio buttons into a ButtonGroup to ensure exclusive selection ButtonGroup btnGroupH = new ButtonGroup(); btnGroupH.add(rbLeft); btnGroupH.add(rbRight); btnGroupH.add(rbCenter); // Set up a JPanel to hold all radio buttons JPanel pnlRbtnH = new JPanel(new GridLayout(1, 0)); // single row pnlRbtnH.add(rbLeft); pnlRbtnH.add(rbCenter); pnlRbtnH.add(rbRight); pnlRbtnH.setBorder(BorderFactory.createTitledBorder("Horizontal Alignment")); // A ItemListener for all Radio buttons ItemListener listener = new ItemListener() { @Override public void itemStateChanged(ItemEvent e) { if (e.getStateChange() == ItemEvent.SELECTED) { if (e.getSource() == rbLeft) { lblForTest.setHorizontalAlignment(SwingConstants.LEFT); } else if (e.getSource() == rbCenter) { lblForTest.setHorizontalAlignment(SwingConstants.CENTER); } else if (e.getSource() == rbRight) { lblForTest.setHorizontalAlignment(SwingConstants.RIGHT); } } } }; rbLeft.addItemListener(listener); rbCenter.addItemListener(listener); rbRight.addItemListener(listener); // Create radio buttons for setting vertical alignment of the JLabel rbTop = new JRadioButton("Top"); rbTop.setMnemonic(KeyEvent.VK_T); rbMiddle = new JRadioButton("Middle", true); // selected rbMiddle.setMnemonic(KeyEvent.VK_M); rbBottom = new JRadioButton("Bottom"); rbBottom.setMnemonic(KeyEvent.VK_B); // Put the radio buttons into a ButtonGroup to ensure exclusive selection ButtonGroup btnGroupV = new ButtonGroup(); btnGroupV.add(rbTop); btnGroupV.add(rbMiddle); btnGroupV.add(rbBottom); // Set up a JPanel to hold all radio buttons JPanel pnlRbtnV = new JPanel(new GridLayout(1, 0)); // single row pnlRbtnV.add(rbTop); pnlRbtnV.add(rbMiddle); pnlRbtnV.add(rbBottom); pnlRbtnV.setBorder(BorderFactory.createTitledBorder("Vertical Alignment")); // Radio buttons also fire ActionEvent rbTop.addActionListener(new ActionListener() { @Override public void actionPerformed(ActionEvent e) { lblForTest.setVerticalAlignment(SwingConstants.TOP); } }); rbMiddle.addActionListener(new ActionListener() { @Override public void actionPerformed(ActionEvent e) { lblForTest.setVerticalAlignment(SwingConstants.CENTER); } }); rbBottom.addActionListener(new ActionListener() { @Override public void actionPerformed(ActionEvent e) { lblForTest.setVerticalAlignment(SwingConstants.BOTTOM); } }); // Create checkboxes for selecting text, icon, or both, or none cbText = new JCheckBox("Text", true); // selected cbText.setMnemonic(KeyEvent.VK_T); cbIcon = new JCheckBox("Icon", true); // selected cbIcon.setMnemonic(KeyEvent.VK_I); cbIcon.setSelected(true); // Set up a JPanel to hold all checkboxes JPanel pnlCbox = new JPanel(new GridLayout(0, 1)); // single column pnlCbox.add(cbText); pnlCbox.add(cbIcon); // Checkboxes fire ItemEvent. Use an anonymous inner class as ItemListener cbText.addItemListener(new ItemListener() { @Override public void itemStateChanged(ItemEvent e) { // Need to handle both SELECTED and DESELECTED if (e.getStateChange() == ItemEvent.SELECTED) { lblForTest.setText(lblText); } else { lblForTest.setText(""); } } }); cbIcon.addItemListener(new ItemListener() { @Override public void itemStateChanged(ItemEvent e) { // Need to handle both SELECTED and DESELECTED if (e.getStateChange() == ItemEvent.SELECTED) { lblForTest.setIcon(iconCross); } else { lblForTest.setIcon(null); } } }); // Create combobox (drop-down menu) for the foreground color of the JLabel String[] strColors = {"Red", "Blue", "Green", "Cyan", "Magenta", "Yellow", "Black"}; final Color[] colors = {Color.RED, Color.BLUE, Color.GREEN, Color.CYAN, Color.MAGENTA, Color.YELLOW, Color.BLACK}; comboColor = new JComboBox<String>(strColors); comboColor.addItemListener(new ItemListener() { @Override public void itemStateChanged(ItemEvent e) { if (e.getStateChange() == ItemEvent.SELECTED) { lblForTest.setForeground(colors[comboColor.getSelectedIndex()]); } } }); // Set up a JPanel for the combobox JPanel pnlCombo = new JPanel(new FlowLayout()); pnlCombo.add(comboColor); // Set up the content-pane with BorderLayout and adds the panels Container cp = this.getContentPane(); cp.setLayout(new BorderLayout()); cp.add(lblForTest, BorderLayout.CENTER); cp.add(pnlRbtnH, BorderLayout.NORTH); cp.add(pnlRbtnV, BorderLayout.SOUTH); cp.add(pnlCbox, BorderLayout.WEST); cp.add(pnlCombo, BorderLayout.EAST); setDefaultCloseOperation(JFrame.EXIT_ON_CLOSE); setTitle("Button and ComboBox Demo"); setSize(400, 300); // or pack() the components setLocationRelativeTo(null); setVisible(true); } /** The entry main() method */ public static void main(String[] args) { // Run GUI codes in the Event-Dispatching thread for thread safety SwingUtilities.invokeLater(new Runnable() { public void run() { new ButtonComboBoxDemo(); // Let the constructor do the job } }); } } |
Menu-Bar: JMenuBar, JMenu, JMenuItem
The menu-bar is at the same level as the content-pane (of the top-level container JFrame). It is set via the JFrame's setJMenuBar() method (similar to setContentPane()).
To create a menu-bar, construct a JMenuBar. A menu-bar (JMenuBar) contains menu (JMenu). A menu contains menu-item (JMenuItem). JMenuItem is a subclass of AbstractButton, similar to JButton. JMenuItem fires ActionEvent upon activation to all its registered ActionListener.
Example
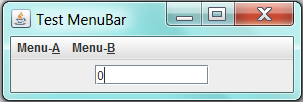
This menu-bar contains 2 menus (Menu-A and Menu-B). Menu-A contains 2 menu-items (Up and Down). Menu-B has 1 menu-item (Reset).
1 2 3 4 5 6 7 8 9 10 11 12 13 14 15 16 17 18 19 20 21 22 23 24 25 26 27 28 29 30 31 32 33 34 35 36 37 38 39 40 41 42 43 44 45 46 47 48 49 50 51 52 53 54 55 56 57 58 59 60 61 62 63 64 65 66 67 68 69 70 71 72 73 74 75 76 77 78 79 80 81 82 83 |
import java.awt.*; import java.awt.event.*; import javax.swing.*; /** Testing menu-bar of JFrame */ public class TestJMenuBar extends JFrame { JTextField display; int count = 0; /** Constructor to setup the GUI */ public TestJMenuBar() { // A menu-bar contains menus. A menu contains menu-items (or sub-Menu) JMenuBar menuBar; // the menu-bar JMenu menu; // each menu in the menu-bar JMenuItem menuItem; // an item in a menu menuBar = new JMenuBar(); // First Menu menu = new JMenu("Menu-A"); menu.setMnemonic(KeyEvent.VK_A); // alt short-cut key menuBar.add(menu); // the menu-bar adds this menu menuItem = new JMenuItem("Up", KeyEvent.VK_U); menu.add(menuItem); // the menu adds this item menuItem.addActionListener(new ActionListener() { @Override public void actionPerformed(ActionEvent e) { ++count; display.setText(count + ""); } }); menuItem = new JMenuItem("Down", KeyEvent.VK_D); menu.add(menuItem); // the menu adds this item menuItem.addActionListener(new ActionListener() { @Override public void actionPerformed(ActionEvent e) { --count; display.setText(count + ""); } }); // Second Menu menu = new JMenu("Menu-B"); menu.setMnemonic(KeyEvent.VK_B); // short-cut key menuBar.add(menu); // the menu bar adds this menu menuItem = new JMenuItem("Reset", KeyEvent.VK_R); menu.add(menuItem); // the menu adds this item menuItem.addActionListener(new ActionListener() { @Override public void actionPerformed(ActionEvent e) { count = 0; display.setText(count + ""); } }); setJMenuBar(menuBar); // "this" JFrame sets its menu-bar Container cp = getContentPane(); cp.setLayout(new FlowLayout()); display = new JTextField("0", 10); cp.add(display); setDefaultCloseOperation(JFrame.EXIT_ON_CLOSE); setTitle("Test MenuBar"); setSize(300, 100); setVisible(true); } /** The entry main() method */ public static void main(String[] args) { // Run the GUI codes on the event-dispatching thread for thread safety SwingUtilities.invokeLater(new Runnable() { @Override public void run() { new TestJMenuBar(); // Let the constructor do the job } }); } } |
JOptionPane: Interacting with the User
The javax.swing.JOptionPane provides standard pre-built dialog boxes to interact with user for both input and output. To create a dialog box, use one of the static methods JOptionPane.showXxxDialog().
// Prompt for user input
public static String showInputDialog(Object message, [Object initialSelectionValue])
public static Object showInputDialog(Component parentComponent, Object message,
      [String title], [int messageType], [Icon icon], [Object[] options], [Object initialValue])

// Asks a confirming question (yes/no/cancel)
public static int showConfirmDialog(Component parentComponent, Object message,
      [String title], [int optionType], [int messageType], [Icon icon])

// Display a message
public static void showMessageDialog(Component parentComponent, Object message,
      [String title], [int messageType], [Icon icon])

// Support all features of the above three methods
public static int showOptionDialog(Component parentComponent, Object message,
      String title, int optionType, int messageType, Icon icon, Object[] options, Object initialValue)

// Component parentComponent: parent of this dialog box, for positioning.
//    If null, centered on the screen.
// Object message: the message, typically a String.
// String title: the title for the dialog box
// int messageType: the style of the message,
//    JOptionPane.ERROR_MESSAGE, INFORMATION_MESSAGE, WARNING_MESSAGE, QUESTION_MESSAGE, PLAIN_MESSAGE.
// int optionType: the set of option buttons,
//    JOptionPane.DEFAULT_OPTION, YES_NO_OPTION, YES_NO_CANCEL_OPTION, OK_CANCEL_OPTION
// Icon icon: a decorative icon, default depends on the messageType
// Object[] options, Object initialValue:
All these methods block the caller until the user's interaction is complete. Each of these methods also comes has a showInternalXxxDialog() version, which uses an internal frame to hold the dialog box.
Example: Input, Confirm and Message Dialogs
1 2 3 4 5 6 7 8 9 10 11 12 13 14 15 16 17 18 19 20 21 22 |
import javax.swing.*;
public class JOptionPaneTest {
   public static void main(String[] args) {
      // JOptionPane does not have to run under a Swing Application (extends JFrame).
      // It can run directly under main().
      String inStr = JOptionPane.showInputDialog(null, "Ask for user input (returns a String)",
            "Input Dialog", JOptionPane.PLAIN_MESSAGE);
      System.out.println("You have entered " + inStr);
      JOptionPane.showMessageDialog(null, "Display a message (returns void)!",
            "Message Dialog", JOptionPane.PLAIN_MESSAGE);
      int answer = JOptionPane.showConfirmDialog(null, "Ask for confirmation (returns an int)",
            "Confirm Dialog", JOptionPane.YES_NO_CANCEL_OPTION);
      switch (answer) {
         case JOptionPane.YES_OPTION:
            System.out.println("You clicked YES"); break;
         case JOptionPane.NO_OPTION:
            System.out.println("You clicked NO"); break;
         case JOptionPane.CANCEL_OPTION:
            System.out.println("You clicked Cancel"); break;
      }
   }
}
|
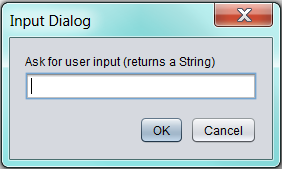
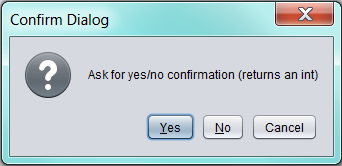
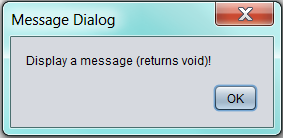
Take note that input dialog returns the String entered by the user; confirm dialog returns an int (JOptionPane.YES_OPTION, NO_OPTION, CANCEL_OPTION); message dialog returns void. Furthermore, you can use JOptionPane directly under main() to prompt user for input, similar to text-based input via Scanner.
Example: Prompting User for Input with Validation
1 2 3 4 5 6 7 8 9 10 11 12 13 14 15 16 17 18 19 20 21 22 23 24 25 26 27 28 29 30 31 32 33 34 35 36 37 38 39 40 41 42 43 44 45 46 47 48 49 50 51 52 53 54 55 56 |
import java.awt.*;
import java.awt.event.*;
import javax.swing.*;

public class InputDialogWithValidation extends JFrame {
   JTextField tfDisplay;  // to display the number entered

   /** Constructor to setup the GUI components */
   public InputDialogWithValidation() {
      Container cp = getContentPane();
      cp.setLayout(new FlowLayout());

      tfDisplay = new JTextField(10);
      tfDisplay.setEditable(false);
      cp.add(tfDisplay);

      JButton btn = new JButton("Input");
      cp.add(btn);
      btn.addActionListener(new ActionListener() {
         @Override
         public void actionPerformed(ActionEvent e) {
            boolean validInput = false;  // for input validation
            int numberIn;
            String inputStr = JOptionPane.showInputDialog("Enter a number [1-9]: ");
            do {
               try {
                  numberIn = Integer.parseInt(inputStr);
               } catch (NumberFormatException ex) {
                  numberIn = -1;  // input triggered NumberFormatException, set to invalid
               }
               if (numberIn < 1 || numberIn > 9) {
                  inputStr = JOptionPane.showInputDialog("Invalid number! Enter a number [1-9]: ");
               } else {
                  JOptionPane.showMessageDialog(null, "You have entered " + numberIn);
                  validInput = true;
               }
            } while (!validInput); // repeat if input is not valid
            tfDisplay.setText(numberIn + "");
         }
      });
      setDefaultCloseOperation(EXIT_ON_CLOSE);
      setSize(300, 100);
      setTitle("Test Input Dialog");
      setVisible(true);
   }

   /** The "main" entry method */
   public static void main(String[] args) {
      // Run the GUI code on the Event-Dispatching Thread for thread safety
      javax.swing.SwingUtilities.invokeLater(new Runnable() {
         public void run() {
            new InputDialogWithValidation(); // Let the constructor do the job
         }
      });
   }
}
|
Pluggable Look and Feel
Swing supports the so-called "pluggable look and feel (plaf)" for its JComponents. The "look" refers to the appearance of the widgets (JComponent); while the "feel" refers to how the widgets behave (e.g., the behaviors of mouse-click for the various mouse-buttons). "Pluggable" refers the ability of changing the look and feel at runtime.
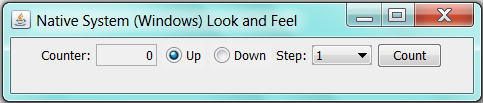
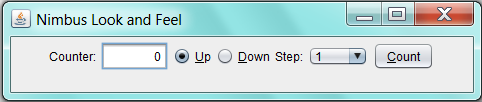
You can choose to use the default Java look and feel, the native system's look and feel (Windows, Linux, Mac), or the newer cross-platform Nimbus look and feel.
Pluggable look and feel is supported in Swing's components by separating the components into two classes: JComponent (in package javax.swing) and ComponentUI (in package javax.swing.plaf). The ComponentUI, called UI delegate, handles all aspects relating to look and feel. Nonetheless, you shall not interact with the UI delegate directly.
These look and feel are supported (in packages javax.swing.plaf and javax.swing.plaf.*):
- Java Look and Feel: Also called
CrossPlatformLookAndFeel, or Metal L&F. The default L&F which provides the same look and feel across all the platforms. - System Look and Feel: the L&F of the native system (e.g., Windows, Linux, Mac).
- Nimbus Look and Feel: the newer cross-platform look and feel released in JDK 1.6 update 10.

The JFC demos (included in JDK demo) "SwingSet2" and "SwingSet3" show the various L&Fs.
Setting the Look and Feel
You need to set the Look and Feel as the first step in your GUI construction. There are a few ways to set the Look and Feel.
Via UIManager.setLookAndFeel()
You can use the static method UIManager.setLookAndFeel(String className) to set the look and feel.
- You can either use the
staticmethodUIManager.getCrossPlatformLookAndFeelClassName(),UIManager.getSystemLookAndFeelClassName()to get the classname string for Java F&F and Native System L&F; or - Use the actual classname string such as "
javax.swing.plaf.metal.MetalLookAndFeel" (for Java L&F), "com.sun.java.swing.plaf.windows.WindowsLookAndFeel" (Windows L&F), "javax.swing.plaf.nimbus.NimbusLookAndFeel" (Nimbus L&F) and "com.sun.java.swing.plaf.motif.MotifLookAndFeel" (Motif L&F).
For example,
// Set the UI manager (shall be the first step of the GUI construction)
try {
   // Set to cross-platform Java Look and Feel (also called "Metal")
   UIManager.setLookAndFeel(UIManager.getCrossPlatformLookAndFeelClassName());
} catch (UnsupportedLookAndFeelException e) {
   e.printStackTrace();
} catch (ClassNotFoundException e) {
   e.printStackTrace();
} catch (InstantiationException e) {
   e.printStackTrace();
} catch (IllegalAccessException e) {
   e.printStackTrace();
}
The alternative Look and Feel (under Windows System) are:
// Native System Look and Feel
UIManager.setLookAndFeel(UIManager.getSystemLookAndFeelClassName());

// Cross-platform Java Look and Feel (also called "Metal")
UIManager.setLookAndFeel("javax.swing.plaf.metal.MetalLookAndFeel");

// Windows Look and Feel
UIManager.setLookAndFeel("com.sun.java.swing.plaf.windows.WindowsLookAndFeel");

// Cross-platform Nimbus Look and Feel (JDK 1.6u10)
UIManager.setLookAndFeel("javax.swing.plaf.nimbus.NimbusLookAndFeel");

// Windows Classic Look and Feel
UIManager.setLookAndFeel("com.sun.java.swing.plaf.windows.WindowsClassicLookAndFeel");

// CDE/Motif Look and Feel
UIManager.setLookAndFeel("com.sun.java.swing.plaf.motif.MotifLookAndFeel");
You can use static method UIManager.getInstalledLookAndFeels() to list all the installed L&F:
UIManager.LookAndFeelInfo[] lafs = UIManager.getInstalledLookAndFeels();
for (UIManager.LookAndFeelInfo laf : lafs) {
   System.out.println(laf);
}
javax.swing.UIManager$LookAndFeelInfo[Metal javax.swing.plaf.metal.MetalLookAndFeel]
javax.swing.UIManager$LookAndFeelInfo[Nimbus javax.swing.plaf.nimbus.NimbusLookAndFeel]
javax.swing.UIManager$LookAndFeelInfo[CDE/Motif com.sun.java.swing.plaf.motif.MotifLookAndFeel]
javax.swing.UIManager$LookAndFeelInfo[Windows com.sun.java.swing.plaf.windows.WindowsLookAndFeel]
javax.swing.UIManager$LookAndFeelInfo[Windows Classic com.sun.java.swing.plaf.windows.WindowsClassicLookAndFeel]
Via the Command Line Option "swing.defaultlaf"
For example,
// Set to Nimbus L&F
java -Dswing.defaultlaf=javax.swing.plaf.nimbus.NimbusLookAndFeel MySwingApp
// Set to Windows L&F
java -Dswing.defaultlaf=com.sun.java.swing.plaf.windows.WindowsLookAndFeel MySwingApp
Via the "swing.properties" file
Create a "swing.properties" file (placed under "$JAVA_HOME/lib" directory) with a option "swing.defaultlaf":
# Swing Look and Feel
swing.defaultlaf=javax.swing.plaf.nimbus.NimbusLookAndFeel
Nimbus Look and Feel (JDK 1.6u10)
Reference: Swing Tutorial's "Nimbus Look and Feel" @ http://docs.oracle.com/javase/tutorial/uiswing/lookandfeel/nimbus.html.
Nimbus is a polished cross-platform look and feel introduced in the JDK 1.6 Update 10. The JFC demo "SwingSet3" (under the JDK demo) shows the Nimbus look and feel for the various Swing JComponents. "Nimbus uses Java 2D vector graphics to draw the user interface (UI), rather than static bitmaps, so the UI can be crisply rendered at any resolution. Nimbus is highly customizable. You can use the Nimbus look and feel as is, or you can skin (customize) the look with your own brand."
To enable Nimbus L&F:
- Use
UIManager.setLookAndFeel():try { // Set to cross-platform Nimbus Look and Feel UIManager.setLookAndFeel("javax.swing.plaf.nimbus.NimbusLookAndFeel"); // JDK 1.7 } catch (Exception e) { e.printStackTrace(); } // OR more robust codes try { // Check if Nimbus is supported and get its classname for (UIManager.LookAndFeelInfo lafInfo : UIManager.getInstalledLookAndFeels()) { if ("Nimbus".equals(lafInfo.getName())) { UIManager.setLookAndFeel(lafInfo.getClassName()); break; } } } catch (Exception e) { try { // If Nimbus is not available, set to the default Java (metal) look and feel UIManager.setLookAndFeel(UIManager.getCrossPlatformLookAndFeelClassName()); } catch (Exception e1) { e1.printStackTrace(); } }Take note that the Nmibus package in JDK 1.6u10 is "com.sun.java.swing.plaf.nimbus.NimbusLookAndFeel"; while in JDK 1.7, it is called "javax.swing.plaf.nimbus.NimbusLookAndFeel". - Use command-line option "
swing.defaultlaf":java -Dswing.defaultlaf=javax.swing.plaf.nimbus.NimbusLookAndFeel MySwingApp
- Use a "
swing.properties" file (under the "$JAVA_HOME/lib"):# Set to Nimbus Look and Feel (System-wide) swing.defaultlaf=javax.swing.plaf.nimbus.NimbusLookAndFeel
A Nimbus component can have 4 different sizes: large, regular, small and mini. You can choose the size via:
myButton.putClientProperty("JComponent.sizeVariant", "mini");
   // default is "regular", options are "large", "small" and "mini"
You can change the color theme via:
UIManager.put("nimbusBase", new Color(...));      // Base color
UIManager.put("nimbusBlueGrey", new Color(...));  // BlueGrey
UIManager.put("control", new Color(...));         // Control

// Set to Nimbus L&F
for (LookAndFeelInfo info : UIManager.getInstalledLookAndFeels() {
    if ("Nimbus".equals(info.getName())) {
        UIManager.setLookAndFeel(info.getClassName());
        break;
    }
}
......
You can customize the look and feel, which is beyond the scope of this article.
More on Layout Manager
Reference: Swing Tutorial's "Laying Out Components Within a Container" @ http://docs.oracle.com/javase/tutorial/uiswing/layout/index.html.
Key Points on Layout Manager
Layout in Production
Use NetBeans' visual GroupLayout to layout the components in production; or GridBagLayout if you prefer to code yourself (why?). The rest of LayoutManagers (such as FlowLayout, BorderLayout, GridLayout) are meant for prototyping.
The two components you need to worry about layout are JPanel and the content-pane of the top-level containers (such as JFrame, JApplet and JDialog).
JPaneldefaults toFlowLayout(with alignment ofCENTER,hgapandvgapof 5 pixels); or you can set the layout of aJPanelin its constructor.- All content-panes default to
BorderLayout(withhgapandvgapof 0). InBorderLayout, theadd(aComponent)without specifying the zone adds the component to theCENTER. Secondadd()will override the firstadd().
Absolute Positioning without LayoutManager shall be avoided, as it does not adjust well on screens with different resolutions; or when the window is resize.
Hints on sizes and alignments
You can provide hints on the minimum, preferred and maximum sizes of a component via setMinimumSize(), setPreferredSize() and setMaximumSize() methods. However, some layout managers ignore these requests, especially the maximum size. You can also do these by extending a subclass and overriding the getXxxSize() call-back methods.
The setSize() method must be issued at the correct point, or else it will not work (as it was overridden by another implicit setSize()). [TODO: Check]
Similarly, you can provide hints on horizontal and vertical alignments (of the edges) among components via setAlignmentX() and setAlignmentY() methods. BoxLayout honors them but other layout managers may ignore these hints. You can also extend a subclass and override the getAlignmentX() and getAlignmentY() call-back methods.
[TODO] setSize(), pack(), validate() and invalidate() for Container, revalidate() and repaint() for Component, doLayout().
Methods validate() and doLayout()
If you change a property of a LayoutManager, such as hgap or vgap of GridLayout, you need to issue a doLayout() to force the LayoutManager to re-layout the components using the new property.
A container has only one LayoutManager. Nonetheless, you can change the LayoutManager via setLayout(newLayoutManager). You need to follow with a validate() to ask the container to re-layout the components.
Code Example
This example creates 6 buttons, which are arranged in 3x2 and 2x3 GridLayout alternately upon clicking any button.
1 2 3 4 5 6 7 8 9 10 11 12 13 14 15 16 17 18 19 20 21 22 23 24 25 26 27 28 29 30 31 32 33 34 35 36 37 38 39 40 41 42 43 44 45 46 47 48 49 50 51 52 53 54 55 56 57 58 59 60 |
import java.awt.*; import java.awt.event.*; import javax.swing.*; /** Changing the LayoutManager of the Container between 3*2 GridLayout and 2*3 GridLayout */ @SuppressWarnings("serial") public class SetLayoutTest extends JFrame { private int rows = 3; private int cols = 2; private Container cp; // content-pane of JFrame /** Constructor to setup the UI components */ public SetLayoutTest() { cp = this.getContentPane(); cp.setLayout(new GridLayout(rows, cols, 3, 3)); // Create an instance of ActionListener to listen to all Buttons ButtonsListener listener = new ButtonsListener(); // Create rows*cols Buttons and add to content-pane JButton[] buttons = new JButton[rows * cols]; for (int i = 0; i < buttons.length; ++i) { buttons[i] = new JButton("Click [" + (i+1) + "]"); cp.add(buttons[i]); buttons[i].addActionListener(listener); } setDefaultCloseOperation(JFrame.EXIT_ON_CLOSE); setTitle("setLayout() Test"); setSize(280, 150); setLocationRelativeTo(null); // center the application window setVisible(true); } /** Inner class used as the ActionListener for the Buttons */ private class ButtonsListener implements ActionListener { @Override public void actionPerformed(ActionEvent e) { // Swap rows and cols int temp = rows; rows = cols; cols = temp; // Set to new rows-by-cols GridLayout cp.setLayout(new GridLayout(rows, cols, 5, 5)); cp.validate(); // ask LayoutManager to re-layout } } /** The entry main() method */ public static void main(String[] args) { // Run GUI codes in the Event-Dispatching thread for thread safety SwingUtilities.invokeLater(new Runnable() { public void run() { new SetLayoutTest(); // Let the constructor do the job } }); } } |
Alternatively, you can also change the rows and columns of GridLayout via setRows() and setColumns() methods, and doLayout(). For example,
@Override
public void actionPerformed(ActionEvent e) {
   // Swap rows and cols
   int temp = rows;
   rows = cols;
   cols = temp;

   GridLayout layout = (GridLayout)cp.getLayout();
   layout.setRows(rows);
   layout.setColumns(cols);
   cp.doLayout();
}
add(), remove(), removeAll() Components from a Container
You can use aContainer.add(aComponent) to add a component into a container. You can also use aContainer.remove(aComponent) or aContainer.removeAll() to remove a component or all the components. You need to issue a validate() call to the container after adding or removing components.
Code Example
This example starts with 2 buttons: one to "add" a button and one to "remove" a button. The buttons are arranged in FlowLayout on the content-pane. For demonstration purpose, I remove all the buttons and re-add all the buttons.
1 2 3 4 5 6 7 8 9 10 11 12 13 14 15 16 17 18 19 20 21 22 23 24 25 26 27 28 29 30 31 32 33 34 35 36 37 38 39 40 41 42 43 44 45 46 47 48 49 50 51 52 53 54 55 56 57 58 59 60 61 62 63 64 65 66 67 68 69 70 71 72 73 74 75 76 77 78 79 80 81 82 |
import java.awt.*; import java.awt.event.*; import javax.swing.*; /** Add or remove components from a container */ @SuppressWarnings("serial") public class AddRemoveComponentsTest extends JFrame { private int numButtons = 2; // number of buttons, init to 2 (1 add, 1 remove) Container cp; // content-pane of JFrame JButton[] buttons; // array of buttons ButtonsListener listener; // an ActionListener instance for all buttons /** Constructor to setup the UI components */ public AddRemoveComponentsTest() { cp = getContentPane(); // Create an instance of ActionListener to listen to all Buttons listener = new ButtonsListener(); // Call helper method to create numButtons buttons createButtons(); setDefaultCloseOperation(JFrame.EXIT_ON_CLOSE); setTitle("Add/Remove Components Test"); setSize(400, 150); setLocationRelativeTo(null); setVisible(true); } /** Create numButtons buttons on content-pane with FlowLayout */ private void createButtons() { // For demonstration, all the components are removed, instead of // add or remove selected component. cp.removeAll(); cp.setLayout(new FlowLayout(FlowLayout.LEFT, 5, 5)); // Create buttons buttons = new JButton[numButtons]; // allocate array int i = 0; // Create (numButtons-1) "Add" buttons, but minimum one do { buttons[i] = new JButton("Add"); cp.add(buttons[i]); buttons[i].addActionListener(listener); ++i; } while (i < numButtons - 1); // Create a "Remove" button if numButtons > 1 if (i == numButtons - 1) { buttons[i] = new JButton("Remove"); cp.add(buttons[i]); buttons[i].addActionListener(listener); } cp.validate(); // needed after adding/removing component repaint(); // needed to cleanup dirty background } /** Inner class used as the ActionListener for the Buttons */ private class ButtonsListener implements ActionListener { @Override public void actionPerformed(ActionEvent e) { // adjust the number of buttons if (e.getActionCommand().equals("Add")) { ++numButtons; } else { if (numButtons >= 2) { --numButtons; } } // Call helper method to create numButtons buttons createButtons(); } } /** The entry main() method */ public static void main(String[] args) { // Run GUI codes in the Event-Dispatching thread for thread safety SwingUtilities.invokeLater(new Runnable() { public void run() { new AddRemoveComponentsTest(); // Let the constructor do the job } }); } } |
Component Orientation
Most languages from written form left-to-right, but some otherwise. You can set the orientation on Component via:
// java.awt.Component
public void setComponentOrientation(ComponentOrientation o)
   // ComponentOrientation.LEFT_TO_RIGHT or RIGHT_TO_LEFT.
Since JDK 1.4, layout managers, such as FlowLayout and BorderLayout, can layout components according to component-orientation of the container. Some new terms were introduced. For example, in BorderLayout, instead of using EAST, WEST, NORTH, SOUTH (which are absolute), the term LINE_START, LINE_END, PAGE_START, PAGE_END were added which can adjust itself according to the component orientation. LINE_START is the same as WEST, if the component orientation is LEFT_TO_RIGHT. On the other hand, it is EAST, if the component orientation is RIGHT_TO_LEFT. Similarly, in FlowLayout's alignment, LEADING and TRAILING were added in place of LEFT and RIGHT.
Code Example
1 2 3 4 5 6 7 8 9 10 11 12 13 14 15 16 17 18 19 20 21 22 23 24 25 26 27 28 29 30 31 32 33 34 35 36 37 38 39 40 41 42 43 44 45 46 47 48 49 50 51 52 53 54 55 56 57 58 59 60 61 62 63 64 65 66 67 68 69 70 71 72 73 74 75 76 77 78 79 80 |
import java.awt.*; import java.awt.event.*; import javax.swing.*; /** BorderLayout Demo */ @SuppressWarnings("serial") public class BorderLayoutTest extends JFrame { public static final String TITLE = "BorderLayout Demo"; // Private variables of GUI components private Container cp; // content-pane of this JFrame private JButton btnNorth, btnSouth, btnCenter, btnEast, btnWest; private boolean leftToRight = true; /** Constructor to setup the UI components */ public BorderLayoutTest() { cp = this.getContentPane(); btnNorth = new JButton("PAGE_START [HIDE]"); btnSouth = new JButton("PAGE_END [HIDE]"); btnWest = new JButton("LINE_START [HIDE]"); btnEast = new JButton("LINE_END [HIDE]"); btnCenter = new JButton("CENTER [SHOW ALL, CHANGE ORIENTATION]"); btnCenter.setPreferredSize(new Dimension(300, 100)); // set size for CENTER ActionListener listener = new ButtonListener(); btnNorth.addActionListener(listener); btnSouth.addActionListener(listener); btnEast.addActionListener(listener); btnWest.addActionListener(listener); btnCenter.addActionListener(listener); // Add all buttons to the content-pane addButtons(); setDefaultCloseOperation(JFrame.EXIT_ON_CLOSE); // exit if close button clicked setTitle(TITLE); // "this" JFrame sets title pack(); // "this" JFrame packs all its components setLocationRelativeTo(null); // center the application window setVisible(true); // show it } /** Helper method to add all buttons to the content-pane */ private void addButtons() { cp.removeAll(); cp.setComponentOrientation(leftToRight ? ComponentOrientation.LEFT_TO_RIGHT : ComponentOrientation.RIGHT_TO_LEFT); cp.add(btnNorth, BorderLayout.PAGE_START); cp.add(btnSouth, BorderLayout.PAGE_END); cp.add(btnWest, BorderLayout.LINE_START); cp.add(btnEast, BorderLayout.LINE_END); cp.add(btnCenter, BorderLayout.CENTER); cp.validate(); } /** Inner class used as ActionListener for all buttons */ private class ButtonListener implements ActionListener { @Override public void actionPerformed(ActionEvent evt) { JButton source = (JButton)evt.getSource(); if (source == btnCenter) { leftToRight = !leftToRight; // toggle addButtons(); } else { cp.remove(source); cp.validate(); } } } /** The entry main() method */ public static void main(String[] args) { // Run GUI codes in the Event-Dispatching thread for thread safety SwingUtilities.invokeLater(new Runnable() { @Override public void run() { new BorderLayoutTest(); // Let the constructor do the job } }); } } |
Absolute Positioning Without a Layout Manager
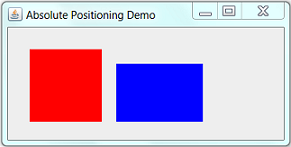
You could use absolute position instead of a layout manager (such as FlowLayout or BorderLayout) by invoking method setLayout(null). You can then position you components using the method setBounds(int xTopLeft, int yTopLeft, int width, int height). For example:
1 2 3 4 5 6 7 8 9 10 11 12 13 14 15 16 17 18 19 20 21 22 23 24 25 26 27 28 29 30 31 32 33 34 35 36 37 |
import java.awt.*; import javax.swing.*; /** Test Absolute Positioning */ public class CGAbsolutePositioning extends JFrame { /** Constructor to setup the GUI components */ public CGAbsolutePositioning() { Container cp = getContentPane(); cp.setLayout(null); // disable layout manager - use absolute layout JPanel p1 = new JPanel(); p1.setBounds(30, 30, 100, 100); p1.setBackground(Color.RED); cp.add(p1); JPanel p2 = new JPanel(); p2.setBounds(150, 50, 120, 80); p2.setBackground(Color.BLUE); cp.add(p2); setDefaultCloseOperation(JFrame.EXIT_ON_CLOSE); setTitle("Absolute Positioning Demo"); setSize(400, 200); setVisible(true); } /** The entry main method */ public static void main(String[] args) { // Run GUI codes in Event-Dispatching thread for thread safety SwingUtilities.invokeLater(new Runnable() { @Override public void run() { new CGAbsolutePositioning(); // Let the constructor do the job } }); } } |
More on Event-Handling
Both AWT and Swing applications uses the AWT event-handling classes (in package java.awt.event). Swing added a few new event handling classes (in package javax.swing.event), but they are not frequently used.
AWT GUI Components (such as Button, TextField, and Window) can trigger an AWTEvent upon user’s activation.
| User Action | Event Triggered | Event Listener interface |
|---|---|---|
Click a Button, JButton |
ActionEvent |
ActionListener |
Open, iconify, close Frame, JFrame |
WindowEvent |
WindowListener |
Click a Component, JComponent |
MouseEvent |
MouseListener |
Change texts in a TextField, JTextField |
TextEvent |
TextListener |
| Type a key | KeyEvent |
KeyListener |
Click/Select an item in a Choice, JCheckbox, JRadioButton, JComboBox |
ItemEvent, ActionEvent |
ItemListener, ActionListener |
The subclasses of AWTEvent are as follows:
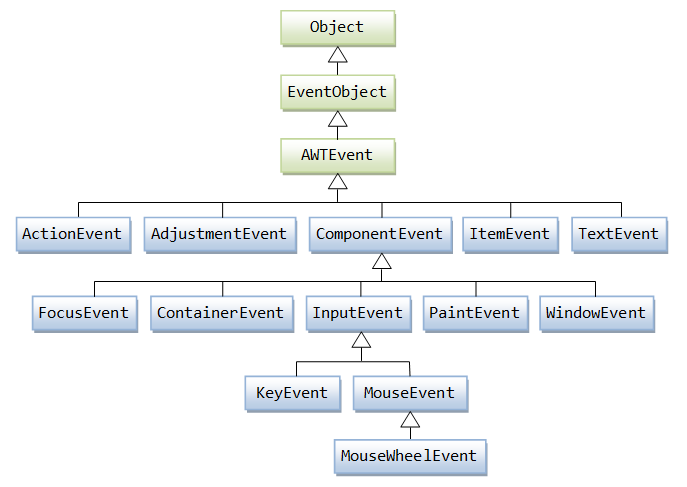
java.util.EventObject
All event objects extends java.util.EventObject, which takes the source object in this constructor, and provides a getSource() method.
// Constructor
public EventObject(Object source)

// Method
public Object getSource()
Take note that the constructor takes an Object; and getSource() returns an instance of type Object. You may need to downcast it back to its original type.
ActionEvent & ActionListener
An ActionEvent is fired, when an action has been performed by the user. For examples, when the user clicks a button, chooses a menu item, presses enter key in a text field. The associated ActionListener interface declares only one abstract method, as follows:
public interface ActionListener extends java.util.EventListener {
   public void actionPerformed(ActionEvent evt); // called-back when an action has been performed
}
From the ActionEvent argument evt, you may use evt.getActionCommand() to get a String related to this event, for example, the button's label, the String entered into the textfield. This is particularly useful if the same ActionEvent handler is used to handle multiple source objects (e,g., buttons or textfields), for identifying the source object that triggers this ActionEvent.
Swing's Action
Read Swing Tutorial's "How to Use Actions".
A javas.swing.Action is a ActionEvent listener. If two or more components (e.g., a menu item and a button) perform the same function in response to an ActionEvent, you can use an Action object to specify both the state and functionality of the components (whereas actionPerformed() defines only the function). For example, you can specify the states such as the text, icon, shortcut key, tool-tip text, for all the source components.
You can attach an Action object to a component via aComponent.setAction(anAction) method:
- The component's state (e.g., text, icon) is updated to match the state of the
Action. - The component adds the
Actionobject as anActionEventlistener. - If the state of the
Actionchanges, the component's state is updated to match theAction.
To create an Action object, you extend AbstractAction to provide the state and implement the actionPerformed() method to response to the ActionEvent.
Example
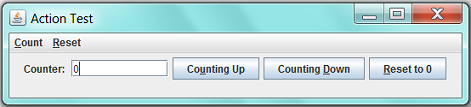
In this example, a menu-item and a button share the same Action. The Action object specifies the states (text, tooltip's text, and a mnemonic alt short-cut key) and override the actionPerformed(). Take note that the label on the buttons are updated to match the Action's names.
1 2 3 4 5 6 7 8 9 10 11 12 13 14 15 16 17 18 19 20 21 22 23 24 25 26 27 28 29 30 31 32 33 34 35 36 37 38 39 40 41 42 43 44 45 46 47 48 49 50 51 52 53 54 55 56 57 58 59 60 61 62 63 64 65 66 67 68 69 70 71 72 73 74 75 76 77 78 79 80 81 82 83 84 85 86 87 88 89 90 91 92 93 94 95 96 97 98 99 100 101 102 103 104 105 106 107 108 109 110 111 112 113 114 115 116 117 118 119 120 121 122 123 124 125 126 127 |
import javax.swing.*; import java.awt.*; import java.awt.event.*; /** * Test Actions which are ActionListeners that can be applied to more than one sources. * An action can specify the state and functionality of an ActionListener. */ @SuppressWarnings("serial") public class TestAction extends JFrame { private JTextField tfCount; private int count; /** Constructor to setup the GUI */ public TestAction() { // Create the Actions shared by the button and menu-item Action countUpAction = new CountUpAction("Count Up", "To count up", new Integer(KeyEvent.VK_U)); Action countDownAction = new CountDownAction("Count Down", "To count down", new Integer(KeyEvent.VK_D)); Action resetAction = new ResetAction("Reset", "To reset to zero", new Integer(KeyEvent.VK_R)); Container cp = getContentPane(); cp.setLayout(new FlowLayout()); // Create buttons cp.add(new JLabel("Counter: ")); tfCount = new JTextField("0", 8); tfCount.setHorizontalAlignment(JTextField.RIGHT); cp.add(tfCount); JButton btnCountUp = new JButton(); cp.add(btnCountUp); JButton btnCountDown = new JButton(); cp.add(btnCountDown); JButton btnReset = new JButton(); cp.add(btnReset); // Set actions for buttons btnCountUp.setAction(countUpAction); btnCountDown.setAction(countDownAction); btnReset.setAction(resetAction); // Create menu-bar JMenuBar menuBar = new JMenuBar(); JMenu menu; JMenuItem menuItem;; // Create the first menu menu = new JMenu("Count"); menu.setMnemonic(KeyEvent.VK_C); menuItem = new JMenuItem(countUpAction); // allocate menu-item and set action menu.add(menuItem); menuItem = new JMenuItem(countDownAction); // allocate menu-item and set action menu.add(menuItem); menuBar.add(menu); // Create the second menu menu = new JMenu("Reset"); menu.setMnemonic(KeyEvent.VK_R); menuItem = new JMenuItem(resetAction); // allocate menu-item and set action menu.add(menuItem); menuBar.add(menu); setJMenuBar(menuBar); // "this" JFrame sets menu-bar setDefaultCloseOperation(JFrame.EXIT_ON_CLOSE); setTitle("Action Test"); setSize(550, 120); setVisible(true); } /** * Action inner classes */ public class CountUpAction extends AbstractAction { /** Constructor */ public CountUpAction(String name, String shortDesc, Integer mnemonic) { super(name); putValue(SHORT_DESCRIPTION, shortDesc); putValue(MNEMONIC_KEY, mnemonic); } @Override public void actionPerformed(ActionEvent e) { ++count; tfCount.setText(count + ""); } } public class CountDownAction extends AbstractAction { /** Constructor */ public CountDownAction(String name, String shortDesc, Integer mnemonic) { super(name); putValue(SHORT_DESCRIPTION, shortDesc); putValue(MNEMONIC_KEY, mnemonic); } @Override public void actionPerformed(ActionEvent e) { --count; tfCount.setText(count + ""); } } public class ResetAction extends AbstractAction { /** Constructor */ public ResetAction(String name, String shortDesc, Integer mnemonic) { super(name); putValue(SHORT_DESCRIPTION, shortDesc); putValue(MNEMONIC_KEY, mnemonic); } @Override public void actionPerformed(ActionEvent e) { count = 0; tfCount.setText(count + ""); } } /** The entry main() method */ public static void main(String[] args) { // Run GUI codes in the Event-Dispatching thread for thread safety javax.swing.SwingUtilities.invokeLater(new Runnable() { public void run() { new TestAction(); // Let the constructor does the job } }); } } |
WindowEvent & WindowListener/WindowAdapter
Interface WindowListener is used for handling WindowEvent triggered via the three special buttons (minimize, maximize/restore down, and close) on the top-right corner of the window or other means. There are 7 abstract methods declared in the interface, as follows:
public interface WindowListener extends java.util.EventListener {
   public void windowClosing(WindowEvent evt);
      // called-back when the user attempt to close this window, most commonly-used handler
   public void windowActivated(WindowEvent evt);
      // called-back when this window is set to the active window
   public void windowDeactivated(WindowEvent evt);
      // called-back when this window is no longer the active window
   public void windowOpened(WindowEvent evt);
      // called-back when this window is first made to be visible
   public void windowClosed(WindowEvent evt);
      // called-back when the window has been closed
   public void windowIconified(WindowEvent evt);
      // called-back when this window is minimized
   public void windowDeiconified(WindowEvent evt);
      // called-back when this window is change from minimize to normal state
}
The most commonly-used method is WindowClosing(), which is called when the user attempts to close this window via the "window-close" button or "file-exit" menu item.
// Sample handler for windowClosing()
@Override
public void WindowClosing(WindowEvent evt) {
   // Ask user to confirm
   ......
   // Perform clean up operations
   ......
   System.exit(0);   // Terminate the program
}
WindowAdapter
A WindowEvent listener must implement the WindowListener interface and provides implementation to ALL the 7 abstract methods declared. An empty-body implementation is required even if you are not using that particular handler. To improve productivity, an adapter class called WindowAdapter is provided, which implements WindowListener interface and provides default implementation to all the 7 abstract methods. You can then derive a subclass from WindowAdapter and override only methods of interest and leave the rest to their default implementation.
This example shows how to extend a WindowAdapter class, using an anonymous inner class, to handle a window-closing event.
public class GUIApplication extends JFrame {
   public GUIApplication() {  // Constructor
      ......
      this.addWindowListener(new WindowAdapter() {
         @Override
         public void windowClosing(WindowEvent evt) {
            System.exit(0);
         }
      });
   }
   ......
}
JFrame's setDefaultCloseOperation()
In Swing's JFrame, a special method called setDefaultCloseOperation() is provided to handle clicking of the "window-close" button. For example, to exit the program upon clicking the close-window button, you can use the following instead of WindowListener or WindowAdapter.
setDefaultCloseOperation(JFrame.EXIT_ON_CLOSE); // exit program upon clicking window-close button
Similarly, most of the event listener interface has its equivalent adapter, e.g., MouseAdapter for MouseListener interface, KeyAdapter for KeyListener interface, MouseMotionAdapter for MouseMotionListener interface. There is no ActionAdapter for ActionListener, because there is only one abstract method inside the ActionListener interface, with no need for an adapter.
A word of caution: If you implement the WindowListener yourself and misspell a method name says windowClosing() to windowClosing(), the compiler will signal an error to notify you that windowClosing() method was not implemented. However, if you extend from WindowAdapter class and misspell a method name, the compiler treats the misspell method as a new method in the subclass, and uses the default implementation provided by WindowAdapter for handling that event. This small typo error took me a few agonizing hours to debug. This problem is resolved via the annotation @Override introduced in JDK 1.5, which tells the compiler to issue an error if the annotated method does not override its superclass.
KeyEvent & KeyListener/KeyAdapter
The KeyListener interface defines three abstract methods:
void keyTyped(KeyEvent evt)
   // Called-back when a key has been typed (pressed followed by released)
void keyPressed(KeyEvent evt)
   // Called-back when a key has been pressed
void keyReleased(KeyEvent evt)
   // Callback when a key has been released
There are two kinds of key events:
- The typing of a valid character, e.g.,
'a','A'. This is called a key-typed event. - The pressing or releasing of a key, e.g., up-arrow, enter,
'a',shift+'a'. This is a key-pressed or key-released event.
Use keyTyped() to process key-typed event, which produces a valid Unicode character. You can use evt.getKeyChar() to retrieve the char typed. getKeyChar() can differentiate between 'a' and 'A' (pressed shift+'a').
You can use keyPressed() and keyReleased() for all the keys, character key or others (such as up-arrow and enter). You can use evt.getKeyCode() to retrieve the int Virtual Key (VK) code, e.g., KeyEvent.VK_UP, KeyEvent.VK_ENTER, KeyEvent.VK_A. You can also use evt.getKeyChar() to retrieve the unicode character, if the event produced a valid Unicode character.
getKeyCode() vs. getKeyChar()
- If you press
'a'key,getKeyChar()returns'a'andgetKeyCode()returnsVK_A. - If you press shift+
'a', two key-pressed events and one key-typed event triggered.getKeyChar()returns'A'andgetKeyCode()returnsVK_SHIFTin the first key-pressed event andVK_Ain the second event. The first key-pressed event is often ignored by the program.
Notice that Virtual Key codes, key-char are used, instead of actual key code, to ensure platform and keyboard-layout independent.
For Example,
1 2 3 4 5 6 7 8 9 10 11 12 13 14 15 16 17 18 19 20 21 22 23 24 25 26 27 28 29 30 31 32 33 34 35 36 37 38 39 40 41 42 43 44 45 46 47 48 |
import java.awt.*; import java.awt.event.*; import javax.swing.*; /** Test KeyListener */ public class KeyListenerTest extends JFrame implements KeyListener { /** Constructor to setup the GUI */ public KeyListenerTest() { Container cp = getContentPane(); cp.addKeyListener(this); // Need to enables receiving of key inputs for this GUI component. cp.setFocusable(true); // "May" need to request keyboard focus on this component. cp.requestFocus(); setDefaultCloseOperation(JFrame.EXIT_ON_CLOSE); setTitle("Testing Key Listener"); setSize(300, 200); setVisible(true); } @Override public void keyTyped(KeyEvent e) { char keyChar = e.getKeyChar(); System.out.println("keyTyped: Key char is " + keyChar); } @Override public void keyPressed(KeyEvent e) { int keyCode = e.getKeyCode(); char keyChar = e.getKeyChar(); System.out.println("keyPressed: VK Code is " + keyCode + ", Key char is " + keyChar); } @Override public void keyReleased(KeyEvent e) {} // Ignored /** The entry main method */ public static void main(String[] args) { // Run GUI codes on the Event-Dispatching thread for thread safety */ SwingUtilities.invokeLater(new Runnable() { @Override public void run() { new KeyListenerTest(); // Let the constructor do the job } }); } } |
Try pressing 'a', 'A' (shift+'a'), enter, up-arrow, etc, and observe the key-char and VK-code produced by keyTyped() and keyPressed().
Below is a sample handler for a key listener:
@Override
public void keyPressed(KeyEvent e) {
   switch (e.getKeyCode()) {
      case KeyEvent.VK_UP: ......; break
      case KeyEvent.VK_DOWN: ......; break
      case KeyEvent.VK_LEFT: ......; break
      case KeyEvent.VK_RIGHT: ......; break
   }
}

@Override
public void keyTyped(KeyEvent e) {
   // Can also be placed in keyPressed()
   switch (e.getKeyChar()) {
      case 'w': ......; break
      case 'a': ......; break
      case 'z': ......; break
      case 's': ......; break
   }
}
The commonly-used virtual key codes are:
VK_LEFT,VK_RIGHT,VK_UP,VK_DOWN: arrow keysVK_KP_LEFT,VK_KP_RIGHT,VK_KP_UP,VK_KP_DOWN: arrow key on numeric keypadVK_0toVK_9,VK_AtoVK_Z: numeric and alphabet keys. Also produce a Unicode char for thegetKeyChar()VK_ENTER,VK_TAB,VK_BACKSPACE
MouseEvent & MouseListener/MouseAdapter
The MouseListener interface is associated with MouseEvent (triggered via mouse-button press, release and click (press followed by release)) on the source object. It declares 5 abstract methods:
public void mouseClicked(MouseEvent evt)
   // Called-back when a mouse button has been clicked (pressed followed by released) on the source
public void mouseEntered(MouseEvent evt)
   // Called-back when the mouse enters the source
public void mouseExited(MouseEvent evt)
   // Called-back when the mouse exits the source
public void mousePressed(MouseEvent evt)
   // Called-back when a mouse button has been pressed on the source
public void mouseReleased(MouseEvent evt)
   // Called-back when a mouse button has been released on the source
From the MouseEvent argument evt, you can:
- use
evt.getX()andevt.getY()to retrieve the(x, y)coordinates of the location of the mouse. - use
evt.getXOnScreen()andevt.getYOnScreen()to retrieve the absolute(x, y)coordinates on the screen. - use
evt.getClickCount()to retrieve the number of clicks, e.g., 2 for double-click. - use
evt.getButton()to determine which button (MouseEvent.BUTTON1,MouseEvent.BUTTON2,MouseEvent.BUTTON3, orMouseEvent.NOBUTTON) is clicked.
An adapter class MouseAdapter is available, which provides default (empty) implementation to the 5 abstract methods declared in the MouseListener interface. You can create a mouse listener by sub-classing the MouseAdapter and override the necessary methods. For example,
// Use an anonymous inner class (extends MouseAdapter) as mouse listener
aSource.addMouseListener(new MouseAdapter() {
   @Override
   public void mouseClicked(MouseEvent evt) {
      // ... do something ...
   }
});
MouseEvent & MouseMotionListener/MouseMotionAdapter
The MouseEvent is associated with two interfaces: MouseListener (for mouse clicked/pressed/released/entered/exited) described earlier; and the MouseMotionListener (for mouse moved and dragged). The MouseMotionListener interface declares 2 abstract methods:
public void mouseDragged(MouseEvent evt);
   // Called-back when a mouse button is pressed on a source and then dragged
public void mouseMoved(MouseEvent evt);
   // Called-back when the mouse has been moved onto a source but no buttons pressed
From the MouseEvent argument, you can use getX(), getY(), getXOnScreen(), getYOnScreen() to find the position of the mouse cursor, as described earlier.
The mouseDragged() can be used to draw a arbitrary-shape line using mouse-pointer. The mouse-dragged event starts when you pressed a mouse button, and will be delivered continuously until the mouse-button is released. For example,
@Override
public void MouseDragged(MouseEvent evt) {
   // add evt.getX() and evt.getY() to a list of (x, y).
   // you can then use drawPolyline() method of the Graphics class to draw this line
   ......
}
Swing's MouseInputListener/MouseInputAdapter
Swing added a new event listener called MouseInputListener which combines MouseListener and MouseMotionListener as follows. You only need to implement one interface instead of two interfaces.
interface javax.swing.event.MouseInputListener
   extends java.awt.MouseListener, java.awt.MouseMotionListener {
   // Empty body - no additional method declared
}
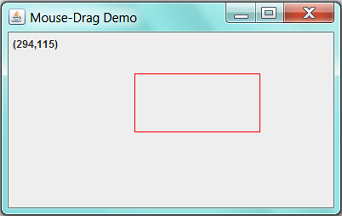
Example: Using mouse-drag to draw a red rectangle. (You need to understand "Custom Graphics" - the next article - to read this program.)
1 2 3 4 5 6 7 8 9 10 11 12 13 14 15 16 17 18 19 20 21 22 23 24 25 26 27 28 29 30 31 32 33 34 35 36 37 38 39 40 41 42 43 44 45 46 47 48 49 50 51 52 53 54 55 56 57 58 59 60 61 62 63 64 65 66 67 68 69 70 71 72 73 74 75 76 77 78 79 80 81 82 |
import java.awt.*; import java.awt.event.*; import javax.swing.*; import javax.swing.event.*; /** Test mouse-dragged */ @SuppressWarnings("serial") public class MouseDragDemo extends JFrame { private int startX, startY, endX, endY; // of a rectangle private JLabel statusBar; // display the status /** Constructor to setup the GUI */ public MouseDragDemo() { // Define an anonymous inner class extends JPanel for custom drawing // and allocate an instance JPanel drawPanel = new JPanel() { @Override public void paintComponent(Graphics g) { super.paintComponent(g); // paint parent's background g.setColor(Color.RED); // drawRect() uses x, y, width and height instead of (x1,y1) and (x2,y2) int x = (startX < endX) ? startX : endX; int y = (startY < endY) ? startY : endY; int width = endX - startX + 1; if (width < 0) width = -width; int height = endY - startY + 1; if (height < 0) height = -height; g.drawRect(x, y, width, height); } }; statusBar = new JLabel(); drawPanel.setLayout(new FlowLayout(FlowLayout.LEFT)); drawPanel.add(statusBar); // Allocate an instance of MyMouseDraggedListener // and used it as MouseListener and MouseMotionListener MyMouseDraggedListener listener = new MyMouseDraggedListener(); drawPanel.addMouseListener(listener); drawPanel.addMouseMotionListener(listener); setContentPane(drawPanel); setDefaultCloseOperation(JFrame.EXIT_ON_CLOSE); setTitle("Mouse-Drag Demo"); setSize(400, 250); setVisible(true); } private class MyMouseDraggedListener extends MouseInputAdapter { @Override public void mousePressed(MouseEvent evt) { startX = evt.getX(); startY = evt.getY(); statusBar.setText("(" + startX + "," + startY + ")"); } @Override public void mouseDragged(MouseEvent evt) { endX = evt.getX(); endY = evt.getY(); statusBar.setText("(" + endX + "," + endY + ")"); repaint(); // Called back paintComponent() } @Override public void mouseReleased(MouseEvent evt) { endX = evt.getX(); endY = evt.getY(); statusBar.setText("(" + endX + "," + endY + ")"); repaint(); // Called back paintComponent() } } /** The entry main method */ public static void main(String[] args) { // Run GUI codes on the Event-Dispatching thread for thread safety SwingUtilities.invokeLater(new Runnable() { @Override public void run() { new MouseDragDemo(); // Let the constructor do the job } }); } } |
[TODO] GUI programming is huge. Need to separate into a few articles.
REFERENCES & RESOURCES
- "Creating a GUI With JFC/Swing" (aka "The Swing Tutorial") @ http://docs.oracle.com/javase/tutorial/uiswing/.
- JFC Demo (under JDK demo "
jfc" directory). - "SwingLabs" java.net project @ http://java.net/projects/swinglabs.
- Java2D Tutorial @ http://docs.oracle.com/javase/tutorial/2d/index.html.
- JOGL (Java Binding on OpenGL) @ http://java.net/projects/jogl/.
- Java3D (@ http://java3d.java.net/).