Relational Database and Structure Query Language (SQL)
I presume that you have some knowledge on Relational Databases and the SQL language. Otherwise, read "Introduction to Relational Database and SQL".
Setting-up MySQL
In this article, I shall describe the MySQL Relational Database Management System. For other database systems, read "Other Databases".
Install MySQL (Read "How to Set Up MySQL and Get Started"). I shall assume that the MySQL server is running on the default TCP port number 3306.
On MySQL, instead of using the "mysql" command-line client program provided, you can write your own client programs (in Java or other languages) to access the MySQL server. Your client programs shall connect to the database server at the given IP address and TCP port number, issue the SQL commands, and process the results received.
Install JDK and Programming Editor
Before you proceed, I shall assume that you are familiar with Java Programming and have installed the followings:
- JDK (Read "How to install JDK and Get Started").
- A programming text editor, such as Sublime Text, Atom.
Create a Directory to Keep all your Works
I shall assume that you have created a directory called "c:\myWebProject" (for Windows) or "~/myWebProject" (for macOS) in your earlier exercises. Do it otherwise.
This step is important; otherwise, you will be out-of-sync with this article and may not be able to find your files later.
Install MySQL JDBC DRIVER (IMPORTANT - Don't MISS This Step!)
You need to install an appropriate JDBC (Java Database Connectivity) driver to run your Java database programs. The MySQL's JDBC driver is called "MySQL Connector/J" and is available at MySQL mother site.
For Windows
- Download the "latest" MySQL JDBC driver from http://dev.mysql.com/downloads ⇒ "Connector/J" ⇒ Connector/J 8.03.{xx}, where {xx} is the latest update number ⇒ In "Select Operating System", choose "Platform Independent" ⇒ ZIP Archive (e.g., "
mysql-connector-j-8.3.{xx}.zip" ⇒ "No thanks, just start my download". - UNZIP (right-click and extract all) the download file into your project directory "
C:\myWebProject". - Open the unzipped folder. Look for the JAR file "
mysql-connector-j-8.3.{xx}.jar".
The Absolute Full-path Filename for this JAR file is"C:\myWebProject\mysql-connector-j-3.0.{xx}\mysql-connector-j-8.3.{xx}.jar". Take note of this super-long filename that you will need later. COPY and SAVE in a scratch pad so that you can retrieve later.
For macOS
- Download the latest MySQL JDBC driver from http://dev.mysql.com/downloads ⇒ MySQL Connectors ⇒ Connector/J ⇒ Connector/J 8.3.{xx}, where {xx} is the latest update number ⇒ In "Select Operating System", choose "Platform Independent" ⇒ Compressed TAR Archive (e.g.,
mysql-connector-j-8.3.{xx}.tar.gz. - Double-click on the downloaded TAR file to expand into folder "
mysql-connector-j-8.3.{xx}". - Move the expanded folder into your project directory "
~/myWebProject". - Open the expanded folder. Look for the JAR file "
mysql-connector-j-8.3.{xx}.jar".
The Absolute Full-path Filename for this JAR file is"~/myWebProject/mysql-connector-j-8.3.{xx}/mysql-connector-j-8.3.{xx}.jar". Take note of this super-long filename that you will need later. COPY and SAVE in a scratch pad so that you can retrieve later.
(For Advanced User Only) CLASSPATH
You can compile Java database programs without the JDBC driver. But to run the JDBC programs, the JDBC driver's JAR-file must be included in the environment variable CLASSPATH, or in the java's command-line option -cp (or -classpath or --class-path).
You can set the -cp option for Java runtime as follows:
// For windows
java -cp .;/path/to/mysql-connector-j-8.3.{xx}.jar JDBCClassToRun
// For macOS / Unixes
java -cp .:/path/to/mysql-connector-j-8.3.{xx}.jar JDBCClassToRun
Prior to JDK 9, you can copy the JAR file into JDK's extension directory at "<JAVA_HOME>\jre\lib\ext" (Windows) or "/Library/Java/Extensions" (macOS). JDK 9 removes this extension mechanism.
Setup Database
We have to set up a database before embarking on our database programming. We shall call our database "ebookshop" which contains a table called "books", with 5 columns, as below:
Database: ebookshop
Table: books
+-------+----------------------------+---------------+---------+-------+
| id    | title                      | author        | price   | qty   |
| (INT) | (VARCHAR(50))              | (VARCHAR(50)) | (FLOAT) | (INT) |
+-------+----------------------------+---------------+---------+-------+
| 1001  | Java for dummies           | Tan Ah Teck   | 11.11   |   11  |
| 1002  | More Java for dummies      | Tan Ah Teck   | 22.22   |   22  |
| 1003  | More Java for more dummies | Mohammad Ali  | 33.33   |   33  |
| 1004  | A Cup of Java              | Kumar         | 44.44   |   44  |
| 1005  | A Teaspoon of Java         | Kevin Jones   | 55.55   |   55  |
+-------+----------------------------+---------------+---------+-------+
Start MySQL Server: Start the MySQL server and verify the server's TCP port number from the console messages. I shall assume that MySQL server is running on the default port number of 3306.
// For Windows: assume that MySQL is installed in "c:\myWebProject\mysql"
c:
cd \myWebProject\mysql\bin
mysqld --console

// For macOS
// Use graphical control at "System Preferences" -> MySQL -> Start|Stop
Start a MySQL client: I shall also assume that there is an authorized user called "myuser" with password "xxxx".
// For Windows: assume that MySQL is installed in "c:\myWebProject\mysql"
c:
cd \myWebProject\mysql\bin
mysql -u myuser -p

// For macOS: assume that MySQL is installed in "/usr/local/mysql"
cd /usr/local/mysql/bin
./mysql -u myuser -p
Run the following SQL statements to create our test database and table.
create database if not exists ebookshop;

use ebookshop;

drop table if exists books;
create table books (
   id int,
   title varchar(50),
   author varchar(50),
   price float,
   qty int,
   primary key (id));

insert into books values (1001, 'Java for dummies', 'Tan Ah Teck', 11.11, 11);
insert into books values (1002, 'More Java for dummies', 'Tan Ah Teck', 22.22, 22);
insert into books values (1003, 'More Java for more dummies', 'Mohammad Ali', 33.33, 33);
insert into books values (1004, 'A Cup of Java', 'Kumar', 44.44, 44);
insert into books values (1005, 'A Teaspoon of Java', 'Kevin Jones', 55.55, 55);

select * from books;
Introduction to JDBC Programming by Examples
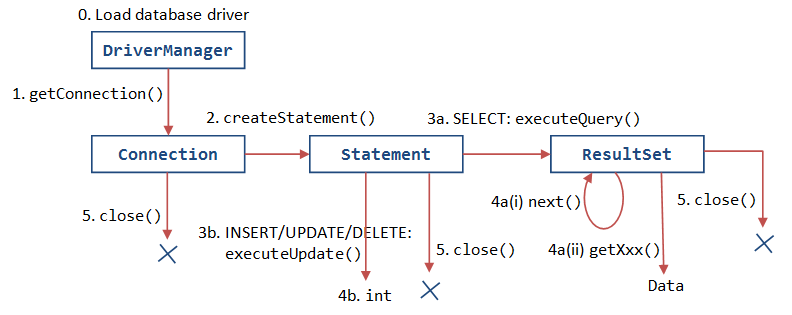
A JDBC program comprises the following 5 steps:
- STEP 1: Connect to the database via a
Connectionobject. - STEP 2: Allocate a
Statementobject, under theConnectioncreated earlier, for holding a SQL command. - STEP 3: Write a SQL query and execute the query via the
Statement.executeQuery()|executeUpdate(). - STEP 4: Process the query result.
- STEP 5: Close the
StatementandConnectionto free up the resources.
We shall illustrate Java Database programming by the following examples.
Example 1: SQL SELECT
Try out the following JDBC program, which issues an SQL SELECT to MySQL from a Java Program.
Use a Programming Text Editor (e.g., Sublime Text) to create the following program and save as "JdbcSelectTest.java" in your project directory "c:\myWebProject" (Windows) or "~/myWebProject" (macOS).
import java.sql.*;  // Using 'Connection', 'Statement' and 'ResultSet' classes in java.sql package

public class JdbcSelectTest {   // Save as "JdbcSelectTest.java"
   public static void main(String[] args) {
      try (
         // Step 1: Connect to the database via a 'Connection' object called 'conn'
         Connection conn = DriverManager.getConnection(
               "jdbc:mysql://localhost:3306/ebookshop?allowPublicKeyRetrieval=true&useSSL=false&serverTimezone=UTC",
               "myuser", "xxxx");   // For MySQL only
               // The format is: "jdbc:mysql://hostname:port/databaseName", "username", "password"

         // Step 2: Construct a 'Statement' object called 'stmt' inside the Connection created
         Statement stmt = conn.createStatement();
      ) {
         // Step 3: Write a SQL query string. Execute the SQL query via the 'Statement'.
         //  The query result is returned in a 'ResultSet' object called 'rset'.
         String strSelect = "select title, price, qty from books";
         System.out.println("The SQL statement is: " + strSelect + "\n"); // Echo For debugging

         ResultSet rset = stmt.executeQuery(strSelect);

         // Step 4: Process the 'ResultSet' by scrolling the cursor forward via next().
         //  For each row, retrieve the contents of the cells with getXxx(columnName).
         System.out.println("The records selected are:");
         int rowCount = 0;
         // Row-cursor initially positioned before the first row of the 'ResultSet'.
         // rset.next() inside the whole-loop repeatedly moves the cursor to the next row.
         // It returns false if no more rows.
         while(rset.next()) {   // Repeatedly process each row
            String title = rset.getString("title");  // retrieve a 'String'-cell in the row
            double price = rset.getDouble("price");  // retrieve a 'double'-cell in the row
            int    qty   = rset.getInt("qty");       // retrieve a 'int'-cell in the row
            System.out.println(title + ", " + price + ", " + qty);
            ++rowCount;
         }
         System.out.println("Total number of records = " + rowCount);

      } catch(SQLException ex) {
         ex.printStackTrace();
      }  // Step 5: Close conn and stmt - Done automatically by try-with-resources (JDK 7)
   }
}
Compile
To compile the program:
// Windows: The Java source directory is "c:\myWebProject"
c:
cd \myWebProject
javac JdbcSelectTest.java

// macOS: The Java source directory is "~/myWebProject"
cd ~/myWebProject
javac JdbcSelectTest.java
Run
It is rather difficult to run the program, as you need to include the MySQL JDBC Driver in the "classpath" (via -cp or -classpath or --class-path option) as follows. Replace {xx} with your installation number.
// For windows
c:
cd \myWebProject
java -cp .;C:\myWebProject\mysql-connector-j-8.3.{xx}\mysql-connector-j-8.3.{xx}.jar JdbcSelectTest

// For macOS
cd ~/myWebProject
// Need to use $HOME instead of ~ in the "java" command
java -cp .:$HOME/myWebProject/mysql-connector-j-8.3.{xx}/mysql-connector-j-8.3.{xx}.jar JdbcSelectTest
You should COPY and SAVE this command to a scratch pad, so that you don't need to type this super-long command again and again.
The -cp includes two paths separated by a ";" (Windows) or ":" (macOS). The "." denotes the current directory (to locate the JdbcSelectTest) followed by the full-path filename of the MySQL JDBC Driver JAR-file (that I asked you to take note earlier).
(Skip Unless...) Read "Common Errors in JDBC Programming on MySQL".
(For Eclipse IDE User) If you use Eclipse IDE, check my Eclipse article on how to add an external JAR file into an Eclipse project.
Dissecting the Program
- The JDBC operations are carried out through the "
Connection", "Statement" and "ResultSet" objects (defined in packagejava.sql). However, you need not know the details, but merely the public methods defined in the API (Application Program Interface). You also need not re-invent the wheels by creating these classes yourself (which will take you many years?!). "Re-using" software component is a main strength of OOP. - Notice that there is little programming involved in using JDBC programming. You only have to specify the database-URL, write the SQL query, and process the query result. The rest of the codes are kind of "standard JDBC program template". Again, this is because the wheels have been invented.
- In Line 7, we allocate a
Connectionobject (calledconn) viaDriverManager.getConnection(database-url, db-user, password). The Java program uses a so-called database-URL to connect to the server:- For MySQL:
// Syntax
Connection conn = DriverManager.getConnection("jdbc:mysql://{host}:{port}/{database-name}", "{user}", "{password}");
// Example
Connection conn = DriverManager.getConnection("jdbc:mysql://localhost:3306/ebookshop", "myuser", "xxxx");
Thedatabase-urlis in the form of "jdbc:mysql://{host}:{port}/{database-name}", with protocoljdbcand sub-protocolmysql. Theportspecifies the MySQL server's TCP port number;user/passwordis an authorized MySQL user. In our example,"localhost" (with a special IP address of127.0.0.1) is the hostname for local loop-back testing;"3306" is the server's TCP port number, andebookshopis the database name. - Others: Read "Other Databases".
- For MySQL:
- In Line 13, we allocate a
Statementobject (calledstmt) inside theConnectioncreated in the previous step viaconn.createStatement(). - In Line 16, we write a SQL SELECT command string (called
strSelect). - To execute the SQL command, we invoke method
stmt.executeQuery(strSelect). It returns the query result in aResultSetobject (calledrset). - The
ResultSetmodels the returned table, which can be access via a row cursor. The cursor is initially positioned before the first row in theResultSet. The methodrset.next()moves the cursor to the first row. You can then userset.getXxx(columnName)to retrieve the value of the column for that row, whereXxxcorresponds to the type of the column, such asint,float,doubleandString. - The while-loop issue
rset.next()repeatedly to move the cursor to the next row, and processes row-by-row. - The
rset.next()returnsfalseat the last row of theResultSet, which terminates the while-loop. - You could use
rset.getString(columnName)to retrieve all types (int,double, etc). - For maximum portability,
ResultSetcolumns within each row should be read in left-to-right order, and each column should be read only once via thegetXxx()methods. IssuegetXxx()to a cell more than once may trigger a strange error. - In this example, we use JDK 7's new feature called try-with-resources, which automatically closes all the opened resources in the try-clause, in our case, the
ConnectionandStatementobjects.
Exercises: Modify the above program to issue the following SELECT statements and display all the columns retrieved. Make sure that you modify the ResultSet processing to process only the columns retrieved (otherwise, you will get a "Column not found" error).
SELECT * FROM booksSELECT title, author, price, qty FROM books WHERE author = 'Tan Ah Teck' OR price >= 30 ORDER BY price DESC, id ASC
Example 2: SQL UPDATE
To execute a SQL UPDATE, you have to invoke the method executeUpdate() of the Statement object, which returns an int indicating the number of records affected (Line 19). Recall that for SELECT, we use executeQuery(), which returns a ResultSet object modeling the returned table (Line 25). SQL UPDATE|INSERT|DELETE does not return a table, but an int indicating the number of records affected.
Save the program as "JdbcUpdateTest.java" in your project directory "c:\myWebProject" (Windows) or "~/myWebProject" (macOS).
import java.sql.*;     // Use classes in java.sql package

public class JdbcUpdateTest {    // Save as "JdbcUpdateTest.java"
   public static void main(String[] args) {
      try (
         // Step 1: Allocate a database 'Connection' object
         Connection conn = DriverManager.getConnection(
               "jdbc:mysql://localhost:3306/ebookshop?allowPublicKeyRetrieval=true&useSSL=false&serverTimezone=UTC",
               "myuser", "xxxx");    // for MySQL only

         // Step 2: Allocate a 'Statement' object in the Connection
         Statement stmt = conn.createStatement();
      ) {
         // Step 3 and 4: Execute a SQL UPDATE via executeUpdate()
         //   which returns an int indicating the number of rows affected.
         // Increase the price by 7% and qty by 1 for id=1001
         String strUpdate = "update books set price = price*1.07, qty = qty+1 where id = 1001";
         System.out.println("The SQL statement is: " + strUpdate + "\n");  // Echo for debugging
         int countUpdated = stmt.executeUpdate(strUpdate);
         System.out.println(countUpdated + " records affected.\n");

         // Step 3 and 4 (again): Issue a SELECT (via executeQuery()) to check the UPDATE.
         String strSelect = "select * from books where id = 1001";
         System.out.println("The SQL statement is: " + strSelect + "\n");  // Echo for debugging
         ResultSet rset = stmt.executeQuery(strSelect);
         while(rset.next()) {   // Move the cursor to the next row
            System.out.println(rset.getInt("id") + ", "
                    + rset.getString("author") + ", "
                    + rset.getString("title") + ", "
                    + rset.getDouble("price") + ", "
                    + rset.getInt("qty"));
         }
      } catch(SQLException ex) {
         ex.printStackTrace();
      }  // Step 5: Close conn and stmt - Done automatically by try-with-resources
   }
}
See the previous example on how to compile and run this program! Point to this Java file "JdbcUpdateTest"!
Exercises: Modify your Java program to issue the following SQL statements:
- Increase the
priceby 50% for "A Cup of Java". - Set the
qtyto 0 for "A Teaspoon of Java".
Example 3: SQL INSERT and DELETE
Similarly, use the executeUpdate() to execute 'INSERT INTO' and 'DELETE FROM' (Line 20, 26, 34, 40). The method returns an int indicating the number of records affected.
Save the program as "JdbcInsertTest.java" in your project directory "c:\myWebProject" (Windows) or "~/myWebProject" (macOS).
import java.sql.*;     // Use classes in java.sql package

public class JdbcInsertTest {    // Save as "JdbcUpdateTest.java"
   public static void main(String[] args) {
      try (
         // Step 1: Allocate a database 'Connection' object
         Connection conn = DriverManager.getConnection(
               "jdbc:mysql://localhost:3306/ebookshop?allowPublicKeyRetrieval=true&useSSL=false&serverTimezone=UTC",
               "myuser", "xxxx"); // for MySQL only

         // Step 2: Allocate a 'Statement' object in the Connection
         Statement stmt = conn.createStatement();
      ) {
         // Step 3 and 4: Execute a SQL INSERT|DELETE statement via executeUpdate(),
         //   which returns an int indicating the number of rows affected.

         // DELETE records with id>=3000 and id<4000
         String sqlDelete = "delete from books where id >= 3000 and id < 4000";
         System.out.println("The SQL statement is: " + sqlDelete + "\n");  // Echo for debugging
         int countDeleted = stmt.executeUpdate(sqlDelete);
         System.out.println(countDeleted + " records deleted.\n");

         // INSERT a record
         String sqlInsert = "insert into books values (3001, 'Gone Fishing', 'Kumar', 11.11, 11)";
         System.out.println("The SQL statement is: " + sqlInsert + "\n");  // Echo for debugging
         int countInserted = stmt.executeUpdate(sqlInsert);
         System.out.println(countInserted + " records inserted.\n");

         // INSERT multiple records
         sqlInsert = "insert into books values "
               + "(3002, 'Gone Fishing 2', 'Kumar', 22.22, 22),"
               + "(3003, 'Gone Fishing 3', 'Kumar', 33.33, 33)";
         System.out.println("The SQL statement is: " + sqlInsert + "\n");  // Echo for debugging
         countInserted = stmt.executeUpdate(sqlInsert);
         System.out.println(countInserted + " records inserted.\n");

         // INSERT a partial record
         sqlInsert = "insert into books (id, title, author) values (3004, 'Fishing 101', 'Kumar')";
         System.out.println("The SQL statement is: " + sqlInsert + "\n");  // Echo for debugging
         countInserted = stmt.executeUpdate(sqlInsert);
         System.out.println(countInserted + " records inserted.\n");

         // Step 3 and 4: Issue a SELECT (via executeQuery()) to check the changes
         String strSelect = "select * from books";
         System.out.println("The SQL statement is: " + strSelect + "\n");  // Echo For debugging
         ResultSet rset = stmt.executeQuery(strSelect);
         while(rset.next()) {   // Move the cursor to the next row
            System.out.println(rset.getInt("id") + ", "
                    + rset.getString("author") + ", "
                    + rset.getString("title") + ", "
                    + rset.getDouble("price") + ", "
                    + rset.getInt("qty"));
         }
      } catch(SQLException ex) {
         ex.printStackTrace();
      }  // Step 5: Close conn and stmt - Done automatically by try-with-resources
   }
}
See the previous example on how to compile and run this program! Point to this Java file "JdbcInsertTest"!
Notes:
- You cannot insert two records with the same primary key (i.e.,
id) value. Hence, we issue aDELETEbeforeINSERTnew record. In this way, you can re-run the program. - If you insert a partial record, the missing columns will be set to their default values.
Exercise: Modify your Java program to issue the following SQL statements:
- Delete all books with id > 8000; and insert: (8001, 'Java ABC', 'Kevin Jones', 15.55, 55) and (8002, 'Java XYZ', 'Kevin Jones', 25.55, 55);
JDBC Cycle
(Skip Unless...) How to Debug?
SYMPTOM: Can compile the JDBC program but Runtime Error
ERROR MESSAGE:
   (Windows) No suitable driver found
   (macOS/Linux) NullPointerException
PROBABLE CAUSES: MySQL JDBC Driver Connector/J was NOT (properly) installed.
POSSIBLE SOLUTION:
   1. Read "2.3 Install MySQL JDBC Driver" again, again and again...
   2. You need to include MySQL JDBC driver via "cp" option to run your JDBC program:
      > java -cp .;path-to\mysql-connector-j-x.x.xx.jar JdbcClassName
   3. For Tomcat, you may copy the driver JAR-file into Tomcat's "lib" directory.
SYMPTOM: Can compile the JDBC program but Runtime Error
ERROR MESSAGE: com.mysql.jdbc.exceptions.jdbc4.CommunicationsException: Communications link failure
PROBABLE CAUSES:
   1. MySQL Server is NOT started, or
   2. The program was connecting to a wrong TCP port number or wrong hostname (or IP address)
      in your database-URL jdbc:mysql://localhost:port/databaseName.
POSSIBLE SOLUTION:
   1. Make sure that server has been started. Note down the server's port number
      from the server's console.
   2. Check the database-URL's hostname and port number: jdbc:mysql://localhost:port/databaseName
   3. Run a MySQL client, issue command "status" to confirm the server's TCP port number.
   4. Run a mysql client, use "mysql -u root -p --port=xxxx" to specify the port number to
      confirm the server's port number.
SYMPTOM: Can compile the JDBC program but Runtime Error
ERROR MESSAGE: java.sql.SQLException: Access denied for user 'username'@'localhost' (using password: YES)
PROBABLE CAUSES: Wrong username or password in statement:
   DriverManager.getConnection(databaseURL, username, password).
POSSIBLE SOLUTION: Obvious!
SYMPTOM: Can compile the JDBC program but Runtime Error
ERROR MESSAGE: java.sql.SQLNonTransientConnectionException: Public Key Retrieval is not allowed
POSSIBLE SOLUTION:
1. Check you userid and password by logging in thru mysql command-line client
2. Add allowPublicKeyRetrieval=true and/or useSSL=false to Connnection's URL, e.g.,
jdbc:mysql://localhost:3306/ebookshop?allowPublicKeyRetrieval=true&useSSL=false&serverTimezone=UTC
SYMPTOM: Can compile the JDBC program but Runtime Error
ERROR MESSAGE: java.sql.SQLException: The server time zone value 'xxx' is unrecognized or represents more than one time zone.
POSSIBLE SOLUTION:
Add serverTimezone=UTC to Connnection's URL, e.g.,
jdbc:mysql://localhost:3306/ebookshop?allowPublicKeyRetrieval=true&useSSL=false&serverTimezone=UTC
SYMPTOM: Can compile the JDBC program but Runtime Error
ERROR MESSAGE: com.mysql.jdbc.exceptions.jdbc4.MySQLSyntaxErrorException:
   Unknown database 'xxxx'
PROBABLE CAUSES: DriverManager.getConnection("jdbc:mysql://localhost:8888/xxxx", userid, password)
   specifies a database that does not exist in the server.
POSSIBLE SOLUTION: Create the database using a client, before running the Java program.
SYMPTOM: Can compile the JDBC program but Runtime Error
ERROR MESSAGE: com.mysql.jdbc.exceptions.jdbc4.MySQLSyntaxErrorException:
   Table 'xxxx.xxxx' doesn't exist
PROBABLE CAUSES: The SQL statement references a non-existence table.
POSSIBLE SOLUTION: Check your SQL statement and the database tables.
SYMPTOM: Can compile the JDBC program but Runtime Error
ERROR MESSAGE: java.sql.SQLException: Column 'xxx' not found.
PROBABLE CAUSES: The method ResultSet.getXxx(columnName) cannot locate
   the requested columnName in the ResultSet.
POSSIBLE SOLUTION: Make sure that the column 'xxx' is included in the SELECT statement,
   so that it is included in the ResultSet.
SYMPTOM: Can compile the JDBC program but Runtime Error
ERROR MESSAGE: com.mysql.jdbc.exceptions.jdbc4.MySQLSyntaxErrorException:
   You have an error in your SQL syntax; check the manual that corresponds to
   your MySQL server version for the right syntax to use near .... at line x
PROBABLE CAUSES: Syntax error in your SQL statement.
POSSIBLE SOLUTION: Obvious!
REFERENCES & RESOURCES
- JDBC Online Tutorial @ http://download.oracle.com/javase/tutorial/jdbc/index.html.
- JDBC Home Page @ http://www.oracle.com/technetwork/java/javase/jdbc/index.html.
- White Fisher, et al., "JDBC API Tutorial and Reference", 3rd eds, Addison Wesley, 2003.
- MySQL Home Page @ https://dev.mysql.com/, and documentation.
- MySQL 8.0 Reference Manual @ https://dev.mysql.com/doc/refman/8.0/en/.
- Russell Dyer, "MySQL in a Nutshell", O'Reilly, 2008.