In this article, I shall describe some HTML5/CSS3/JavaScript/jQuery libraries (plug-ins) that could zest up the UI/UX of your web pages.
Bootstrap
Bootstrap (@ https://getbootstrap.com) greatly simplifies the coding of UI/UX. You can produce a professional-looking UI/UX in a short time, without writing your own HTML/CSS/JavaScript UI/UX codes.
"Quickly design and customize responsive mobile-first sites with Bootstrap, the world’s most popular front-end open source toolkit, featuring Sass variables and mixins, responsive grid system, extensive prebuilt components, and powerful JavaScript plugins." ...quoted from Bootstrap mother site.
The main features are:
- Flexible Grid system for responsive web design, with mobile-first approach.
- Cross-browser support with consistency.
- Extensive list of components (such as navigation bars, BreadCrumbs, and Alerts) and JavaScript plug-ins (such as Modals, Carousels, and Popovers).
Bootstrap Versions
[TODO]
- Bootstrap 1:
- Bootstrap 2:
- Bootstrap 3:
- Bootstrap 4: with new components, faster stylesheet and more responsiveness; but may not work on older browsers. Bootstrap 4 use jQuery and Popper.js for JavaScript components (like modals, tooltips, popovers etc). The latest stable version is 4.6 (Apr 2021).
- Bootstrap 5:
Getting Started With Bootstrap v5.0
To use Bootstrap, you need to include Bootstrap's CSS (bootstrap.min.css) and JavaScript (bootstrap.min.js or bootstrap.bundle.min.js) in your HTML pages. The easier way is linking to "jsDelivr" - a free open source CDN (Content delivery network) - as in the following template.
Bootstrap HTML Template "BootstrapTemplate.html"
1 2 3 4 5 6 7 8 9 10 11 12 13 14 15 16 17 18 19 20 21 22 23 24 25 26 27 |
<!doctype html> <!-- BootstrapTemplate.html --> <html lang="en"> <head> <!-- Required meta tags for Bootstrap --> <meta charset="utf-8"> <meta name="viewport" content="width=device-width, initial-scale=1"> <!-- Bootstrap CSS (from jsdelivr CDN) --> <link href="https://cdn.jsdelivr.net/npm/bootstrap@5.0.0-beta3/dist/css/bootstrap.min.css" rel="stylesheet" integrity="sha384-eOJMYsd53ii+scO/bJGFsiCZc+5NDVN2yr8+0RDqr0Ql0h+rP48ckxlpbzKgwra6" crossorigin="anonymous"> <!-- Other External CSS files --> <title>YOUR PAGE TITLE</title> </head> <body> <!-- Your Content HERE --> <h1>Hello, world!</h1> <!-- Bootstrap JavaScript Bundle with Popper (from jsdelivr CDN) --> <script src="https://cdn.jsdelivr.net/npm/bootstrap@5.0.0-beta3/dist/js/bootstrap.bundle.min.js" integrity="sha384-JEW9xMcG8R+pH31jmWH6WWP0WintQrMb4s7ZOdauHnUtxwoG2vI5DkLtS3qm9Ekf" crossorigin="anonymous"></script> <!-- Other External JS files --> </body> </html> |
Dissecting the codes
- The HTML
doctype(line 1) is needed for bootstrap to work properly. - Bootstrap is developed mobile first, and then scale up as necessary using CSS media queries. The responsive viewport
metatag (Line 7) is needed to ensure proper rendering and touch zooming for all devices. - Line 10 includes the bootstrap CSS via jsdelivr CDN.
- Line 22 includes the bootstrap JavaScript (bundle with Popper) via jsdelivr CDN. We place the JavaScript at the end of the document, before
</body>ending tag, for better responsiveness, provided these scripts are not referenced by other scripts in the<head>and<body>.
Advantage of using the CDN
If the users have already downloaded the same file from the CDN, it will be loaded from cache upon the subsequent requests, which leads to faster loading time.
Local Copy of Bootstrap CSS/JS
Instead of using CDN, you could also provide a local copy of bootstrap CSS and JS.
[TODO] more
Customizing Bootstrap
You can customize Bootstrap by downloading, modifying and re-compiling the Sass source codes provided. More discussion in the later section.
Viewport
Mobile browsers render web pages in a virtual window called viewport, which is usually wider than the screen width, so that they do not need to squeeze the page into the screen. Users can pan or zoom to see the different parts of the web page.
Modern mobile browsers support a <meta> tag to control the viewport. The property width sets the viewport's width (to the device-width in the above template); initial-scale sets the zoom level when the page is first loaded (to no zoom in the above template).
Responsive Design
"Responsive design is a graphic user interface (GUI) design approach used to create content that adjusts smoothly to various screen sizes. Designers size elements in relative units (%) and apply media queries, so their designs can automatically adapt to the browser space to ensure content consistency across devices."
Flexbox Responsive Layout
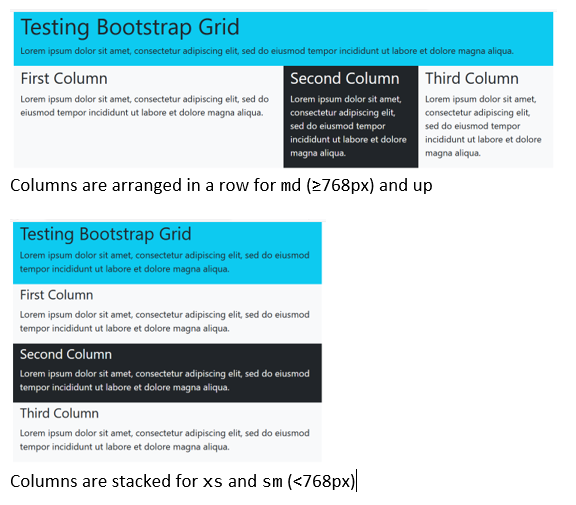
In responsive design, columns are arranged in a row for larger screen; but columns are stacked for smaller screen (such as phone), as illustrated.
Getting Started
- Read "Docs", "Examples" sections in Bootstrap mother site @ https://getbootstrap.com.
- Do not start with the "Sign-in" example, as it does not have component such as header/footer, navigation bar, and rows/columns. Start with .... example.
Responsive Containers
Breakpoints (Grid Tiers) for Responsive Design
Bootstrap 5.0 defines six breakpoints on the device's width (also called grid tiers) to support responsive design with the following default values. There is no CSS classes for extra-small devices, because that is the default in the mobile first design approach. It is, however, denoted by xs in the discussion. The xxl is introduced in Bootstrap 5.
| Breakpoint | CSS Class infix | Device's Width | |
|---|---|---|---|
| 1. | Extra-Small (xs) | - | < 576px |
| 2. | Small | sm | ≥ 576px |
| 3. | Medium | md | ≥ 768px |
| 4. | Large | lg | ≥ 992px |
| 5. | Extra-Large | xl | ≥ 1200px |
| 6. | Extra-Extra-Large | xxl | ≥ 1400px |
Responsive Containers
Bootstrap organizes the pages in rectangular container. There are three types of containers, marked with CSS class:
.container: a fixed-width responsive container (of variousmax-width)..container-fluid: a full-width container (i.e., "width:100%") for all devices..container-{breakpoint}: (Introduced in Bootstrap 5) full-width below breakpoint, fixed-width ofmax-widthfor breakpoint and up.
Setting Container's max-width via Media Query on the Device
Media query (introduced in CSS3) uses the @media rule to include a block of CSS properties only if a certain condition is true. For example, Bootstrap uses the following media queries on min-width of the various device's breakpoints to set the max-width of the container to support responsive design.
.container,
.container-fluid,
.container-xxl,
.container-xl,
.container-lg,
.container-md,
.container-sm {
  width: 100%;
  padding-right: var(--bs-gutter-x, 0.75rem);
  padding-left: var(--bs-gutter-x, 0.75rem);
  margin-right: auto;
  margin-left: auto;
}

// Extra small devices (portrait phones, less than 576px)
// No media query since this is the default Mobile-first approach in Bootstrap
// Take note that the later statements may override the earlier settings.

// Small devices (landscape phones, 576px and up)
@media (min-width: 576px) {   // for "device" screen larger than 576px
  .container-sm, .container {
    max-width: 540px;         // Set the max-width of the "container"
                              // May be overridden by the next query
  }
}

// Medium devices (tablets, 768px and up)
@media (min-width: 768px) {
  .container-md, .container-sm, .container {
    max-width: 720px;  // Override the previous settings for .container and .container-sm
  }
}

// Large devices (desktops, 992px and up)
@media (min-width: 992px) {
  .container-lg, .container-md, .container-sm, .container {
    max-width: 960px;
  }
}
// Extra Large devices
@media (min-width: 1200px) {
  .container-xl, .container-lg, .container-md, .container-sm, .container {
    max-width: 1140px;
  }
}
// Extra-Extra Large devices
@media (min-width: 1400px) {
  .container-xxl, .container-xl, .container-lg, .container-md, .container-sm, .container {
    max-width: 1320px;
  }
}
Example 1: Containers: To see the effects of the various container, start from the above "BootstrapTemplate.html" and include the following container in the <body> content.
1 2 3 4 5 6 7 |
<div class="container bg-light text-info mt-3 mb-3 p-3 border"> <!-- Also try other containers --> <h1>Testing Bootstrap Grid Layout</h1> <p>fim ipsum dolor sit amet, consectetur adipiscing elit, sed do eiusmod tempor incididunt ut labore et dolore magna aliqua. Ut enim ad minim veniam, quis nostrud exercitation ullamco laboris nisi ut aliquip ex ea commodo consequat. Duis aute irure dolor in reprehenderit in voluptate velit esse cillum dolore eu fugiat nulla pariatur. Excepteur sint occaecat cupidatat non proident, sunt in culpa qui officia deserunt mollit anim id est laborum.</p> </div> <!-- end of .container --> |
- Use F12 debugger to inspect the CSS styles of this
<div>.
.mt-3and.mb-3set themargin-topandmargin-bottomrespectively. Themargin-leftandmargin-rightare inherited toauto, which centralizes the<div>..p-3sets thepadding(all four sides).- The measurement unit is
rem(relative to thefont-sizeof the root element). The size of 3 is 1rem, which is 16px. (Note: another measurement unit ofemis relative to thefont-sizeof the current element.) .bordersets "border: 1px solid"..bg-lightsets thebackground-colorproperty.-
.text-primarysets thecolorproperty.
- Resize the width of your window (to simulate various devices from phone, tablet to desktop), and observe the change in
widthandmax-widthof the.containerfromxs,sm, tomd, tolg, toxl, toxxl(from small to large in mobile-first approach).- The .
containerhas full-width (i.e, "width: 100%") untilsmbreakpoint of 576px. This is the mobile-first default forxs. - For screen width of 576-767px (
sm), it has a fixed-width set via the property "max-width: 540px". - For screen width of 768-991px (
md), it has a fixed-width set via the property "max-width: 720px", and so on. - The above is enabled via the CSS3 media query on the
min-widthof the device, as in the above codes.
- The .
- Repeat for
.container-fluid, which has full-width (of "width:100%") for all breakpoints, without settingmax-width. - Repeat for
.container-sm,.container-md,.container-lg,container-xl, andcontainer-xxl. For example,.container-mdhas 100% full-width for screen size smaller than 768px (belowmd), and switches to fixed-width (max-width) for screen width of more than 768px (mdand above). - Study the above CSS media query code on the
max-width. Make sure you understand how these breakpoints work.
The following table summaries the max-width of the various containers for various device breakpoints.
| X-Small <576px |
Small ≥576px |
Medium ≥768px |
Large ≥992px |
X-Large ≥1200px |
XX-Large ≥1400px |
|
|---|---|---|---|---|---|---|
| .container | 100% | 540px | 720px | 960px | 1140px | 1320px |
| .container-sm | 100% | 540px | 720px | 960px | 1140px | 1320px |
| .container-md | 100% | 100% | 720px | 960px | 1140px | 1320px |
| .container-lg | 100% | 100% | 100% | 960px | 1140px | 1320px |
| .container-xl | 100% | 100% | 100% | 100% | 1140px | 1320px |
| .container-xxl | 100% | 100% | 100% | 100% | 100% | 1320px |
| .container-fluid | 100% | 100% | 100% | 100% | 100% | 100% |
Use .container for a responsive pixel width, .container-fluid for width:100% across all viewports and devices, or a responsive container (e.g., .container-md) for a combination of fluid and pixel widths.
Grid Layout - Rows and Columns
A container consists of rows, marked with CSS class ".row". A row consists of columns. Contents are to be placed inside columns.
In the Bootstrap's grid system, a row contains 12 available column-units on which you could span your columns. To markup a column, use CSS classes ".col-{breakpoint}-{colspan}". For example, "<div class='col-sm-4'>" marks a column which spans 4 out of the 12 available column-units (i.e., one-third of the row) on small (sm) devices and up.
If more than 12 column-units are placed in a single row, the extra columns will be wrapped onto a new row.
Example 2: Rows and Columns
Again, start from the above "BootstrapTemplate.html", and include the following in the <body> content.
1 2 3 4 5 6 7 8 9 10 11 12 13 14 15 16 17 18 19 20 21 22 |
<div class="container bg-info"> <!-- also try other containers --> <h1>Testing Bootstrap Grid</h1> <p>Lorem ipsum dolor sit amet, consectetur adipiscing elit, sed do eiusmod tempor incididunt ut labore et dolore magna aliqua.</p> <div class="row"> <div class="col-md-6 bg-light"> <h2><small>First Column</small></h2> <p>Lorem ipsum dolor sit amet, consectetur adipiscing elit, sed do eiusmod tempor incididunt ut labore et dolore magna aliqua.</p> </div> <div class="col-md-3 bg-dark text-white"> <h2><small>Second Column</small></h2> <p>Lorem ipsum dolor sit amet, consectetur adipiscing elit, sed do eiusmod tempor incididunt ut labore et dolore magna aliqua.</p> </div> <div class="col-md-3 bg-light"> <h2><small>Third Column</small></h2> <p>Lorem ipsum dolor sit amet, consectetur adipiscing elit, sed do eiusmod tempor incididunt ut labore et dolore magna aliqua.</p> </div> </div> <!-- end of .row --> </div> <!-- end of .container --> |
- This page has a "
container" (fixed-width ofmax-width) with ONE "row". There are three columns in the "row", with width of "col-md-6", "col-md-3" and "col-md-3", respectively. - In the mobile-first approach, the
mdsettings apply tomdand up, but NOT belowmd(i.e.,smandxs). - For
mdand larger screen, the three columns will be arranged in ONE row. But if you reduce the window's width to below themd's breakpoint of 768px, the columns will be stacked on one another and occupy the entire window's width (regardless of the column-span settings of 6, 3, 3). This is known as Flexbox Layout. Try resizing the window to see the effect. - To design you web page for mobile devices as well as desktop, you can set the three columns as "
col-sm-12 col-md-6", "col-sm-6 col-md-3" and "col-sm-6 col-md-3".- On
xs, the three columns stacked on each others. - On
sm, the first column occupies the entire row; the 2nd and 3rd columns stack below on a new row. - On
mdand up, the three columns are arranged in a row.
- On
- Try setting all the three columns to "
col-md". The three columns will be equally spaced in a row, formdand up, but stacked forsmandxs. - Try setting all the three columns to "
col". The three columns will be equllay spaced in a row, fromxstoxxl. - Try "
container-fluid", which stretches the container to cover the window's full-width, fromxstoxxl. - Take note that grid system only require the Bootstrap CSS. It does not need Bootstrap JS.
Example 2: Column Offset
To move a column to the right (skipping some columns), use ".offset-{breakpoint}-{colspan}".
1 2 3 4 5 6 7 8 9 10 11 12 |
<div class="container bg-info"> <h1>Testing Bootstrap Grid</h1> <p>Lorem ipsum dolor sit amet, consectetur adipiscing elit, sed do eiusmod tempor incididunt ut labore et dolore magna aliqua.</p> <div class="row"> <div class="col-md-4 offset-md-8 bg-light"> <h2><small>First Column</small></h2> <p>Lorem ipsum dolor sit amet, consectetur adipiscing elit, sed do eiusmod tempor incididunt ut labore et dolore magna aliqua.</p> </div> </div> <!-- end of .row --> </div> <!-- end of .container --> |
- On
mdand up, the column is offset by 8/12 of the width. Onxsandsm, the offset is not shown and the column occupies the entire window's width. - Try "
offset-md-6" and "offset-md-7".
Note: Older versions of Bootstrap use .col-{breakpoint}-offset-{colspan}.
Example 3: Re-ordering Columns for Responsive Design
1 2 3 4 5 6 7 8 9 10 11 12 13 14 15 16 17 |
<div class="container bg-info"> <h1>Testing Bootstrap Grid</h1> <p>Lorem ipsum dolor sit amet, consectetur adipiscing elit, sed do eiusmod tempor incididunt ut labore et dolore magna aliqua.</p> <div class="row"> <div class="col-md-10 bg-light"> <h2><small>Main Column</small></h2> <p>Lorem ipsum dolor sit amet, consectetur adipiscing elit, sed do eiusmod tempor incididunt ut labore et dolore magna aliqua.</p> </div> <div class="col-md-2 order-md-first bg-dark text-white"> <h2><small>Navigation Column (Order-First)</small></h2> <p>Lorem ipsum dolor sit amet, consectetur adipiscing elit, sed do eiusmod tempor incididunt ut labore et dolore magna aliqua.</p> </div> </div> <!-- end of .row --> </div> <!-- end of .container --> |
- You can use CSS classes
.order-1,.order-2, to.order-5; or.order-first(equivalent to.order-0),.order-last(equivalent to.order-6) to re-order the columns. You can apply the breakpoint too, e.g.,.order-{breakpoint}-{n}. - On
mdand up, the main column (appears first in the HTML page) is pushed right, and displayed on the right; while the navigation column is pulled left and displayed on the left. In other words, the column orders are re-ordered. - On
xsandsm, these settings do not apply. The main column is stacked on top of the navigation column, in accordance to the sequence of the codes.
Note: Older versions of Bootstrap use .pull-left and .push-right.
More
There are many more column classes.
Bootstrap Examples
Study Bootstrap "Grid" example @ https://getbootstrap.com/docs/5.0/examples/grid/ and all the example under "Framework" to get started.
[TODO] more
Grid of Columns vs. Table
You should use Bootstrap's columns for multi-column contents, e.g., two-column view, navigation-main columns, as in the above examples. The columns are responsive. Use HTML table if you are tabulating data (with many columns).
Color
General Color CSS Class Postfix
There are eight general CSS class postfix for color:
*-primary,*-secondary*-success,*-danger,*-warning,*-info*-light,*-dark
where * could be:
.bg-{color}: background,.text-{color}: text foreground,.link-{color}.border-{color},.table-{color}: table background,.btn-{color}: button background.- ......
Background Color CSS Classes
.bg-{color}where{color}is one of the color class postfix..bg-body,.bg-white,.bg-transparent
Text Color CSS Classes
.text-{color}where{color}is one of the color class postfix..text-body,.text-white,.text-muted,.text-white-50,.text-black-50,.text-reset(to reset the color to its parent).
[TODO] Example on .bg-{color} and .text-{color}
Link Color
.link-{color}where{color}is one of the color class postfix.- Links also have
:hoverand:activecolor properties.
Table Color
See "Table" section.
Spacing - Margin (.m*), Padding (.p*) and Gutter (.g*)
The CSS classes have the format {property}{side}-{size} for xs and {property}{side}-{breakpoint}-{size} for sm, md, lg, xl and xxl.
The {property} is m for margin and p for padding.
The {side} is:
tfor top,bfor bottom,sfor start (or left), andefor end (or right). Take note that Bootstrap 5 introduces new RTL (right-to-left) support. As a result, the notion of "left" and "right" has been replaced with "start" and "end".xfor both left and right,yfor both top and bottom.- blank for all 4 sides.
The {size} is:
- 0 to remove margin/padding.
- 1:
$spacer*0.25 - 2:
$spacer*0.5 - 3:
$spacer - 4:
$spacer*1.25 - 5:
$spacer*1.5 auto: for margin only. Use.mx-autoto centralize an element.
The measurement unit is rem (relative to the font-size of the root element). The default $spacer is 16px, which is 1rem. (Note: another measurement unit of em is relative to the font-size of the current element.)
The commonly used classes are: .p-3 ("padding: 1rem"), .mb-2 ("margin-bottom: 0.5rem"). Avoid margin-top. Vertical margins can collapse, yielding unexpected results.
[TODO] Examples
Glutters - Gap between Columns
For Grid of rows and columns, you can also use glutter classes to control the gaps between columns. The format is .g{side}-{size} or .g{side}-{breakpoint}-{size}, where {side} is either x, y or blank, and {size} is 0-5.
Border
- To add a border, use CSS class
.border(4 sides),.border-top,.border-bottom.,.border-start,.border-end. - To remove a border, use CSS class
.border-0(4 sides),.border-top-0,.border-bottom-0.,.border-start-0,.border-end-0. - To set the width of a border, use CSS class
.border-n, wherenis 1-5. - To set the color of a border, use CSS class
.border-primitive,.border-secondary, ...,.border-whiteetc. - To apply rounded corner,use CSS class
.rounded,.rounded-top,.rounded-bottom,.rounded-start,.rounded-end,.rounded-circle,.rounded-pill,.rounded-0,.rounded-1,.rounded-2,.rounded-3.
Sizing - width (.w*) and height (.h*)
- width:
.w-25,.w-50,.w-75,.w-100(width:n%),.w-auto. - height:
.h-25,.h-55,.h-50,.h-75,.h-100(height:n%),.h-auto. - max-width and max-height:
.mw-100,.mh-100.
Fonts and Texts
Fonts Size, Weight and Style
- font-size:
.fs-1,.fs-2,.fs-3,.fs-4,.fs-5,.fs-6. - font-weight (for bold):
.fw-normal,.fw-bold,.fw-bolder,.fw-light,.fw-lighter. - font-style (for italic):
.fst-normal,.fst-italic. .font-monospace- line-height:
.lh-1,.lh-sm,.lh-lg,.lh-base.
Text Alignment, Transformation and Color
- text-align:
.text-start,.text-end,.text-center. for text alignment. Bootstrap 5 introduces RTL (right-to-left) and the notion of "left" and "right" has been replaced by "start" and "end". You can also apply a breakpoint, in the form of.text-{breakpoint}-{start|end|center}, so that the formatting is applied to{breakpoint}and above. .text-nowrap(white-space: nowrap),.text-wrap.- text-transform:
.text-lowercase,.text-uppercaseand.text-capitalize. .text-{color}and.bg-{color}for setting text color and background color. See the "Color" section.
[TODO] Examples
Typography
HTML Heading Tags <h1> to <h6> and CSS Classes .h1 to .h6
The HTML headings <h1> to <h6> are available. CSS classes .h1 to .h6 are also defined for matching the font styling of a heading. E.g.,
<h3>Heading Level 3</h3>
<p class="h3">The paragraph is displayed like the above h3</p>
<small> and .small
For a smaller heading. You can nest a <small> HTML tag (or CSS class .small) under the headings to reduce the font size to 65% (for <h1> to <h3>) and 75% (for <h4> to <h6>)
CSS Classes .display1 to .display6
For a larger heading. E.g.
<h3 class=".display3">This heading is larger than raw h3</h3>
Lead and Small Paragraphs
You can apply CSS class .lead for a lead paragraph, with bigger font size and line-height so as to stand out among others. To reduce the font size, apply nested <small> or class .small.
[TODO] Example
Inline Text Element Markups
- <mark>, .mark: highlight text
- <del>, <ins>: deleted and inserted text.
- <small>, .small: smaller font size. Note that
<big>is not supported in HTML5. - <s>, .text-decoration-line-through: strike-thru.
- <u>, .text-decoration-underline: unlineline.
- <strong>, <b>, <em>, <i>: Strong (bold). Emphasis (italics).
<b>and<i>are back in HTML5
Lists
- Ordered Lists (
<ol>,<li>), unordered lists (<ul>,<li>), and definition list (<dl>,<dt>,<dd>) are supported. - To remove the bullets or numbering, apply class
.list-unstyled. - For inline list, apply class
.list-inline.
Program Codes
- <code>: program code in monospace font
- <kbd>: keyboard (or user) input
- <pre>: pre-formatted
- <var>: variable
- <samp>: sample output
Images
Bootstrap provides these image formatting classes:
- .img-fluid: for responsive images by applying "
max-width: 100%" and "height: auto", so that the image scales with the parent element. - .img-thumbnail: give a rounded 1 px border appearance.
- .float-start, .float-end: for image alignment
- "mx-auto d-block": center an image
Tables
See Bootstrap's documentation.
<table class="table table-sm|table-border|table-stripped|table-hover|table-{color}">
  <thead>
    <tr>                             <!-- Can apply bg/fg color to the row via class="table-{color} text-{color}" -->
      <th scope="col">Col1Head</th>  <!-- Can apply bg/fg color to the cell via class="table-{color} text-{color}" -->
      <th scope="col">Col2Head</th>
      ......
    </tr>
  </thead>
  <tbody>
    <tr>
      <th scope="row">Row1Head</th>
      <td>......</td>
      <td>......</td>
      ......
    </tr>
    ......
  </tbody>
  <tfoot>
    <tr>
       ......
    </tr>
  </tfoot>
</table>
- Mark a Bootstrap-formatted table with CSS class
.table. i.e.,<table class="table ......">.- To add zebra-strips to the rows in
<tbody>, use<table class="table table-stripped">. - To show the borders, use
<table class='table table-bordered'>. - To highlight the pointed (hover) row (to the rows in
<tbody>), use<table class="table table-hover">. - To compact the table, use
<table class="table table-sm">(or<table class="table table-condensed">in the older version).
- To add zebra-strips to the rows in
- To color the entire table (i.e, set the background color of the table), use
<table class="table table-{color}">, where{color}isprimary,secondary,dark,light,danger,warning,success, andinfo. You can also apply a color to a row or cell, using<tr class="table-{color}">or<td class="table-{color}">. - To set the text color, use the usual
.text-{color}. - To center the text, use
.text-center. It is actually fine to align all columns to the left.
Example
[TODO]
Take note that .table-{color} sets the background color; while .text-{color} sets the foreground color.
- For header row, use larger
font-sizeinstead of bold (which does not displayed well for most of thefont-family).<tr class="table-primary text-primary" style="font-size:1.1em"> <!-- 10% larger relative to current element --> <th class="fw-normal">......</th> <!-- diable the default bold --> ...... </tr>
- For secondary-header row (if any), use:
<tr class="table-secondary text-primary">
  ......
</tr>
- For main-content rows, use:
<tr class="table-light">
  ......
</tr>
Figures
A figure can include an image with a caption. For example,
<figure class="figure">
  <img src="..." class="figure-img img-fluid rounded" alt="...">
  <figcaption class="figure-caption">A caption for the above image.</figcaption>
</figure>
Buttons
- It is preferable to use
<button type=button|submit|reset>element for button, instead of<input type="submit|reset|button>or<a>. - Apply CSS class
.btn, i.e.,<button class="btn">. - To style a button, use classes
.btn-default,.btn-{color}, or.btn-link. - To change the size of button, use classes
.btn-lg(bigger than.btn-default),.btn-sm,.btn-xs(smaller than.btn-default). - To span the full-width (i.e., block button), add
.btn-block. - To disable a button, add
.disabled. - To activate a button programmatically, add
.active.
Forms
Read the CSS's "form" section, which is clearly presented with many examples.
For example,
<div class="container mb-3">
  <h1>Testing Bootstrap Form</h1>
  <p>Lorem ipsum dolor sit amet, consectetur adipiscing elit, sed do
     eiusmod tempor incididunt ut labore et dolore magna aliqua.</p>

  <form>
    <!-- Use .form-label for Label -->
    <!-- Use .form-control for input text, email, password and textarea -->
    <div class="mb-2">
      <label class="form-label" for="email">Email address</label>
      <input type="email" class="form-control" id="email" placeholder="Enter your email">
    </div>
    <div class="mb-2">
      <label class="form-label" for="password">Password</label>
      <input type="password" class="form-control" id="password" placeholder="Enter your password">
      <!-- Use .form-text for text -->
      <p class="form-text">Password shall be 6-20 characters</p>
    </div>
    <div class="mb-2">
      <label class="form-label" for="comment">Enter Your Comments</label>
      <textarea class="form-control" id="comment" rows="3"></textarea>
    </div>

    <!-- Checkboxes (inline) -->
    <fieldset class="mb-2">
      <legend class="col-form-label">Choose a Color</legend>
      <div class="form-check form-check-inline">
        <input type="checkbox" class="form-check-input" id="color1" name="color" value="red">
        <label class="form-check-label" for="color1">Red</label>
      </div>
      <div class="form-check form-check-inline">
        <input type="checkbox" class="form-check-input" id="color2" name="color" value="green">
        <label class="form-check-label" for="color2">Green</label>
      </div>
      <div class="form-check form-check-inline">
        <input type="checkbox" class="form-check-input" id="color3" name="color" value="blue" checked>
        <label class="form-check-label" for="color3">Blue</label>
      </div>
   </fieldset>

    <!-- Radio Buttons (stack) -->
    <fieldset class="mb-2">
      <legend class="col-form-label">Your Gender</legend>
      <div class="form-check">
        <input type="radio" class="form-check-input" id="gender1" name="gender" value="m">
        <label class="form-check-label" for="gender1">Male</label>
      </div>
      <div class="form-check">
        <input type="radio" class="form-check-input" id="gender2" name="gender" value="f">
        <label class="form-check-label" for="gender2">Female</label>
      </div>
   </fieldset>

   <!-- Selection -->
    <div class="mb-4">
      <label class="form-label" for="select1">Select an option</label>
      <select class="form-select" id="select1">
        <option selected>Open this select menu</option>
        <option value="1">One</option>
        <option value="2">Two</option>
        <option value="3">Three</option>
      </select>
   </div>

    <!-- submit button -->
    <button type="submit" class="w-25 btn btn-lg btn-primary">Submit</button>
  </form>
</div> <!-- end of .container -->
How It Works
[TODO]
Grid of .form-row and .col
You can use .form-row instead of the normal .row in a grid, which has less grid margins.
[TODO] Example
Form Validation
[TODO]
Navigation Bar (Navbar)
Read the "Nav" and "NavBar" Sections, which are clearly presented with many examples.
Study all the "Navbars in action" examples.
Example
[TODO]
Bootstrap JavaScript Plugins (To Update)
Tooltips
Tooltips are used to provide hints for icons, links, and buttons, which are displayed when you place your mouse pointer over them.
In HTML5, you can attach a tooltip to an element via the "title" attribute. Bootstrap JavaScript Tooltips plugin allows you to place the tooltips on top, bottom, left or right of the component.
Popovers
Popovers are used for housing secondary information for any element by adding small overlays of content.
Accordion
Collapsible panels
ScrollSpy
The navigation menu gets highlighted based on the scroll position.
Modals
A modal is a special dialog box that provides crucial information to the users. It is usually displayed on top of a "faded" and "disabled" background.
Carousels
Slide show of images which are displayed in a cyclic manner.
Bootstrap Extensions (To Update)
Open Source Themes and Templates
- Start Bootstrap (@ http://startbootstrap.com/).
- Bootswatch (@ https://bootswatch.com/).
- Black Tie (@ http://www.blacktie.co/).
- Bootstrap Zero (@ http://www.bootstrapzero.com/).
- Bootplus (@ http://aozora.github.io/bootplus/).
- Fbootstrapp (@ http://ckrack.github.io/fbootstrapp/).
- Bootmetro (@ http://aozora.github.io/bootmetro/).
More Plugins
- Font Awesome (@ http://fortawesome.github.io/Font-Awesome/): The iconic font and CSS toolkit.
- Bootsnipp (@ http://bootsnipp.com/): Design elements, playground and code snippets for Bootstrap HTML/CSS/JS framework.
- Bootstrap Magic (@ https://pikock.github.io/bootstrap-magic/): Easily create your own Twitter Bootstrap theme.
- Jasny Bootstrap (@ http://jasny.github.io/bootstrap/): The missing components for your favorite front-end framework.
- Fuel UX (@ http://getfuelux.com/): Fuel UX extends Bootstrap with additional lightweight JavaScript controls for your web applications.
- Bootdey (@ http://bootdey.com/): share bootstrap code snippets, themes built with bootstrap.
- BootBundle (@ http://www.bootbundle.com/): Bootstrap themes, snippets & components bundle.
- Start Bootstrap (@ http://startbootstrap.com/): Free Bootstrap Themes & Templates.
- Bootstrap Expo (@ http://expo.getbootstrap.com/): Beautiful and inspiring uses of Bootstrap.
Editors
- Bootply (@ http://www.bootply.com/): Bootstrap Editor and Builder.
- LayoutIt (@ http://www.layoutit.com/): Drag & Drop Interface Builder..
Utilities
- Bootlint Online (@ http://www.bootlint.com/): Checks for several common HTML mistakes in webpages that are using Bootstrap in a fairly "vanilla" way.
SASS
Sass is a preprocessor scripting language that is interpreted or compiled into Cascading Style Sheets (CSS).
[TODO]
Customizing Bootstrap
[TODO]
Icon Libraries
Placing some nice icons in your web pages greatly zests up your UI/UX.
Bootstrap's Icons
Bootstrap also provides an open-source Icon Library @ https://icons.getbootstrap.com. At the time of writing (Apr 2021), Bootstrap Icon has over 1300 icons, in SVGs, SVG sprite, or web fonts.
Setup
To use the Bootstrap icons, the easier way is to include the bootstrap-icons.css from a CDN, e.g.,:
<link rel="stylesheet" href="https://cdn.jsdelivr.net/npm/bootstrap-icons@1.4.1/font/bootstrap-icons.css">
Other setups are possible. Refer to Bootstrap Icons mother site.
Getting Started
Using Bootstrap Icons is straight-forward: To include a particular icon, simply write "<i class="bi bi-{icon-name}"></i>" (e.g,. "<i class="bi bi-person"></i>"). You can check the icon-name from the mothersite.
To re-size the icons, you can use the Bootstrap sizing utility clases, such as .fs-1 to .fs-6.
How It works? (Out-dated)
Refer to "How it works" section for "Font Awesome".
Bootstrap glyphicon includes 5 font formats: EOT, WOFF/WOFF2, TTF, SVG. The relevant CSS rules are:
@font-face {
  font-family: 'Glyphicons Halflings';   /* define the font-family name */
  src: url('../fonts/glyphicons-halflings-regular.eot');   /* IE9 */
  src: url('../fonts/glyphicons-halflings-regular.eot?#iefix') format('embedded-opentype'),  /* IE6-8 */
       url('../fonts/glyphicons-halflings-regular.woff2') format('woff2'),  /* Modern Browsers */
       url('../fonts/glyphicons-halflings-regular.woff') format('woff'),
       url('../fonts/glyphicons-halflings-regular.ttf') format('truetype'),
       url('../fonts/glyphicons-halflings-regular.svg#glyphicons_halflingsregular') format('svg');
}

.glyphicon {
  position: relative;
  top: 1px;
  display: inline-block;
  font-family: 'Glyphicons Halflings';
  font-style: normal;
  font-weight: normal;
  line-height: 1;
  -webkit-font-smoothing: antialiased;
  -moz-osx-font-smoothing: grayscale;
}

/* An icon example */
.glyphicon-asterisk:before {
  content: "\2a";
}
Font Awesome (Out-dated)
I am not updating this section, as Font Awesome begins to charge for some icons, while providing some free icons.
Font Awesome provides a nice set of over 400 scalable vector icons that can be easily included into your web pages, and customized for size, color, etc.
Installation and Setup
- Download from http://fortawesome.github.io/Font-Awesome and unzip.
- Copy the "
font-awesome.min.css" into your "css" folder; copy the "fonts" folders too. - To use Font Awesome, simply include the Font Awesome's CSS in your page:
<link rel="stylesheet" href="css/font-awesome.min.css">
Getting Started
Read the "Get Started" section @ http://fortawesome.github.io/Font-Awesome/get-started, followed by the "Examples" section.
Using Font Awesome is straight-forward:
- To include a particular icon, simply write "
<i class='fa fa-icon-name'></i>" or more syntactically correct "<span class='fa fa-icon-name'></span>". You can check the icon-name from the "Icons" section. - To size up the icon, add class name "
fa-lg" (33% larger), "fa-2x", "fa-3x", "fa-3x", "fa-4x" orfa-5x. - To set the icon to fixed-width for proper alignment (e.g., in tables and list), add class name "
fa-fw". - To set the icon in list, add class name "
fa-ul" to<ul>and "fa-li" to<li>. - More: Read the Examples.
You can use Font Awesome together with Bootstrap. Font Awesome has a larger set of icons which suits many web pages.
How It Works?
In the past, web designers are limited to a few web-safe fonts that are available on most computers. CSS3 adds support for web fonts, that can be downloaded together with the style sheets. This is carried out via the @font-face at-rule.
For example, the "font-awesome.css" begins with:
@font-face {
  font-family: 'FontAwesome';
  src: url('../fonts/fontawesome-webfont.eot?v=4.3.0');  /* IE9 */
  src: url('../fonts/fontawesome-webfont.eot?#iefix&v=4.3.0') format('embedded-opentype'),  /* IE6-IE8 */
       url('../fonts/fontawesome-webfont.woff2?v=4.3.0') format('woff2'),  /* Super Modern Browsers */
       url('../fonts/fontawesome-webfont.woff?v=4.3.0') format('woff'),  /* Pretty Modern Browsers */
       url('../fonts/fontawesome-webfont.ttf?v=4.3.0') format('truetype'),  /* Safari, Android, iOS */
       url('../fonts/fontawesome-webfont.svg?v=4.3.0#fontawesomeregular') format('svg');  /* Legacy iOS */
  font-weight: normal;
  font-style: normal;
}
where:
font-family: define the font-family name, which can be used in thefont-familyproperty of your style rule, e.g.,body { font-family: name }src: font file location, can be expressed inurl()for remote font file, orlocal()for local font. Theurl's will be tried in sequence, until one is found to be suitable for the browser. For Font Awesome, the font files must be kept in the "fonts" directory, at the same level as "css".
To include a icon, we are required to use <i class='fa fa-icon-name'></i>. The style rules for .fa and .fa-send (as an example of an icon) are as follows:
.fa {
  display: inline-block;
  font: normal normal normal 14px/1 FontAwesome;
        /* font-style font-variant font-weight font-size/line-height font-family */
  font-size: inherit;
  text-rendering: auto;
  -webkit-font-smoothing: antialiased;
  -moz-osx-font-smoothing: grayscale;
  transform: translate(0, 0);
}

.fa-send:before {
  content: "\f1d8";
}
- The
font-familyrefers to the custom web font. - The
:before(or::beforein CSS3) pseudo-element selector inserts thecontentvalue before theinnerHTMLof the element (i.e.,<i>), which is a Unicode defined for the icon in the font files. (The::beforeand::afterare the only CSS rules that can modify the contents of the HTML document!) Font Awesome uses the Unicode Private Use Area (PUA) to ensure screen readers do not read off random characters that represent icons.
Font file Format
- EOF (Embedded Open Type): A proprietary file standard, created by Microsoft, supported only by IE (≤9). No other browsers support EOT.
- WOFF/WOFF2 (Web Open Font Format): Load faster because they use a compressed version of OTF and TTF. WOFF2 is the next generation that boasts better compression. This seems to be the winner. Supported by all newer browsers (IE ≥9, FireFox, Chrome, etc.).
- OTF (OpenType Font) and TTF (TrueType Font): Traditional font formats used in desktops.
- SVG (Scalable Vector Graphics); old mobile version of Safari and Android.
Take note that Font Awesome provides all 6 font formats (WOFF2/WOFF, EOT, OTF, TTF, and SVG), so as to support all browsers and devices. WOFF2 has the smallest file size.
CSS Pre-processors (less and scss)
CSS rules can be written with CSS preprocessor, which lets you write styles using programming constructs (such as variables) and then compile into the final CSS.
Font Awesome uses less and scss. Read "less\font-awesome.less" and "scss\font-awesome.scss".
Parsley JS for Form/Field Input Validation (To Update)
Parsley (@ http://parsleyjs.org), is an excellent JavaScript/jQuery library for form input validation.
Setting Up
- Download the "
parsley.zip" from http://parsleyjs.org/doc/download.html. Unzip. - Copy the JavaScript files to your JavaScript folder, e.g., "
js"; and CSS file to your CSS folder, e.g., "css" - Include the jQuery JS, Parsley JS, and Parsley CSS and in your web pages. Take note that Parsley uses jQuery.
<script src="js/jquery-1.11.2.min.js"></script>
<script src="js/parsley.min.js"></script>
<link rel="stylesheet" href="css/parsley.css">
Getting Started
You MUST read the "Examples" and "Documentation" at the Parsley mother site.
I shall present some examples instead of repeating the information.
Example 1: Form Validation using HTML5 (for Comparison)
1 2 3 4 5 6 7 8 9 10 11 12 13 14 15 16 17 18 |
<!DOCTYPE html> <!-- H5FormCompare.html --> <html lang="en"> <head> <meta charset="utf-8"> <title>HTML5 Form Validation</title> </head> <body> <form> <label>Name: <input type="text" name="name" autofocus required pattern="^\w{4,32}$"></label> <label>Email: <input type="email" name="email" required></label><br> <input type="submit"> </form> </body> </html> |
How It works?
- For the first
<input type="text">field, HTML5 inspects attributes "required" and "pattern" to carry out form input validation. In our example, the "pattern" is assigned a regex which matches 4-32 word characters. - For the second
<input type="email">field, HTML5 inspects attribute "required" to validate this field. - HTML5 validates form input by default. To disable form validation, use
<form novalidate>.
Try it out! Observe the bubble error messages "Please fill out this field.", "Please match the requested format.", and "Please enter an email address.". Also observe that validation is first done during the "onchange" (i.e., when you push Enter or click outside the text field).
Example 2: Form Validation Using Parsley
1 2 3 4 5 6 7 8 9 10 11 12 13 14 15 16 17 18 19 20 21 22 23 24 25 26 |
<!DOCTYPE html> <!-- ParsleyFormValidation.html --> <html lang="en"> <head> <meta charset="utf-8"> <title>Test Parsley Form Validation</title> <link rel="stylesheet" href="css/parsley-2.0.7.css"> <script src="js/jquery-1.11.2.min.js"></script> <script src="js/parsley-2.0.7.min.js"></script> </head> <body> <form data-parsley-validate > <label>Name: <input type="text" name="name" autofocus required data-parsley-trigger="change" pattern="^\w{4,32}$" data-parsley-pattern-message="Invalid name (4-32 characters)!" data-parsley-required-message="Name is required!"></label> <label>Email: <input type="email" name="email" required data-parsley-trigger="keyup"></label><br> <input type="submit"> </form> </body> </html> |
How It works?
- Parsley added custom "
data-*" attributes, in the form of "data-parsley-*" to the form elements. - You do NOT need to write any JavaScript codes?!
- We include "
data-parsley-validate" in the<form>tag to bind Parsley validation to the form. - For the first
<input type="text">field, Parsley uses HTML5's attributes "required" and "pattern" for validation. In our example, the "pattern" is assigned a regex matching 4-32 word characters. We also override the default error messages for the "required" and "pattern" fields, via the "data-parsley-required-message" and "data-parsley-pattern-message", respectively. Thedata-parsley-trigger="change"specifies that validation is triggered upon anonchangeevent (i.e., pushing Enter or Tab key, or click outside the field). - For the second
<input type="email">field, Parsley usestype="email"to match for a valid email. Thedata-parsley-trigger="keyup"specifies that validation is triggered upon anonkeyupevent (i.e., whenever you pushes a key).
Try out this form! It works only if you can see the overridden error messages. Otherwise, use FireFox/Firebug to debug your script!
Notes
- Even though you specified
data-parsley-trigger="keyup", Parsley does not carry out validation with less than 4 characters ("Do not assault your users with error messages too soon!") - When a field is detected as invalid, further checks are done on each keystroke, to quickly remove the error message when the field input is valid. Hence, the "
data-parsley-trigger" setting is only applicable for the initial detection. - The "
submit" button will not work, unless all the fields are valid.
Example: Field Validation (without Form) with Parsley Ex. 1
Suppose that we wish to validate an input field, which is not wrapped inside a <form> element.
1 2 3 4 5 6 7 8 9 10 11 12 13 14 15 16 17 18 19 20 21 22 23 24 25 26 27 |
<!DOCTYPE html> <!-- ParsleyFieldEx1.html --> <html lang="en"> <head> <meta charset="utf-8"> <title>Test Parsley Field Validation</title> <link rel="stylesheet" href="css/parsley-2.0.7.css"> <script src="js/jquery-1.11.2.min.js"></script> <script src="js/parsley-2.0.7.min.js"></script> <script> $(document).ready( function() { // Bind all <input> elements for Parsley validation $('input').parsley(); }); </script> </head> <body> <input type="text" name="name" placeholder="Enter your name" required pattern="^\w{4,32}$" data-parsley-pattern-message="Invalid name!" data-parsley-required-message="Name is required!" data-parsley-trigger="change"> <input type="email" name="email" placeholder="Enter your email" required data-parsley-trigger="change"> </body> </html> |
How It works?
- The document contains two
<input>elements which is not wrapped inside a<form>(for whatsoever reasons such as tabulating the<input>in rows). - In the first
<input type="text">, we specify the validation criteria via the "required" and "pattern" attributes; and the error messages via "data-parsley-pattern-message" and "data-parsley-pattern-message". We also set "data-parsley-trigger='change'". - In the jQuery script, we bind the
<input>elements to Parsley to perform validation at "data-parsley-trigger='change'".
Example: Field Validation (without Form) with Parsley Ex. 2
Further to the above example, suppose that we also wish to carry out processing for the input elements, if it is validated, upon onchange.
1 2 3 4 5 6 7 8 9 10 11 12 13 14 15 16 17 18 19 20 21 22 23 24 25 26 27 28 29 30 31 32 33 34 35 |
<!DOCTYPE html> <!-- ParsleyFieldEx2.html --> <html lang="en"> <head> <meta charset="utf-8"> <title>Test Parsley Field Validation</title> <link rel="stylesheet" href="css/parsley-2.0.7.css"> <script src="js/jquery-1.11.2.min.js"></script> <script src="js/parsley-2.0.7.min.js"></script> <script> $(document).ready( function() { // Suppose that you need to process the <input> elements upon onchange // instead of purely validation. // No 'data-parsley-trigger="change"' in the <input> elements. // But bind an onchange handler to the <input>'s which triggers // Parsley validation before processing. $('input').change( function(event) { event.preventDefault(); if ($(this).parsley().validate() === true) { alert("OK and Processed!"); } }); }); </script> </head> <body> <input type="text" name="name" placeholder="Enter your name" required pattern="^\w{4,32}$" data-parsley-pattern-message="Invalid name!" data-parsley-required-message="Name is required!"> <!-- No data-parsley-trigger --> <input type="email" name="email" placeholder="Enter your email" required> </body> </html> |
How It Work?
- Instead of binding the
<input>elements to Parsley to perform validation at "data-parsley-trigger='change'", we remove "data-parsley-trigger='change'" from the<input>elements, but bind an onchange handler to the<input>'s. - The onchange handler invokes "
.parsley.validate()" to trigger Parsley validation, which returnstrueif valid, but something else if not valid (hence, we need to compare withtrue). - The processing operations shall follow once the input is validated.
Notes
- Parsley also provides a function called "
.parsley.isValid()" which triggers Parsley validation (like ".parsley.validate()"), but does not affect the UI nor show the error messages.
Example: Field Validation (without Form) with Parsley Ex. 3
Further to the above examples, suppose that we wish to validate all the input fields, but perform processing via a button if all inputs are valid.
1 2 3 4 5 6 7 8 9 10 11 12 13 14 15 16 17 18 19 20 21 22 23 24 25 26 27 28 29 30 31 32 33 34 35 36 37 38 39 40 41 42 43 |
<!DOCTYPE html> <!-- ParsleyFieldEx3.html --> <html lang="en"> <head> <meta charset="utf-8"> <title>Test Parsley Field Validation</title> <link rel="stylesheet" href="css/parsley-2.0.7.css"> <script src="js/jquery-1.11.2.min.js"></script> <script src="js/parsley-2.0.7.min.js"></script> <script> $(document).ready( function() { // Bind the <input> elements for Parsley validation // triggered at data-parsley-trigger="change". $('input').parsley(); // Bind an onclick handler to the <button> // to trigger Parsley validation on all fields upon click. $('button').click( function(event) { event.preventDefault(); // Validate all input fields. var isValid = true; $('input').each( function() { if ($(this).parsley().validate() !== true) isValid = false; }); if (isValid) { alert("OK and Processed!"); } }); }); </script> </head> <body> <input type="text" name="name" id="name" placeholder="Enter your name" required pattern="^\w{4,32}$" data-parsley-pattern-message="Invalid name!" data-parsley-required-message="Name is required!" data-parsley-trigger="change"> <input type="email" name="email" id="email" placeholder="Enter your email" required data-parsley-trigger="change"> <button type="button">Send</button> </body> </html> |
How It Works?
- We validate all the input fields by binding the
<input>elements to Parsley to perform validation at "data-parsley-trigger='change'", as in the first example. - We bind an onclick handler to the
<button>, which invokes ".parsley.validate()" on all the<input>fields before processing the button. No special attributes for<button>are needed.
Fuel UX (To Update)
Fuel UX extends Bootstrap with additional lightweight JavaScript controls for your webapps, such as Datepicker, Scheduler, Repeater and Wizard. It also styles controls such as checkbox, radio, combobox, infinite scroll, select. The mother site is http://getfuelux.com/index.html.
Firebug/Web Developer Tools seem unable to debug Fuel UX?! But Chrome is working.
Datepicker
Note: Too much codes, try jQuery UI Datepicker (@ https://jqueryui.com/datepicker/) instead.
I re-arrange the examples provided by Fuel UX for easier understanding.
Example 1: Without JavaScript
Wrap the control under a <div> with class="datapicker" and custom data attribute data-initialize="datapicker", as highlighted.
1 2 3 4 5 6 7 8 9 10 11 12 13 14 15 16 17 18 19 20 21 22 23 24 25 26 27 28 29 30 31 32 33 34 35 36 37 38 39 40 41 42 43 44 45 46 47 48 49 50 51 52 53 54 55 56 57 58 59 60 61 62 63 64 65 66 67 68 69 70 71 72 73 74 75 76 77 78 79 80 81 82 83 84 85 86 87 88 89 90 91 92 93 94 95 96 97 98 99 100 101 102 103 104 105 106 107 108 109 |
<!DOCTYPE html>
<html lang="en">
<head>
<meta charset="utf-8">
<meta name="viewport" content="width=device-width, initial-scale=1">
<title>Fuel UX Datepicker (No JavaScript)</title>
<link href="css/bootstrap-3.3.4.min.css" rel="stylesheet">
<link href="css/fuelux-3.6.3.min.css" rel="stylesheet">
<script src="js/jquery-1.11.2.min.js"></script>
<script src="js/bootstrap-3.3.4.min.js"></script>
<script src="js/fuelux-3.6.3.min.js"></script>
</head>

<body class="fuelux">
<div class="container">
  <h1>Fuel UX Datepicker (No JavaScript)</h1>
  <p>Lorem ipsum dolor sit amet, consectetur adipiscing elit, sed do
     eiusmod tempor incididunt ut labore et dolore magna aliqua.</p>

  <div class="datepicker" data-initialize="datepicker" id="myDatepicker">
    <div class="input-group">
      <input type="text" class="form-control" id="myDatepickerInput">
      <div class="input-group-btn">
        <button type="button" class="btn btn-default dropdown-toggle" data-toggle="dropdown">
          <span class="glyphicon glyphicon-calendar"></span>
          <span class="sr-only">Toggle Calendar</span>
        </button>
        <div class="dropdown-menu dropdown-menu-right datepicker-calendar-wrapper" role="menu">
          <div class="datepicker-calendar">
            <div class="datepicker-calendar-header">
              <button type="button" class="prev">
                <span class="glyphicon glyphicon-chevron-left"></span>
                <span class="sr-only">Previous Month</span></button>
              <button type="button" class="next">
                <span class="glyphicon glyphicon-chevron-right">
                </span><span class="sr-only">Next Month</span></button>
              <button type="button" class="title">
                <span class="month">
                  <span data-month="0">January</span>
                  <span data-month="1">February</span>
                  <span data-month="2">March</span>
                  <span data-month="3">April</span>
                  <span data-month="4">May</span>
                  <span data-month="5">June</span>
                  <span data-month="6">July</span>
                  <span data-month="7">August</span>
                  <span data-month="8">September</span>
                  <span data-month="9">October</span>
                  <span data-month="10">November</span>
                  <span data-month="11">December</span>
                </span>
                <span class="year"></span>
              </button>
            </div>
            <table class="datepicker-calendar-days">
              <thead>
                <tr>
                  <th>Su</th>
                  <th>Mo</th>
                  <th>Tu</th>
                  <th>We</th>
                  <th>Th</th>
                  <th>Fr</th>
                  <th>Sa</th>
                </tr>
              </thead>
              <tbody></tbody>
            </table>
            <div class="datepicker-calendar-footer">
              <button type="button" class="datepicker-today">Today</button>
            </div>
          </div>
          <div class="datepicker-wheels" aria-hidden="true">
            <div class="datepicker-wheels-month">
              <h2 class="header">Month</h2>
              <ul>
                <li data-month="0"><button type="button">Jan</button></li>
                <li data-month="1"><button type="button">Feb</button></li>
                <li data-month="2"><button type="button">Mar</button></li>
                <li data-month="3"><button type="button">Apr</button></li>
                <li data-month="4"><button type="button">May</button></li>
                <li data-month="5"><button type="button">Jun</button></li>
                <li data-month="6"><button type="button">Jul</button></li>
                <li data-month="7"><button type="button">Aug</button></li>
                <li data-month="8"><button type="button">Sep</button></li>
                <li data-month="9"><button type="button">Oct</button></li>
                <li data-month="10"><button type="button">Nov</button></li>
                <li data-month="11"><button type="button">Dec</button></li>
              </ul>
            </div>
            <div class="datepicker-wheels-year">
              <h2 class="header">Year</h2>
              <ul></ul>
            </div>
            <div class="datepicker-wheels-footer clearfix">
              <button type="button" class="btn datepicker-wheels-back">
                <span class="glyphicon glyphicon-arrow-left"></span>
                <span class="sr-only">Return to Calendar</span></button>
              <button type="button" class="btn datepicker-wheels-select">Select
                <span class="sr-only">Month and Year</span></button>
            </div>
          </div>
        </div>
      </div>
    </div>
  </div> <!-- end of .datepicker -->
</div> <!-- end of .container -->
</body>
</html>
|
Example 2: With JavaScript
Instead of using the custom data attribute "data-initialize" to initialize Datepicker, we invoke JavaScript method .datepicker({ init-object }), in this example. We also change the date format to MMMM-YY-DD (MySQL Date Format), but this requires Moment JS (@ http://momentjs.com/). In addition, we created some buttons to illustrate the various JavaScript methods.
1 2 3 4 5 6 7 8 9 10 11 12 13 14 15 16 17 18 19 20 21 22 23 24 25 26 27 28 29 30 31 32 33 34 35 36 37 38 39 40 41 42 43 44 45 46 47 48 49 50 51 52 53 54 55 56 57 58 59 60 61 62 63 64 65 66 67 68 69 70 71 72 73 74 75 76 77 78 79 80 81 82 83 84 85 86 87 88 89 90 91 92 93 94 95 96 97 98 99 100 101 102 103 104 105 106 107 108 109 110 111 112 113 114 115 116 117 118 119 120 121 122 123 124 125 126 127 128 129 130 131 132 133 134 135 136 137 138 139 140 141 142 143 144 145 146 147 148 149 150 151 152 153 154 155 156 157 158 159 160 161 162 163 164 165 166 167 168 169 170 171 172 173 174 175 176 |
<!DOCTYPE html>
<html lang="en">
<head>
<meta charset="utf-8">
<meta name="viewport" content="width=device-width, initial-scale=1">
<title>Fuel UX Datepicker (No JavaScript)</title>
<link href="css/bootstrap-3.3.4.min.css" rel="stylesheet">
<link href="css/fuelux-3.6.3.min.css" rel="stylesheet">
<script src="js/jquery-1.11.2.min.js"></script>
<script src="js/bootstrap-3.3.4.min.js"></script>
<script src="js/moment-with-locales-2.10.3.min.js"></script>
<script src="js/fuelux-3.6.3.min.js"></script>
<script>
$(document).ready( function() {
   /* initialize datepicker */
   $('#myDatepicker').datepicker({
      allowPastDates: true,
      momentConfig: {          /* require moment.js */
         culture: 'en',
         format: 'YYYY-MM-DD'  /* in MySQL Date format */
      }
   });

   /* event handlers */
   $('#myDatepicker').on('changed.fu.datepicker', function (event, data) {
      console.log('datepicker change event fired');
   });

   $('#myDatepicker').on('inputParsingFailed.fu.datepicker', function () {
      console.log('datepicker inputParsingFailed event fired');
   });

   /* for the buttons */
   $('#btnDatepickerEnable').on('click', function () {
      $('#myDatepicker').datepicker('enable');
   });

   $('#btnDatepickerDisable').on('click', function () {
      $('#myDatepicker').datepicker('disable');
   });

   jQuery('#btnDatepickerLogFormattedDate').on('click', function () {
      console.log($('#myDatepicker').datepicker('getFormattedDate'));
   });

   $('#btnDatepickerLogDateObj').on('click', function () {
      console.log($('#myDatepicker').datepicker('getDate'));
   });

   $('#btnDatepickerSetDate').on('click', function () {
      var futureDate = new Date(+new Date() + (7 * 24 * 60 * 60 * 1000));
      $('#myDatepicker').datepicker('setDate', futureDate);
      console.log($('#datepicker').datepicker('getDate'));
   });

   $('#btnDatepickerDestroy').on('click', function () {
      var markup = $('#myDatepicker').datepicker('destroy');
      console.log(markup);
      $(this).closest('.section').append(markup);
   });
});
</script>

</head>


<body class="fuelux">
<div class="container">
  <h1>Fuel UX Datepicker (No JavaScript)</h1>
  <p>Lorem ipsum dolor sit amet, consectetur adipiscing elit, sed do
     eiusmod tempor incididunt ut labore et dolore magna aliqua.</p>

  <div class="datepicker" id="myDatepicker">
    <div class="input-group">
      <input type="text" class="form-control" id="myDatepickerInput">
      <div class="input-group-btn">
        <button type="button" class="btn btn-default dropdown-toggle" data-toggle="dropdown">
          <span class="glyphicon glyphicon-calendar"></span>
          <span class="sr-only">Toggle Calendar</span>
        </button>
        <div class="dropdown-menu dropdown-menu-right datepicker-calendar-wrapper" role="menu">
          <div class="datepicker-calendar">
            <div class="datepicker-calendar-header">
              <button type="button" class="prev">
                <span class="glyphicon glyphicon-chevron-left"></span>
                <span class="sr-only">Previous Month</span></button>
              <button type="button" class="next">
                <span class="glyphicon glyphicon-chevron-right">
                </span><span class="sr-only">Next Month</span></button>
              <button type="button" class="title">
                <span class="month">
                  <span data-month="0">January</span>
                  <span data-month="1">February</span>
                  <span data-month="2">March</span>
                  <span data-month="3">April</span>
                  <span data-month="4">May</span>
                  <span data-month="5">June</span>
                  <span data-month="6">July</span>
                  <span data-month="7">August</span>
                  <span data-month="8">September</span>
                  <span data-month="9">October</span>
                  <span data-month="10">November</span>
                  <span data-month="11">December</span>
                </span>
                <span class="year"></span>
              </button>
            </div>
            <table class="datepicker-calendar-days">
              <thead>
                <tr>
                  <th>Su</th>
                  <th>Mo</th>
                  <th>Tu</th>
                  <th>We</th>
                  <th>Th</th>
                  <th>Fr</th>
                  <th>Sa</th>
                </tr>
              </thead>
              <tbody></tbody>
            </table>
            <div class="datepicker-calendar-footer">
              <button type="button" class="datepicker-today">Today</button>
            </div>
          </div>
          <div class="datepicker-wheels" aria-hidden="true">
            <div class="datepicker-wheels-month">
              <h2 class="header">Month</h2>
              <ul>
                <li data-month="0"><button type="button">Jan</button></li>
                <li data-month="1"><button type="button">Feb</button></li>
                <li data-month="2"><button type="button">Mar</button></li>
                <li data-month="3"><button type="button">Apr</button></li>
                <li data-month="4"><button type="button">May</button></li>
                <li data-month="5"><button type="button">Jun</button></li>
                <li data-month="6"><button type="button">Jul</button></li>
                <li data-month="7"><button type="button">Aug</button></li>
                <li data-month="8"><button type="button">Sep</button></li>
                <li data-month="9"><button type="button">Oct</button></li>
                <li data-month="10"><button type="button">Nov</button></li>
                <li data-month="11"><button type="button">Dec</button></li>
              </ul>
            </div>
            <div class="datepicker-wheels-year">
              <h2 class="header">Year</h2>
              <ul></ul>
            </div>
            <div class="datepicker-wheels-footer clearfix">
              <button type="button" class="btn datepicker-wheels-back">
                <span class="glyphicon glyphicon-arrow-left"></span>
                <span class="sr-only">Return to Calendar</span></button>
              <button type="button" class="btn datepicker-wheels-select">Select
                <span class="sr-only">Month and Year</span></button>
            </div>
          </div>
        </div>
      </div>
    </div>
  </div> <!-- end of .datepicker -->

  <br>
  <h5 id="datepicker-examples-sample-methods">Sample Methods</h5>
  <div class="btn-group">
    <button class="btn btn-default" id="btnDatepickerEnable">enable</button>
    <button class="btn btn-default" id="btnDatepickerDisable">disable</button>
    <button class="btn btn-default" id="btnDatepickerLogFormattedDate">log formatted date</button>
    <button class="btn btn-default" id="btnDatepickerLogDateObj">log date object</button>
  </div>
  <div class="btn-group">
    <button class="btn btn-default" id="btnDatepickerSetDate">set date 7 days ahead (will log new value)</button>
    <button class="btn btn-default" id="btnDatepickerDestroy">destroy and append</button>
  </div>

</div> <!-- end of .container -->
</body>
</html>
|
Repeater
References:
- Fuel UX Repeater Tutorial @ http://fuelux-tutorials.herokuapp.com/repeater/.
- Fuel UX Control "Repeater" @ http://getfuelux.com/javascript.html#repeater.
- Fuel UX Extension "Repeater List View" and "Repeater Thumbnail View" @ http://getfuelux.com/extensions.html#bundled-extensions-list.
Example 1: Basic Static DataSource
1 2 3 4 5 6 7 8 9 10 11 12 13 14 15 16 17 18 19 20 21 22 23 24 25 26 27 28 29 30 31 32 33 34 35 36 37 38 39 40 41 42 43 44 45 46 47 48 49 50 51 52 53 54 55 56 57 58 59 60 61 62 63 64 65 66 67 68 69 70 71 72 73 74 75 76 77 78 79 80 81 82 83 84 85 86 87 88 89 90 91 92 93 94 95 96 97 98 99 100 101 102 103 104 105 106 107 108 109 110 111 112 113 114 115 116 117 118 119 120 121 122 123 124 125 126 127 128 129 130 131 132 133 134 135 136 137 138 139 140 141 142 143 144 145 146 147 148 149 150 151 152 153 154 155 156 157 158 159 160 161 162 163 164 165 166 167 168 169 170 171 172 173 174 175 176 177 178 179 180 181 182 183 184 185 186 187 188 189 190 191 192 193 194 195 196 197 198 199 200 201 202 203 204 205 |
<!DOCTYPE html>
<!-- FuelRepeaterBasic.html -->
<html lang="en">
<head>
<meta charset="utf-8">
<meta name="viewport" content="width=device-width, initial-scale=1">
<title>Fuel UX Repeater</title>
<link href="css/bootstrap-3.3.4.min.css" rel="stylesheet">
<link href="css/fuelux-3.6.3.min.css" rel="stylesheet">
<script src="js/jquery-1.11.2.min.js"></script>
<script src="js/bootstrap-3.3.4.min.js"></script>
<script src="js/fuelux-3.6.3.min.js"></script>

<script>
$(document).ready( function() {
   // initialize the repeater
   $('#myRepeater').repeater({
      dataSource: myDataSource   /* bind the dataSource */
   });
});

// Define the columns (in array of column objects)
var columns = [
   { 'label'   : 'Name',   // Column header label
     'property': 'name',   // bind to items' key
     'sortable': true      // is the column sortable?
   },
   { 'label'   : 'Description',
     'property': 'desc',
     'sortable': false
   },
   { 'label'   : 'Status',
     'property': 'status',
     'sortable': true
   },
   { 'label'   : 'Category',
     'property': 'cat',
     'sortable': true
   }
];

// Define the data items (rows) (hardcoded here)
// The key should match the columns' property defined above
var items = [
   { "name": "Name 1",  "desc": "Desc 1",  "status": "draft",    "cat":"A" },
   { "name": "Name 2",  "desc": "Desc 2",  "status": "active",   "cat":"C" },
   { "name": "Name 3",  "desc": "Desc 3",  "status": "archived", "cat":"B" },
   { "name": "Name 4",  "desc": "Desc 4",  "status": "active",   "cat":"C" },
   { "name": "Name 5",  "desc": "Desc 5",  "status": "archived", "cat":"D" },
   { "name": "Name 6",  "desc": "Desc 6",  "status": "archived", "cat":"C" },
   { "name": "Name 7",  "desc": "Desc 7",  "status": "active",   "cat":"D" },
   { "name": "Name 8",  "desc": "Desc 8",  "status": "draft",    "cat":"C" },
   { "name": "Name 9",  "desc": "Desc 9",  "status": "draft",    "cat":"A" },
   { "name": "Name 10", "desc": "Desc 10", "status": "draft",    "cat":"B" },
   { "name": "Name 11", "desc": "Desc 11", "status": "draft",    "cat":"C" },
   { "name": "Name 12", "desc": "Desc 12", "status": "archived", "cat":"C" },
   { "name": "Name 13", "desc": "Desc 13", "status": "active",   "cat":"D" },
   { "name": "Name 14", "desc": "Desc 14", "status": "archived", "cat":"A" },
   { "name": "Name 15", "desc": "Desc 15", "status": "draft",    "cat":"B" },
   { "name": "Name 16", "desc": "Desc 16", "status": "archived", "cat":"C" },
   { "name": "Name 17", "desc": "Desc 17", "status": "active",   "cat":"C" },
   { "name": "Name 18", "desc": "Desc 18", "status": "archived", "cat":"A" },
   { "name": "Name 19", "desc": "Desc 19", "status": "active",   "cat":"C" },
   { "name": "Name 20", "desc": "Desc 20", "status": "draft",    "cat":"D" },
   { "name": "Name 21", "desc": "Desc 21", "status": "draft",    "cat":"B" }
];

/* Call back to render the desired page */
function myDataSource(options, callback) {
   // Prepare displayData for the callback function
   var pageIndex = options.pageIndex;  // page index, starting from 0
   var pageSize = options.pageSize;    // number of items per page
   var totalItems = items.length;      // total number of items
   var totalPages = Math.ceil(totalItems / pageSize);  // number of pages
   var startIndex = (pageIndex * pageSize) + 1; // start index (from 0) for desired page
   var endIndex = (startIndex + pageSize) - 1;  // end index for desired page
   if (endIndex > totalItems) {
      endIndex = totalItems;  // adjust for last page
   }
   var rows = items.slice(startIndex - 1, endIndex);  // slice items for the desired page

   // Set the displayData object for the callback function
   var displayData = {
      'page'    : pageIndex,
      'pages'   : totalPages,
      'count'   : totalItems,
      'start'   : startIndex,
      'end'     : endIndex,
      'columns' : columns,
      'items'   : rows
   };

   // Pass the displayData back to the repeater to render
   callback(displayData);
}
</script>

</head>
<body class="fuelux">
<div class="container">
  <h1>Fuel UX Repeater Basic</h1>
  <p>Lorem ipsum dolor sit amet, consectetur adipiscing elit, sed do
     eiusmod tempor incididunt ut labore et dolore magna aliqua.</p>

  <!-- Repeater -->
  <div class="repeater" id="myRepeater">
    <div class="repeater-header">
      <div class="repeater-header-left">
        <div class="repeater-search">
          <div class="search disabled input-group">
            <input type="search" class="form-control" placeholder="Search">
            <span class="input-group-btn">
              <button class="btn btn-default" type="button">
                <span class="glyphicon glyphicon-search"></span>
                <span class="sr-only">Search</span>
              </button>
            </span>
          </div>
        </div>
      </div> <!-- end of .repeater-header-left -->
      <div class="repeater-header-right">
        <span>Filter Status: </span>
        <div class="btn-group selectlist disabled repeater-filters">
          <button type="button" class="btn btn-default dropdown-toggle" data-toggle="dropdown">
            <span class="selected-label"> </span>
            <span class="caret"></span>
            <span class="sr-only">Toggle Filters</span>
          </button>
          <ul class="dropdown-menu pull-right" role="menu">
            <li data-value="all" data-property="all" data-selected="true">
              <a href="#">All</a></li>
            <li class="divider"></li>
            <li data-value="draft" data-property="status"><a href="#">Draft</a></li>
            <li data-value="archived" data-property="status"><a href="#">Archived</a></li>
            <li data-value="active" data-property="status"><a href="#">Active</a></li>
          </ul>
          <input class="hidden hidden-field" name="filterSelection"
            readonly="readonly" aria-hidden="true" type="text">
        </div>
      </div> <!-- end of .repeater-header-right -->
    </div>  <!-- end of .repeater-header -->

    <div class="repeater-viewport">
      <div class="repeater-canvas"></div>
      <div class="loader repeater-loader"></div>
    </div>

    <div class="repeater-footer">
      <div class="repeater-footer-left">
        <div class="repeater-itemization">
          <span>
            <span class="repeater-start"></span> -
            <span class="repeater-end"></span> of
            <span class="repeater-count"></span> items</span>
          <div class="btn-group selectlist dropup" data-resize="auto">
            <button type="button" class="btn btn-default dropdown-toggle" data-toggle="dropdown">
              <span class="selected-label"> </span>
              <span class="caret"></span>
              <span class="sr-only">Toggle Dropdown</span>
            </button>
            <ul class="dropdown-menu" role="menu">
              <li data-value="10" data-selected="true"><a href="#">10</a></li>
              <li data-value="25"><a href="#">25</a></li>
              <li data-value="50"><a href="#">50</a></li>
            </ul>
            <input class="hidden hidden-field" name="itemsPerPage"
                   readonly="readonly" aria-hidden="true" type="text">
          </div>
          <span>Per Page</span>
        </div>
      </div> <!-- end of .repeater-footer-left -->
      <div class="repeater-footer-right">
        <div class="repeater-pagination">
          <button type="button" class="btn btn-default btn-sm repeater-prev">
            <span class="glyphicon glyphicon-chevron-left"></span>
            <span class="sr-only">Previous Page</span>
          </button>
          <label class="page-label" id="myPageLabel">Page</label>
          <div class="repeater-primaryPaging active">
            <div class="input-group input-append dropdown combobox dropup">
              <input type="text" class="form-control" aria-labelledby="myPageLabel">
              <div class="input-group-btn">
                <button type="button" class="btn btn-default dropdown-toggle" data-toggle="dropdown">
                  <span class="caret"></span>
                  <span class="sr-only">Toggle Dropdown</span>
                </button>
                <ul class="dropdown-menu dropdown-menu-right"></ul>
              </div>
            </div>
          </div>
          <input type="text" class="form-control repeater-secondaryPaging"
                 aria-labelledby="myPageLabel">
          <span>of <span class="repeater-pages"></span></span>
          <button type="button" class="btn btn-default btn-sm repeater-next">
            <span class="glyphicon glyphicon-chevron-right"></span>
            <span class="sr-only">Next Page</span>
          </button>
        </div>
      </div> <!-- end of .repeater-footer-right -->
    </div> <!-- end of .repeater-footer -->
  </div> <!-- end of .repeater -->

</div> <!-- end of .container -->
</body>
</html>
|
How It Works?
To initialize the Repeater, invoke JavaScript method .repeater(initOptions). The argument initOptions is an object, which shall contain a key dataSource, with a dataSource function as value.
// Initialize the repeater
$('#myRepeater').repeater({'dataSource': myDataSource});

// Call back to obtain display data for the current page
function myDataSource(options, callback) {
   ......
};
The dataSource function is called back by the fuel UX engine to obtain the display data, prior to rendering the current page. It passes back 2 arguments: an options object and a callback function.
In options object, Fuel UX gathers the options selected by the users for the desired page to be displayed (e.g., page number to display, search string, filter value, sort column, etc). They are:
options.pageIndex(number): the desired page index, obtained from.repeater-pagination. The page index begins at 0.options.pageSize(number): number of items per page, obtained from.repeater-itemization.
From options.pageIndex, options.pageSize and the total number of items, we could setup the displayData of the desired page for the callback function, as follows:
var pageIndex = options.pageIndex;   // page index, starting from 0
var pageSize = options.pageSize;     // number of items per page
var totalItems = items.length;       // Total number of items
var totalPages = Math.ceil(totalItems / pageSize);  // number of pages
var startIndex = (pageIndex * pageSize) + 1;  // start index of the desired page, this index starts from 1
var endIndex = (startIndex + pageSize) - 1;   // end index for the desired page
if (endIndex > totalItems) {
   endIndex = totalItems;  // last page?
}
var rows = items.slice(startIndex - 1, endIndex); // items for desired page
The options object also includes these keys for searching, filtering and sorting on column:
options.search(string): the search string, obtained from.repeater-search.options.filter(object): filtering value, obtained from.repeater-filter. Theoptions.filter.propertyandoptions.filter.valueprovides the property (column) and the filter value to be used.options.sortProperty(string) andoptions.sortDirection(string): specifies the sorting property (column) and direction ('asc' or 'desc').
Fuel UX supports two types of views: List view and Thumbnail view.
options.view(string): the view option, obtained from.repeater-view.
Searching, filtering and sorting options require custom processing, to be described in latter examples.
At the end of the dataSource function, we invoke the callback function with a displayData object as argument for rendering the desired page. The displayData object has these keys:
count(number): total number of items.page(number): current page index (starting from 0).pages(number): total number of pages.start(number): start index for the current page (starting from 1).end(number): end index for the current page.columns(array ofcolumnobjects): to provide the columns definition. Each column object could have these keys:label(string): column heading label.property(string): bind to this property of the items (to be described below).sortable(boolean): sortable on this column (only can sort on one column).sortDirection(boolean): 'asc' or 'desc'.className(string): value for theclassattribute for CSS styling. Multiple classes are separated by space.width(string or number): column width (for styling).
{'label':xxx, 'property':xxx, 'sortable': true|false}.items(array ofitemobjects): rows for the current page. Eachitemobject represents a row of data. Theitemobject's keys are bound to thecolumn'sproperty; but you are free to provide fewer properties (no display for that column) or more properties (for custom rendering). Theitems(rows) shall already be processed for search, filter, column sort; and shall be display in the order presented.
In this example, the search, filter, column sort are not functioning, as we did not handle them.
Example 2: Searching, Data Filtering and Column Sorting
You can obtain:
- the search string from
options.search. - the filter object from
options.filter.propertyandoptions.filter.value. we use a special string of 'all' for all items (coded underrepeater-filters). - the sort column from
options.sortPropertyandoptions.sortDirection ('asc'|'desc').
To implement searching, filtering, and column sorting, we need to write more codes. Replace the JavaScript of the previous example by the followings, and include the Underscore JS (@ http://underscorejs.org/).
1 2 3 4 5 6 7 8 9 10 11 12 13 14 15 16 17 18 19 20 21 22 23 24 25 26 27 28 29 30 31 32 33 34 35 36 37 38 39 40 41 42 43 44 45 46 47 48 49 50 51 52 53 54 55 56 57 58 59 60 61 62 63 64 65 66 67 68 69 70 71 72 73 74 75 76 77 78 79 80 81 82 83 84 85 86 87 88 89 90 91 92 93 94 95 96 97 98 99 100 101 102 103 104 105 106 107 108 109 110 111 112 113 114 115 116 117 118 119 120 121 122 123 124 125 126 127 128 129 130 131 132 133 134 135 136 137 138 139 140 141 142 143 144 145 146 147 148 149 150 151 152 153 154 155 156 157 158 159 160 161 162 163 164 165 166 |
......
<script src="js/underscore-1.8.3.min.js"></script>
<script src="js/fuelux-3.6.3.min.js"></script>

<script>
$(document).ready( function() {
   // initialize the repeater
   $('#myRepeater').repeater({
      dataSource: myDataSource   /* bind the dataSource */
   });
});

// Define the columns (in array of column objects)
var columns = [
   { 'label'   : 'Name',   // Column header label
     'property': 'name',   // bind to items' key
     'sortable': true      // is the column sortable?
   },
   { 'label'   : 'Description',
     'property': 'desc',
     'sortable': false
   },
   { 'label'   : 'Status',
     'property': 'status',
     'sortable': true
   },
   { 'label'   : 'Category',
     'property': 'cat',
     'sortable': true
   }
];

// Define the data items (rows) (hardcoded here)
// The key should match the columns' property defined above
var items = [
   { "name": "Name 1",  "desc": "Desc 1",  "status": "draft",    "cat":"A" },
   { "name": "Name 2",  "desc": "Desc 2",  "status": "active",   "cat":"C" },
   { "name": "Name 3",  "desc": "Desc 3",  "status": "archived", "cat":"B" },
   { "name": "Name 4",  "desc": "Desc 4",  "status": "active",   "cat":"C" },
   { "name": "Name 5",  "desc": "Desc 5",  "status": "archived", "cat":"D" },
   { "name": "Name 6",  "desc": "Desc 6",  "status": "archived", "cat":"C" },
   { "name": "Name 7",  "desc": "Desc 7",  "status": "active",   "cat":"D" },
   { "name": "Name 8",  "desc": "Desc 8",  "status": "draft",    "cat":"C" },
   { "name": "Name 9",  "desc": "Desc 9",  "status": "draft",    "cat":"A" },
   { "name": "Name 10", "desc": "Desc 10", "status": "draft",    "cat":"B" },
   { "name": "Name 11", "desc": "Desc 11", "status": "draft",    "cat":"C" },
   { "name": "Name 12", "desc": "Desc 12", "status": "archived", "cat":"C" },
   { "name": "Name 13", "desc": "Desc 13", "status": "active",   "cat":"D" },
   { "name": "Name 14", "desc": "Desc 14", "status": "archived", "cat":"A" },
   { "name": "Name 15", "desc": "Desc 15", "status": "draft",    "cat":"B" },
   { "name": "Name 16", "desc": "Desc 16", "status": "archived", "cat":"C" },
   { "name": "Name 17", "desc": "Desc 17", "status": "active",   "cat":"C" },
   { "name": "Name 18", "desc": "Desc 18", "status": "archived", "cat":"A" },
   { "name": "Name 19", "desc": "Desc 19", "status": "active",   "cat":"C" },
   { "name": "Name 20", "desc": "Desc 20", "status": "draft",    "cat":"D" },
   { "name": "Name 21", "desc": "Desc 21", "status": "draft",    "cat":"B" }
];

// Maintain the current filter option.
// No need to invoke dataFilter() if the option is the same.
var currentFilterOptions = {
   filterVaue: '',
   filterProperty: '',
   sortProperty: '',
   sortDirection: '',
   search: ''
};
var currentItems = [];

/* Call back to render the desired page */
function myDataSource(options, callback) {
   // Run filtering, searching and column sorting on items
   var filteredItems = dataFilter(options);

   // Prepare displayData for the callback function
   var pageIndex = options.pageIndex;  // page index, starting from 0
   var pageSize = options.pageSize;    // number of items per page
   var totalItems = filteredItems.length;      // total number of items
   var totalPages = Math.ceil(totalItems / pageSize);  // number of pages
   var startIndex = (pageIndex * pageSize) + 1; // start index (from 0) for desired page
   var endIndex = (startIndex + pageSize) - 1;  // end index for desired page
   if (endIndex > totalItems) {
      endIndex = totalItems;  // adjust for last page
   }
   var rows = filteredItems.slice(startIndex - 1, endIndex);  // slice items for the desired page

   // Set the displayData object for the callback function
   var displayData = {
      'page'    : pageIndex,
      'pages'   : totalPages,
      'count'   : totalItems,
      'start'   : startIndex,
      'end'     : endIndex,
      'columns' : columns,
      'items'   : rows
   };

   // Pass the displayData back to the repeater to render
   callback(displayData);
}

/*
 * Helper to handle filter, search and column sort. Operate directly on items.
 * Need Underscore JS.
 * Filter value in options.filter.property and options.filter.value
 * Search string in options.search.
 * Sort column in options.sortProperty and options.sortDirection.
 * Use global variables items, currentItems, currentFilterOptions.
 */
function dataFilter(options) {
   // Do nothing if there is no change in any of the filter options
   if ((currentFilterOptions.filterVaue === options.filter.value)
       && (currentFilterOptions.filterProperty === options.filter.property)
       && (currentFilterOptions.sortProperty === options.sortProperty)
       && (currentFilterOptions.sortDirection === options.sortDirection)
       && (currentFilterOptions.search === options.search)) {
      return currentItems;
   }

   currentItems = $.extend([], items);  // clone items to filter

   // Handle filter first
   var filterRegex = new RegExp(options.filter.value, 'i');
      // Explicitly make a regex object instead of just using String.search()
      // to avoid confusion with FuelUX search() and options.search
   if (!filterRegex.test('all')) {  // no filtering for the special value 'all'
      currentItems = _.filter(currentItems, function (item) {
         var isFilterMatch = filterRegex.test(item[options.filter.property]);
         return isFilterMatch;
      });
   }

   // Handle search next (search within the filtered rows)
   if (options.search) {  // non-empty
      var searchRegex = new RegExp(options.search, 'i');
      currentItems = _.filter(currentItems, function (item) {
         // collapse all item property values to a single string to make
         //   matching on it easier to manage
         var itemLine = _.reduce(_.values(_.omit(item)), function (finalText, currentText) {
            return finalText + " " + currentText;
         });
         var isSearchMatch = searchRegex.test(itemLine);
         return isSearchMatch;
      });
   }

   // Hanlde column sort last
   if (options.sortProperty) {
      currentItems = _.sortBy(currentItems, function (item) {
         return item[options.sortProperty];
      });
      if (options.sortDirection === 'desc') {
         currentItems.reverse();
      }
   }

   // Update the current filter option
   currentFilterOptions.filterVaue = options.filter.value;
   currentFilterOptions.filterProperty = options.filter.property;
   currentFilterOptions.sortProperty = options.sortProperty;
   currentFilterOptions.sortDirection = options.sortDirection;
   currentFilterOptions.search = options.search;

   return currentItems;
};
</script>
|
We used Underscore JS (@ http://underscorejs.org/) to filter and sort the items, before setting up the displayData.
[TODO] More explanation
A limitation of repeater is it can only filter on one criterion, NOT multiple criteria. Also, you can only sort on one column, NOT nested columns.
Example 3: Retrieving Data Rows from Server via an Ajax JSON response.
In this example, if the data has not been loaded, we send an Ajax request to do a database query, and return the results in JSON for rendering. Otherwise, we will skip the Ajax request.
SQL Script
We use the following SQL script to create our database.
1 2 3 4 5 6 7 8 9 10 11 12 13 14 15 16 17 18 19 20 21 22 23 24 25 26 27 28 29 30 31 32 33 34 35 |
use test; drop table if exists RepeaterData; create table RepeaterData ( name varchar(20), `desc` varchar(40), status varchar(10), cat varchar(10), primary key (name) ); insert into RepeaterData values ( 'Name 1', 'Desc 1', 'draft', 'A' ), ( 'Name 2', 'Desc 2', 'active', 'C' ), ( 'Name 3', 'Desc 3', 'archived', 'B' ), ( 'Name 4', 'Desc 4', 'active', 'C' ), ( 'Name 5', 'Desc 5', 'archived', 'D' ), ( 'Name 6', 'Desc 6', 'archived', 'C' ), ( 'Name 7', 'Desc 7', 'active', 'D' ), ( 'Name 8', 'Desc 8', 'draft', 'C' ), ( 'Name 9', 'Desc 9', 'draft', 'A' ), ( 'Name 10', 'Desc 10', 'draft', 'B' ), ( 'Name 11', 'Desc 11', 'draft', 'C' ), ( 'Name 12', 'Desc 12', 'archived', 'C' ), ( 'Name 13', 'Desc 13', 'active', 'D' ), ( 'Name 14', 'Desc 14', 'archived', 'A' ), ( 'Name 15', 'Desc 15', 'draft', 'B' ), ( 'Name 16', 'Desc 16', 'archived', 'C' ), ( 'Name 17', 'Desc 17', 'active', 'C' ), ( 'Name 18', 'Desc 18', 'archived', 'A' ), ( 'Name 19', 'Desc 19', 'active', 'C' ), ( 'Name 20', 'Desc 20', 'draft', 'D' ), ( 'Name 21', 'Desc 21', 'draft', 'B' ); select * from RepeaterData; |
Server-side PHP Script FuelRepeaterGetData.php
This PHP script returns all the row as a JSON object.
1 2 3 4 5 6 7 8 9 10 11 12 13 14 15 16 17 18 19 20 21 22 23 24 25 26 27 28 29 30 31 32 |
<?php /** * Retrieving data for Fuel UX Repeater */ // Define the MySQL database parameters. $DB_HOST = 'localhost'; // MySQL server hostname $DB_PORT = '3306'; // MySQL server port number (default 3306) $DB_NAME = 'test'; // MySQL database name $DB_USER = 'xxxx'; // MySQL username $DB_PASS = 'xxxx'; // password try { // Create a PDO database connection to MySQL server $pdo = new PDO("mysql:host=$DB_HOST;port=$DB_PORT;dbname=$DB_NAME", $DB_USER, $DB_PASS); $pdo->setAttribute(PDO::ATTR_ERRMODE, PDO::ERRMODE_EXCEPTION); // Set error mode to exception // Get all records. $stmt = $pdo->prepare('SELECT * FROM RepeaterData'); $stmt->execute(); $results = $stmt->fetchAll(PDO::FETCH_ASSOC); $jsonResult = json_encode($results); echo $jsonResult; // Close the database connection (optional). $pdo = NULL; } catch (PDOException $e) { $fileName = basename($e->getFile(), ".php"); // Filename that trigger the exception $lineNumber = $e->getLine(); // Line number that triggers the exception die("[$fileName][$lineNumber] Database error: " . $e->getMessage() . '<br>'); } ?> |
HTML File
Replace the script in the earlier example with the followings, and include the Underscore JS.
1 2 3 4 5 6 7 8 9 10 11 12 13 14 15 16 17 18 19 20 21 22 23 24 25 26 27 28 29 30 31 32 33 34 35 36 37 38 39 40 41 42 43 44 45 46 47 48 49 50 51 52 53 54 55 56 57 58 59 60 61 62 63 64 65 66 67 68 69 70 71 72 73 74 75 76 77 78 79 80 81 82 83 84 85 86 87 88 89 90 91 92 93 94 95 96 97 98 99 100 101 102 103 104 105 106 107 108 109 110 111 112 113 114 115 116 117 118 119 120 121 122 123 124 125 126 127 128 129 130 131 132 133 134 135 136 137 138 139 140 141 142 143 144 145 146 147 148 149 150 151 152 153 154 155 156 157 158 159 160 161 162 163 164 165 166 167 168 |
......
<script src="js/underscore-1.8.3.min.js"></script>
<script src="js/fuelux-3.6.3.min.js"></script>

<script>
$(document).ready( function() {
   // initialize the repeater
   $('#myRepeater').repeater({
      dataSource: myDataSource   /* bind the dataSource */
   });
});

// Define the columns (in array of column objects)
var columns = [
   { 'label'   : 'Name',   // Column header label
     'property': 'name',   // bind to items' key
     'sortable': true      // is the column sortable?
   },
   { 'label'   : 'Description',
     'property': 'desc',
     'sortable': false
   },
   { 'label'   : 'Status',
     'property': 'status',
     'sortable': true
   },
   { 'label'   : 'Category',
     'property': 'cat',
     'sortable': true
   }
];

// Data rows. Init to null to be loaded from database.
var items = null;

// Maintain the current filter option.
// No need to invoke dataFilter() if the option is the same.
var currentFilterOptions = {
   filterVaue: '',
   filterProperty: '',
   sortProperty: '',
   sortDirection: '',
   search: ''
};
var currentItems = [];

/* Call back to render the desired page */
function myDataSource(options, callback) {
   if (items === null) {
      /*
       * Data rows not populated yet.
       * Send an Ajax Request to Database Server, which returns a JSON response.
       * You can also load the items in ready().
       */
      $.ajax({
         'url'     : 'FuelRepeaterGetData.php',
         'type'    : 'post',
         'dataType': 'json'   // Response as JSON
      })
         .done( function(responseText) {
            items = responseText;  // populate global items
            myDataSourceHelper(options, callback);
         });

   } else {
      myDataSourceHelper(options, callback);
   }
}

/*
 * The items shall already have been populated.
 * Handle search, filter, sort; and prepare the displayData.
 */
function myDataSourceHelper(options, callback) {
   // Run filtering, searching and column sorting on items
   var filteredItems = dataFilter(options);

   // Prepare displayData for the callback function
   var pageIndex = options.pageIndex;  // page index, starting from 0
   var pageSize = options.pageSize;    // number of items per page
   var totalItems = filteredItems.length;      // total number of items
   var totalPages = Math.ceil(totalItems / pageSize);  // number of pages
   var startIndex = (pageIndex * pageSize) + 1; // start index (from 0) for desired page
   var endIndex = (startIndex + pageSize) - 1;  // end index for desired page
   if (endIndex > totalItems) {
      endIndex = totalItems;  // adjust for last page
   }
   var rows = filteredItems.slice(startIndex - 1, endIndex);  // slice items for the desired page

   // Set the displayData object for the callback function
   var displayData = {
      'page'    : pageIndex,
      'pages'   : totalPages,
      'count'   : totalItems,
      'start'   : startIndex,
      'end'     : endIndex,
      'columns' : columns,
      'items'   : rows
   };

   // Pass the displayData back to the repeater to render
   callback(displayData);
}

/*
 * Helper to handle filter, search and column sort. Operate directly on items.
 * Need Underscore JS.
 * Filter value in options.filter.property and options.filter.value
 * Search string in options.search.
 * Sort column in options.sortProperty and options.sortDirection.
 */
function dataFilter(options) {
   // Do nothing if there is no change in any of the filter options
   if ((currentFilterOptions.filterVaue === options.filter.value)
       && (currentFilterOptions.filterProperty === options.filter.property)
       && (currentFilterOptions.sortProperty === options.sortProperty)
       && (currentFilterOptions.sortDirection === options.sortDirection)
       && (currentFilterOptions.search === options.search)) {
      return currentItems;
   }

   currentItems = $.extend([], items);  // clone items to filter

   // Handle filter first
   var filterRegex = new RegExp(options.filter.value, 'i');
      // Explicitly make a regex object instead of just using String.search()
      // to avoid confusion with FuelUX search() and options.search
   if (!filterRegex.test('all')) {  // no filtering for the special value 'all'
      currentItems = _.filter(currentItems, function (item) {
         var isFilterMatch = filterRegex.test(item[options.filter.property]);
         return isFilterMatch;
      });
   }

   // Handle search next (search within the filtered rows)
   if (options.search) {  // non-empty
      var searchRegex = new RegExp(options.search, 'i');
      currentItems = _.filter(currentItems, function (item) {
         // collapse all item property values to a single string to make
         //   matching on it easier to manage
         var itemLine = _.reduce(_.values(_.omit(item)), function (finalText, currentText) {
            return finalText + " " + currentText;
         });
         var isSearchMatch = searchRegex.test(itemLine);
         return isSearchMatch;
      });
   }

   // Hanlde column sort last
   if (options.sortProperty) {
      currentItems = _.sortBy(currentItems, function (item) {
         return item[options.sortProperty];
      });
      if (options.sortDirection === 'desc') {
         currentItems.reverse();
      }
   }

   // Update the current filter option
   currentFilterOptions.filterVaue = options.filter.value;
   currentFilterOptions.filterProperty = options.filter.property;
   currentFilterOptions.sortProperty = options.sortProperty;
   currentFilterOptions.sortDirection = options.sortDirection;
   currentFilterOptions.search = options.search;

   return currentItems;
};
</script>
|
[TODO] Client-side filtering vs. Server-side filtering?
Example 4: Custom Column Cell Rendering
To perform custom column cell rendering, such as injecting markup or combining multiple properties, you can write a custom column rendering function and register the function during initialization of repeater:
$(document).ready( function() {
   // initialize the repeater
   $('#myRepeater').repeater({
      // register dataSource
      dataSource: myDataSource,
      // Setup custom column cell renderer for the list view
      list_columnRendered: myColumnRenderer
   });
});

// Call back after rendering each table cell
function myColumnRenderer(helpers, callback) {
   ......
   ......
   callback();  // continue rendering
}
The Fuel UX repeater calls this function after rendering each table cell within a row. It passes two arguments: a helpers object and a callback function:
helpers.rowData: All key/value data from the current item/row in the dataSource.helpers.columnAttr: Thepropertyspecified bydataSource.columnsof the current column/cell.helpers.container: jQuery element of the currenttror table row for manipulating the row.helpers.item: jQuery element of the currenttdor table cell for manipulating the current cell.callback: Call this function to continue rendering the view.
1 2 3 4 5 6 7 8 9 10 11 12 13 14 15 16 17 18 19 20 21 22 23 24 25 26 27 28 29 30 31 32 33 34 35 36 37 38 39 40 41 42 43 44 45 46 47 48 49 50 51 52 53 54 55 56 57 58 59 60 61 62 63 64 65 66 67 68 69 70 71 72 73 74 75 76 77 78 79 80 81 82 83 84 85 86 87 88 89 90 91 92 93 94 95 96 97 98 99 100 101 102 103 104 105 106 107 108 109 110 111 112 113 114 115 116 117 118 119 120 121 122 123 124 125 126 127 128 129 130 131 132 133 134 135 136 137 138 139 140 141 142 143 144 145 146 147 148 149 150 151 152 153 154 155 156 157 158 159 160 161 162 163 164 165 166 167 168 169 170 171 172 173 174 175 176 177 178 179 180 181 182 183 184 185 186 187 188 189 190 191 192 193 194 195 196 197 198 199 200 201 202 203 204 205 206 207 208 209 210 211 212 213 214 215 216 217 218 219 220 221 222 223 224 225 226 227 228 |
......
<script src="js/underscore-1.8.3.min.js"></script>
<script src="js/fuelux-3.6.3.min.js"></script>
<script>
$(document).ready( function() {
// initialize the repeater
$('#myRepeater').repeater({
dataSource: myDataSource, /* bind the dataSource */
list_columnRendered: myColumnRenderer /* custom column renderer */
});
});
/*
* Define the columns
* We shall combine the name and desc under one column;
* style the status column; do nothing to category;
* add a new column for controls (checkbox, button)
*/
var columns = [
{ 'label' : 'Name/Description', // combine name and desc
'property': 'name',
'sortable': true
},
{ 'label' : 'Status',
'property': 'status',
'sortable': true
},
{ 'label' : 'Category',
'property': 'cat',
'sortable': true
},
{ 'label' : 'Action', // new column of controls
'property': 'action'
}
];
// Define the data items (rows) (hardcoded here)
var items = [
{ "name": "Name 1", "desc": "Desc 1", "status": "draft", "cat":"A" },
{ "name": "Name 2", "desc": "Desc 2", "status": "active", "cat":"C" },
{ "name": "Name 3", "desc": "Desc 3", "status": "archived", "cat":"B" },
{ "name": "Name 4", "desc": "Desc 4", "status": "active", "cat":"C" },
{ "name": "Name 5", "desc": "Desc 5", "status": "archived", "cat":"D" },
{ "name": "Name 6", "desc": "Desc 6", "status": "archived", "cat":"C" },
{ "name": "Name 7", "desc": "Desc 7", "status": "active", "cat":"D" },
{ "name": "Name 8", "desc": "Desc 8", "status": "draft", "cat":"C" },
{ "name": "Name 9", "desc": "Desc 9", "status": "draft", "cat":"A" },
{ "name": "Name 10", "desc": "Desc 10", "status": "draft", "cat":"B" },
{ "name": "Name 11", "desc": "Desc 11", "status": "draft", "cat":"C" },
{ "name": "Name 12", "desc": "Desc 12", "status": "archived", "cat":"C" },
{ "name": "Name 13", "desc": "Desc 13", "status": "active", "cat":"D" },
{ "name": "Name 14", "desc": "Desc 14", "status": "archived", "cat":"A" },
{ "name": "Name 15", "desc": "Desc 15", "status": "draft", "cat":"B" },
{ "name": "Name 16", "desc": "Desc 16", "status": "archived", "cat":"C" },
{ "name": "Name 17", "desc": "Desc 17", "status": "active", "cat":"C" },
{ "name": "Name 18", "desc": "Desc 18", "status": "archived", "cat":"A" },
{ "name": "Name 19", "desc": "Desc 19", "status": "active", "cat":"C" },
{ "name": "Name 20", "desc": "Desc 20", "status": "draft", "cat":"D" },
{ "name": "Name 21", "desc": "Desc 21", "status": "draft", "cat":"B" }
];
// Maintain the current filter option.
// No need to invoke dataFilter() if the option is the same.
var currentFilterOptions = {
filterVaue: '',
filterProperty: '',
sortProperty: '',
sortDirection: '',
search: ''
};
var currentItems = [];
/* Call back to render the desired page */
function myDataSource(options, callback) {
// Run filtering, searching and column sorting on items
var filteredItems = dataFilter(options);
// Prepare displayData for the callback function
var pageIndex = options.pageIndex; // page index, starting from 0
var pageSize = options.pageSize; // number of items per page
var totalItems = filteredItems.length; // total number of items
var totalPages = Math.ceil(totalItems / pageSize); // number of pages
var startIndex = (pageIndex * pageSize) + 1; // start index (from 0) for desired page
var endIndex = (startIndex + pageSize) - 1; // end index for desired page
if (endIndex > totalItems) {
endIndex = totalItems; // adjust for last page
}
var rows = filteredItems.slice(startIndex - 1, endIndex); // slice items for the desired page
// Set the displayData object for the callback function
var displayData = {
'page' : pageIndex,
'pages' : totalPages,
'count' : totalItems,
'start' : startIndex,
'end' : endIndex,
'columns' : columns,
'items' : rows
};
// Pass the displayData back to the repeater to render
callback(displayData);
}
/*
* Handle filter, search and column sort. Operate directly on items.
* Need Underscore JS.
* Filter value in options.filter.property and options.filter.value
* Search string in options.search.
* Sort column in options.sortProperty and options.sortDirection.
*/
function dataFilter(options) {
// Do nothing if there is no change in any of the filter options
if ((currentFilterOptions.filterVaue === options.filter.value)
&& (currentFilterOptions.filterProperty === options.filter.property)
&& (currentFilterOptions.sortProperty === options.sortProperty)
&& (currentFilterOptions.sortDirection === options.sortDirection)
&& (currentFilterOptions.search === options.search)) {
return currentItems;
}
currentItems = $.extend([], items); // clone items to filter
// Handle filter first
var filterRegex = new RegExp(options.filter.value, 'i');
// Explicitly make a regex object instead of just using String.search()
// to avoid confusion with FuelUX search() and options.search
if (!filterRegex.test('all')) { // no filtering for the special value 'all'
currentItems = _.filter(currentItems, function (item) {
var isFilterMatch = filterRegex.test(item[options.filter.property]);
return isFilterMatch;
});
}
// Handle search next (search within the filtered rows)
if (options.search) { // non-empty
var searchRegex = new RegExp(options.search, 'i');
currentItems = _.filter(currentItems, function (item) {
// collapse all item property values to a single string to make
// matching on it easier to manage
var itemLine = _.reduce(_.values(_.omit(item)), function (finalText, currentText) {
return finalText + " " + currentText;
});
var isSearchMatch = searchRegex.test(itemLine);
return isSearchMatch;
});
}
// Hanlde column sort last
if (options.sortProperty) {
currentItems = _.sortBy(currentItems, function (item) {
return item[options.sortProperty];
});
if (options.sortDirection === 'desc') {
currentItems.reverse();
}
}
// Update the current filter option
currentFilterOptions.filterVaue = options.filter.value;
currentFilterOptions.filterProperty = options.filter.property;
currentFilterOptions.sortProperty = options.sortProperty;
currentFilterOptions.sortDirection = options.sortDirection;
currentFilterOptions.search = options.search;
return currentItems;
};
/*
* Custom column (cell) renderer.
* Call back after rendering each cell.
* We combine the name and description properties under one column;
* style the status; and populate Action column with controls.
*/
function myColumnRenderer(helpers, callback) {
var column = helpers.columnAttr; /* dataSource.columns.property */
// get all the data for the entire row
var rowData = helpers.rowData; /* row data in key-value pair */
var customMarkup = '';
// Override the output for specific columns.
switch(column) {
case 'name':
// let's combine name and description into a single column
customMarkup = '<a href="#">' + rowData.name
+ '</a><div class="small text-muted">' + rowData.desc + '</div>';
break;
case 'status':
// let's change the text color based on status
var color = '#000';
switch(helpers.item.text()) {
case 'draft':
color = '#4EB1CB';
break
case 'active':
color = '#4AB471';
break;
case 'archived':
color = '#CF5C60';
break;
}
customMarkup = '<span style="color:' + color + '">'
+ helpers.item.text() + '</span>';
break;
case 'action':
// Add a checkbox with name=xxx
customMarkup = '<input type="checkbox" name="name" value="'
+ rowData.name + '">';
// Add a trash action button
customMarkup += ' <button class="btn btn-xs btn-danger" type="botton"><span class="glyphicon glyphicon-trash" ></span></button>';
// customMarkup += '</div>';
break;
default:
// otherwise, just use the existing text value
customMarkup = helpers.item.text();
break;
}
helpers.item.html(customMarkup);
callback(); /* continue rendering */
}
</script>
|
Example 5: List View and Thumbnail View
[TODO]
Wizard
[TODO]
AMD and RequireJS (To Update)
RequireJS (@ http://requirejs.org/) is a JavaScript file and module loader. It implements the AMD (Asynchronous Module Definition) specification.
The AMD API (@ https://github.com/amdjs/amdjs-api/blob/master/AMD.md) specifies a mechanism for defining modules such that the module and its dependencies can be asynchronously loaded. This is particularly well suited for the browser environment where synchronous loading of modules incurs performance, usability, debugging, and cross-domain access problems. The API has only a function called define(), with the following signature:
define(id?, dependencies?, factory);
The define() function is used to define a module, with its dependencies:
id: the ID of the module being defined. Optional and default to the filename. We often leave it to the default. For example, if the JavaScript filename is "foo.js", the default ID is "foo" (without the ".js").dependencies: array of dependencies module IDs, e.g.,["jquery", "underscore"]. Optional.factory: a function that should be executed to instantiate the module or an object.
Defining Modules
Example 1: Define a module as an object, without dependencies
/* Filename is "js/amdModObj.js" */
define({
   k1: 'v1',
   k2: 'v2',
   k3: 'v3'
});
   // id is "amdModObj" by default (without ".js")
   // No dependencies
   // The factory produces an object, which can be referenced in other modules as "amdModObj"
   // (e.g., the values are "amdModObj.k1", "amdModObj.k2")
Example 2: Define a module as a function, without dependencies
/* Filename is "js/amdModFun.js" */
define( function() {
   return function(n1, n2) {
      return n1 + n2;  // Simply add the arguments
   };
});
   // id is "amdModObj" by default (without ".js")
   // No dependencies
   // The factory produces a function, which can be referenced in other modules as "amdModFun()"
   // (e.g., "amdModFun(1, 2)")
Example 3: Define a module as an object, with dependencies
In this example, we shall define a module, that depends on jQuery and Underscore. We list the dependencies module IDs in an array. We then invoke the factory function, which takes the dependencies modules as arguments. In this case, we use $ and _ as the argument names. This module returns an object, with a key sayHello mapping to the sayHello function.
/* Filename is "js/amdModDep.js" */
define(['jquery', 'underscore'], function($, _) {
  var sayHello = function(message) {
    var template = _.template("Hello, <%= message %>");
          // Create an underscore template
    $(".message").html(template({message: message}));
          // Use jQuery to select an element and show the message
  };
  return {
    sayHello: sayHello   // return an object
  };
});
   // id is "amdModDep" by default (without ".js").
   // Depends on modules with ID of 'jquery' and 'underscore'.
   // The factory produces an object, which can be referenced in other modules as "amdModDep".
   //   You can invoke the function via amdModDep.sayHello('testing').
Using the Defined Modules
Example 1: Using amdModObj.js and amdModFun.js
1 2 3 4 5 6 7 8 9 10 11 12 13 14 15 16 17 18 19 20 21 22 23 24 25 26 27 28 29 |
<!DOCTYPE html> <!-- amdUseMod1.html --> <html lang="en"> <head> <meta charset="utf-8"> <title>Testing AMD Modules</title> <!-- Only need to load the Require JS --> <script src="js/require-2.1.17.min.js"></script> <script> // Configure the Module IDs and their path. // The baseUrl is at this HTML file. require.config({ paths: { 'amdModObj': 'js/amdModObj', // Without the ".js" 'amdModFun': 'js/amdModFun' }, }); // Using modules 'amdModObj' and 'amdModFun' require(['amdModObj', 'amdModFun'], function(amdModObj, amdModFun) { console.log(amdModObj.k3); console.log(amdModFun(1, 2)); }); </script> </head> <body> <p>Hello World</p> </body> </html> |
In this example, we use amdModObj.js and amdModFun.js created earlier.
- We only need to load the Require JS, not the other scripts.
- We use the
require.config()to configure the Module IDs and their paths. Take note that in the script, the baseUrl is at this HTML file. We provide relative path relative to the baseUrl. The file extension ".js" is to be omitted. - To use the modules, we invoke the
require()function, which has similar syntax asdefine(). We list the modules used as dependencies in an array. We then invoke the factory function, which takes the modules as arguments.
Example 2: Factoring out the main.js
Instead of place the script in the HTML, we move the script to "js/amdMain.js" (or typically named "js/app.js" or "js/main.js"). Require JS invokes the main script via attribute data-main="js/amdMain". Take note that in the require.config(), the baseUrl is changed to the main script folder.
1 2 3 4 5 6 7 8 9 10 11 12 13 14 |
/* Filename is "amdMain.js" */ // Configure the Module IDs and their path require.config({ paths: { 'amdModObj': 'amdModObj', // baseUrl is at js/amdMain.js. No ".js" 'amdModFun': 'amdModFun' }, }); // Using modules 'amdModObj' and 'amdModFun' require(['amdModObj', 'amdModFun'], function(amdModObj, amdModFun) { console.log(amdModObj.k3); console.log(amdModFun(1, 2)); }); |
The HTML file is:
1 2 3 4 5 6 7 8 9 10 11 |
<!DOCTYPE html>
<html lang="en">
<head>
<meta charset="utf-8">
<title>Testing AMD Modules</title>
<script data-main="js/amdMain" src="js/require-2.1.17.min.js"></script>
</head>
<body>
<p>Hello World</p>
</body>
</html>
|
Example 3: Using the Module with dependencies on jQuery and Underscore
1 2 3 4 5 6 7 8 9 10 11 12 13 14 15 16 17 18 19 20 21 22 23 24 25 26 27 |
<!DOCTYPE html> <html lang="en"> <head> <meta charset="utf-8"> <title>Testing AMD Modules</title> <script src="js/require-2.1.17.min.js"></script> <script> // Configure the Module IDs and their path require.config({ paths: { 'jquery': 'js/jquery-1.11.2.min', // without the ".js". Can use the remote CDN too. 'underscore': 'js/underscore-1.8.3.min', 'amdModDep' : 'js/amdModDep' }, }); // Using modules 'amdModDep', which depends on 'jquery' and 'underscore'. require(['amdModDep'], function(amdModDep) { amdModDep.sayHello('testing'); }); </script> </head> <body> <h2>Testing AMD and RequireJS</h2> <p class="message"> </p> </body> </html> |
Benefits: The module, as well as its dependencies, are loaded only if "require", asynchronously.
You can also use remote CDN for the modules, e.g.,
require.config({
  paths: {
    "jquery": "https://ajax.googleapis.com/ajax/libs/jquery/1.11.2/jquery.min",   // CDN
    "underscore": "js/underscore"  // Local
  }
});
More Examples
Example 1: jQuery
If an AMD loader is detected, jQuery registers itself as an AMD module, via the following codes at the end of the jquery.js:
// Register as a named AMD module, since jQuery can be concatenated with other
// files that may use define, but not via a proper concatenation script that
// understands anonymous AMD modules. A named AMD is safest and most robust
// way to register. Lowercase jquery is used because AMD module names are
// derived from file names, and jQuery is normally delivered in a lowercase
// file name. Do this after creating the global so that if an AMD module wants
// to call noConflict to hide this version of jQuery, it will work.

// Note that for maximum portability, libraries that are not jQuery should
// declare themselves as anonymous modules, and avoid setting a global if an
// AMD loader is present. jQuery is a special case. For more information, see
// https://github.com/jrburke/requirejs/wiki/Updating-existing-libraries#wiki-anon

if ( typeof define === "function" && define.amd ) {
   define( "jquery", [], function() {
      return jQuery;
   });
}
Example 2: Fuel UX
<script src="//cdn.jsdelivr.net/requirejs/2.1.11/require.js"></script>
<script>
  requirejs.config({
    paths: {
      'bootstrap': '//maxcdn.bootstrapcdn.com/bootstrap/3.2.0/js/bootstrap.min',
      'fuelux': '//www.fuelcdn.com/fuelux/3.6.3/js/fuelux.min',
      'jquery': '//ajax.googleapis.com/ajax/libs/jquery/1.11.0/jquery',
      // Moment.js is optional
      'moment': '//cdn.jsdelivr.net/momentjs/2.6.0/lang-all.min'
    },
    // Bootstrap is a "browser globals" script :-(
    shim: { 'bootstrap': { deps: ['jquery'] } }
  });
  // Require all.js or include individual files as needed
  require(['jquery', 'bootstrap', 'fuelux'], function($){});
</script>
[TODO] Study Fuel UX examples, which uses require JS extensively.
jQuery UI (To Update)
jQuery UI (@ https://jqueryui.com/) is a jQuery add-on library for building User Interface. "jQuery UI is a curated set of user interface interactions, effects, widgets, and themes built on top of the jQuery JavaScript Library. Whether you're building highly interactive web applications or you just need to add a date picker to a form control, jQuery UI is the perfect choice."
jQuery UI can co-exist with BootStrap.
Datepicker
See example and API @ https://jqueryui.com/datepicker/.
1 2 3 4 5 6 7 8 9 10 11 12 13 14 15 16 17 18 19 20 |
<!doctype html>
<html lang="en">
<head>
<meta charset="utf-8">
<title>jQuery UI Datepicker</title>
<link rel="stylesheet" href="http://code.jquery.com/ui/1.11.4/themes/smoothness/jquery-ui.min.css">
<script  src="https://ajax.googleapis.com/ajax/libs/jquery/1.11.3/jquery.min.js"></script>
<script src="http://code.jquery.com/ui/1.11.4/jquery-ui.min.js"></script>
<script>
$( function() {
   $( "#datepicker" ).datepicker({
      dateFormat: "yy-mm-dd"   // MySQL date format
   });
});
</script>
</head>
<body>
<p>Date: <input type="text" id="datepicker"></p>
</body>
</html>
|
Underscore JS (To Update)
"Underscore provides over 100 functions that support both your favorite workaday functional helpers: map, filter, invoke - as well as more specialized goodies: function binding, javascript templating, creating quick indexes, deep equality testing, and so on."
The mother site is http://underscorejs.org/.
Moment JS (To Update)
"Parse, validate, manipulate, and display dates in JavaScript."
The mother site is http://momentjs.com/.
REFERENCES & RESOURCES
Bootstrap
- Bootstrap mother site @ http://getbootstrap.com/.
- Aravind Shenoy and Ulrich Sossou, "Learning Bootstrap", Packt Publishing, 2014.
Font Awesome
- Font Awesome mother site @ http://fortawesome.github.io/Font-Awesome/.
Parsley JS
- Parsley mother site @ http://parsleyjs.org/.
Fuel UX
- Fuel UX mother site @ http://getfuelux.com/index.html.
AMD and Require JS
- AMD API and Examples @ https://github.com/amdjs/amdjs-api/blob/master/AMD.md.
- Require JS API @ http://requirejs.org/docs/api.html.
- Rakhitha Nimesh, Understanding RequireJS for Effective JavaScript Module Loading @ http://www.sitepoint.com/understanding-requirejs-for-effective-javascript-module-loading/.
- Introduction to RequireJS @ http://javascriptplayground.com/blog/2012/07/requirejs-amd-tutorial-introduction/.